 LIMITED SPOTS
All plans are 30% OFF for the first month! with the code WELCOME303
LIMITED SPOTS
All plans are 30% OFF for the first month! with the code WELCOME303

LIMITED SPOTS
All plans are 30% OFF for the first month! with the code WELCOME303

HubSpot’s built-in Contact Manager allows users to manage their own customer information, including email addresses, phone numbers, notes, etc., but it doesn't allow for groups or teams within its platform.
If your business has more than one department that needs access to customers' data, then grouping them by function, company, or other criteria makes sense. But if you're only looking to organize people based on how they interact with each other (i.e., where there are two different departments), an easy way to achieve this would be through creating separate lists of contacts in HubSpot's "People" section. The challenge lies in assigning those individual records to specific lists so they can be grouped together accordingly. Here’s what we found out about connecting contacts in HubSpot using Lists.
This is a common question from many HubSpot customers when working with Teams. You can manually add new members to Team(s) via People & Add User under Tools & Settings menu items. When adding someone to a Team, check off the box next to “Assign To This Team." However, not every user will have such option available. If they don't, you'll need to use a workaround method instead.
You may try searching for all the Users who belong to a certain Team and copy/paste their names into a text file. Then import this.txt file into another spreadsheet program like Google Sheets. Now simply filter down these contacts according to the name column in order to find those whose profiles match whatever Team(s) you want to join. Once located, edit the contact record in Excel and delete everything except the Name field. Hit OK. Finally, open up the original hubspot page and go back to the Tools & Settings menu item mentioned above, click Import Data button at the top right corner, choose the first tab labeled XML Import, and select the Excel file you just created. Your imported contacts should now show up in your HubSpot account.
To view a full guide on how to export and upload CSV files into HubSpot, please visit our Support Center article here.
Yes. As long as both accounts have Exchange enabled settings turned On, any email address connected to either of them will appear as Linked Account. And yes, you can also change the primary email linked to a particular profile while maintaining existing secondary ones. For example, let’s say John Doe has his main Gmail account linked to his HubSpot Profile A, which he uses for most of his interactions. His wife Mary Jane also has her own Gmail account linked to her Personal Profile B, she used solely for work purposes. Ideally, John would prefer having his Work Email listed as Primary Email rather than linking to his Wife Email, because it’ll make it easier for him to keep track of important messages sent from his Company’s domain. So once again, head over to the Manage Accounts window and look for the Edit Permissions link beneath the respective Profiles. Clicking on it will take you directly to the corresponding permission panel. From there, select Change Primary Email Address and follow additional instructions.

A Shared Mailbox is basically a folder containing all incoming emails received from external sources. It works similar to Outlook’s Junk Folder feature wherein all spam messages get automatically moved to the latter after being filtered. Therefore, anything deemed as SPAM gets temporarily stored inside this mailbox until further review. You can see whether a message was placed in a Shared Box by checking the Shared With Me dropdown box beside the preview image icon underneath each email.
So far, shared boxes haven’t been useful enough to warrant their existence. After all, why bother moving junk mail from my regular inbox to a dedicated container when I already know exactly what to do with it anyway? That said though, they might come in handy during times when you need to receive messages from several clients simultaneously. For instance, maybe you've recently started managing 10+ client accounts, some of whom have signed contracts requiring monthly invoices. Or perhaps you have a small design firm consisting of 2 employees servicing 3 different companies with unique requirements. Well, wouldn't it be nice to have a central location where you can view all pending invoices without needing to check everyone’s individual inboxes? Simply put, shared mailboxes serve as centralized hubs for dealing with large volumes of incoming correspondence.
Unfortunately, HubSpot does not offer shared mailboxes natively. Instead, you’d have to rely on third party services if you wish to utilize this functionality. One popular service is called Integromat. We highly recommend giving it a shot since it offers excellent support along with plenty of extra features. There’s even an applet that lets you turn your shared inbox into a dynamic dashboard capable of showing real time updates for various metrics.
For more info, read our previous blog post regarding HubSpot integration with Integromat.
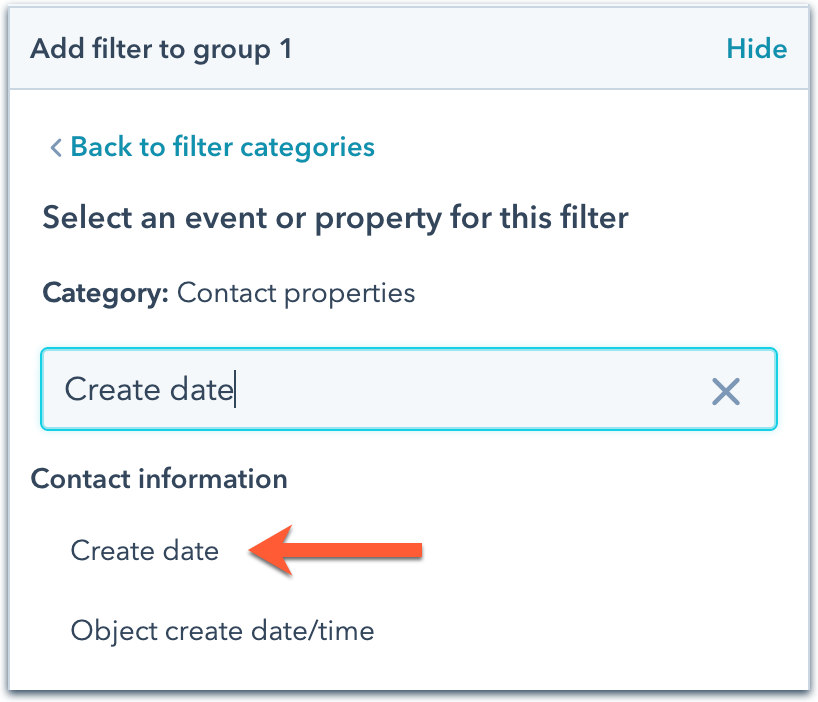
Creating custom Lists in HubSpot is very straightforward. All you need to do is type List + New List into search bar and pick whichever suits your fancy. Alternatively, you can also navigate to /Lists/All Lists and double-click on Create New List. Select whichever approach suits best depending on your preferences.
Once done, hit Save. At this point, you can rename the List and drag and drop elements onto it. Also, feel free to rearrange things around by dragging and dropping rows and columns. Lastly, tap the eye symbol in front of the List title to lock it in place. Don't forget to save changes before closing the editing pane.
Now whenever you run a report or perform any sort of analysis in the Reports module, you won’t experience any issues due to missing information. Best part is, you don't necessarily need to retype all fields that were previously present in the Report Builder beforehand. Those will still remain intact upon saving edits. Just remember to check off the relevant Options before clicking Submit.
Is there anything else you'd like to share about organizing contacts in HubSpot? Please comment below!
HubSpot recently released its new Contact Management features, which allow you to add multiple phone numbers for one person or company, as well as set up auto-responders that will be sent out when people call your number.
However, it's also important to have separate groups within your account so that each department can communicate with their designated teams if they need to. For example, sales reps can use different groups than customer support personnel based on what’s needed at any given moment. Or perhaps there are certain clients who prefer not to receive calls from outside companies, such as contractors. Whatever the case may be, having these types of separation is integral to running a business smoothly. Unfortunately, HubSpot doesn't currently offer this type of feature.
Here's how to get started creating Teams & Lists in HubSpot.
In order to create a team email (or "Team"), open up your Account Overview page by clicking on the dropdown menu next to My Accounts. Then click Create Team under the New section. This gives you three options. You can either start off using a pre-existing template, build your own custom team, or choose to create a brand new team altogether.
If you're opting to make a new team, simply give the team a name, description, color scheme, and logo (this last step lets you customize your branding). When finished, hit Save. Now go back into your Account overview page and select Manage Email Addresses. From here you'll see all existing emails associated with your account, including those assigned to individual profiles. To bring up your newly created team, just double-click on it.
Now whenever someone sends you an email, it should automatically appear in the Sent folder for that specific team. If it does not show up correctly, try changing the default delivery address. This usually happens because some parts of the subject line were included in the original message. Also note that there is no way to delete a particular email once it has been delivered. The only option available is to mark it as read/unread instead.
The same process applies to setting up lists. Once again, head over to your Account Overview page. Next, double-click on Marketing List Settings. Here you’ll find two sections – One called Customize Your Branding and another labeled Build A Better Audience. Click on the latter, then scroll down until you come across “Create Lists.” Double-click on it.
From here you’ll be able to customize both your list templates and lists themselves. There are several fields where you can input names, colors, logos, etc., but unfortunately we weren't able to figure out why our chosen ones didn't work. It seems like most other things worked fine though.
You can also decide whether you want to include mobile phones among your listed items, as well as pick between adding more columns vs. less columns. Finally, you can determine whether you would like to display them side-by-side or stacked vertically.
Once done, save everything by hitting Finish Setup. Now go back to your main Account Overview screen and look for the area titled All Mailboxes. Underneath your selected Marketing Template, you should now see a small blue icon that says Create List. Just double-click on it.
This opens up the same window described above, except now you can actually edit the actual details of your list itself. So you can change the title, color scheme, and even adjust the layout. After selecting something, however, you cannot remove it. Instead, you must first switch back to the Marketing List settings tab.
It's worth noting that while this might seem confusing, it shouldn't really matter much since you won't be sending your lists directly via email anyway. However, if you ever plan to do so, keep in mind that you can always access them through your dashboard.
To send an email to a group of contacts, follow these steps. First, navigate to your Main Dashboard. Then scroll down until you reach Group Emails. Right beneath your Default Template, you should see a box marked Send Bulk Invoices. Inside this box, there is a search bar, so type in whatever you'd like to filter results by. In our case we typed Contacts. Hit Search.
Next, select the checkbox beside Grouped Results. This makes sure you don't end up seeing duplicate entries, so you can avoid accidentally sending messages to two different sets of users simultaneously. Lastly, enter a Subject Line and Message Content. These are optional, but useful if you want to distinguish your emails further.
Afterward, hit Submit Query. Depending on how many records are returned, this can take anywhere from seconds to minutes. Once you've received the results, right-click on whichever entry you want to send the email to. Choose Actions -" Open Selected Record(s) and then click on the envelope icon in the upper left corner. Select More Options, followed by Email Recipient -" Address Book Entry.
Choose OK. That's it!
While sending bulk emails isn't too difficult in general, doing so to a large amount of recipients can become rather cumbersome. Thankfully, HubSpot allows you to export your entire contact database, which can then be used to populate future campaigns.
First, log into the Admin Panel, then go to Tools -" Data Export. On the resulting pop-up window, click Advanced Export. Ensure that Use Existing Fields is checked, then hit Start Export.
On the following screen, you can specify exactly which data points you wish to export. Make sure to tick Include Customers, Followups, Clients, Opportunities, Leads, Notes, Events, Tasks, Activities, Documents, Files, Messages, Subscribers, and Templates. Finally, click Preview and wait about five minutes before checking Back End Successful.
Your exported file should now be ready to import into HubSpot. Simply download it onto your desktop computer and transfer it to a USB stick. Go to Import Wizard -" Upload File and select the file you downloaded earlier. Wait for the upload to finish, and then continue pasting your information.
When asked if you want to replace anything, answer No. Otherwise, HubSpot will attempt to match your imported info against your current records. As long as nothing goes wrong along the way, your campaign will run without issue. And remember, you can still tweak it later if necessary.
Have questions about HubSpot's newest offerings? We've got answers. Visit us today!
HubSpot is great for keeping track of your clients, but it doesn't have one-click groups like ACT!. I'm trying to keep my client database organized with groups so that when someone calls me about a project they don't need to search through hundreds of people's profiles. Is there any way to set up these lists within HubSpot?
Thanks!
This question was solved by Dan Neely below. He has created a guide here showing how to use them. If anyone else wants to add their own experience please let us know in the comments section.
To get started creating new Lists (like Contact Lists) go into My Dashboard " List Management from the left navigation bar. Click Add New List. A popup will appear asking what kind of list you want to make - select either Customer or Project based on which type of data you are looking at. The next screen asks if you would prefer to build a custom list using existing data or import it directly from Act/Exact Online. You can also choose to upload CSV files containing all contact information. Choose whichever option suits best for your needs. Once complete click Save as Default Template. This will allow you to access this template whenever needed without having to customize each time. To edit and format your columns, just double-click on the column heading title.
Now we'll take care of those pesky contacts who aren't registered yet. We're going to run a query that pulls out everyone not currently connected to HubSpot. Go back to your List management page and scroll down until you see Query Builder. Right under Custom SQL Queries put together something along the lines of SELECT * FROM [CONTACTLIST] WHERE ID NOT IN ('[YOURHUBSPOTID']). Replace '[YOURHUBSPOTID]' with whatever id number you assigned to your contacts. Hit execute and watch magic happen! Now every single person not linked to HubSpot should be gone. Repeat this process for other lists such as Projects & Teams.
Once done, you may wish to remove those unused Lists. Under List Settings, uncheck Show Unused Lists. Otherwise, you won't be able to delete them.
You now need to export the results of your queries to CSV file. Head over to File " Export All Data... From the top menu bar. Select Exporting Data then Advanced Options. Check only selected fields then hit OK. Your.csv file should download automatically. Upload the csv file onto Google Drive or another cloud service where you can find it later.
Next step is to import the contacts you've gathered via the aforementioned method. Find Import Data from Files on the same dashboard page. Just browse to the location of your exported file and follow the instructions. It shouldn't take more than 5 minutes after uploading it once you input the correct URL. Then finally head over to Integrations " Lookup Integration Services. On the right side, look for "Import" and drag it to the center pane. Input the name of your newly imported list. Confirm the integration, and wait patiently while it syncs everything up.
After a few seconds you should see all your contacts show up. Congratulations! We did it!
In order to create a Group inside HubSpot, first you must connect HubSpot to your email account. Do this by clicking Integrations " Email Connections. At the bottom of the window, choose Send Emails. Enter all necessary details including SMTP server, port, username and password. Make sure Use Secure Connection is checked. Finally check the box beside Enable Sending Email Through Gmail. Apply changes and save settings.
Now we are ready to create our Group. First navigate to Customers " Contact Information. Next to Roles, click +Add Role. Here, you can pick different roles for customers depending on the function you'd like them to perform. For example, you might want to separate Sales Reps from Service Professionals. Pick a role for each customer and give it a descriptive name. After selecting roles, click Continue.
On the following screen, enter a description for your new Group. Remember to include keywords related to your business. When finished, click Submit. Upon creation, you should receive an alert stating that your Group was successfully created.
Next, open Customers " Manage Customers. Scroll down until you reach Groups. Hover over the arrow next to Groups and select Add Group.... Type in the name of your Group and press Ok. As long as you chose the proper roles earlier during setup, users already signed up to HubSpot will automatically join your Group upon logging in.
If you ever change the Group name, simply repeat steps 1-4 above and replace the old Group name with the updated text. That's it! You've got yourself a brand new Group.
First off, when setting up Groups in HubSpot you cannot manually change them. Instead, you must go through Integrations again. However, since you probably already had to do this before connecting HubSpot to your email accounts, no worries.
Head over to Customers " Contact Information. Next to Roles, hover over the arrow next to Groups and select Add Group.... Type in the name of your Group and press Ok. Again, remember to include keywords relating to your business.
Finally, scroll down until you come across Groups. Press the plus sign (+) located beneath Groups. This will bring up a dropdown menu. Select View Only to view specific Groups only. You can also filter out certain Groups by typing in their names. Alternatively, click Edit Filters to narrow down your selection even further.
For instance, you can exclude certain types of Groups by changing Include to Exclude. Or maybe you'd like to block certain Users by excluding certain Groups. By doing this, you can prevent spammers from joining your Group. Simply select Filter Members from the upper menu bar and input appropriate criteria.
If you ever decide to delete a Group, return to Groups and click on the minus (-) icon underneath Groups. Delete desired Groups by checking the boxes alongside them.
Unlike Groups, teams are customizable. They offer greater flexibility because you can divide members up according to specific requirements. Like Groups, however, they cannot be changed manually. Therefore, you must go through Integrations again. But luckily for you, you already went through this procedure before connecting HubSpot to your email accounts, thus saving some work.
Navigate to Customers " Account Info. Beneath Company Name, locate Team Setup. Clicking on this link brings you to a pop-up window. There you will see two tabs labelled Companies and Teams. Ensure both are unchecked so that companies cannot become teams. Also, ensure that Teams contain multiple companies.
Next, you will need to create a company for each department within your organization. Simply click +Create a new Company. Give it a suitable name. Then switch to Companies tab. Each company can consist of several departments. So if you were working for a large corporation, you may end up with dozens of tiny little companies. Not a problem. Simply continue adding additional Companies. Don't worry about duplicating anything. Keep in mind that you can always merge duplicate entries or delete extra ones afterwards using Tools " Merge Companies.
When you finish making a company, go back to Teams tab. Here you will see a list of all previously created companies. Double-click on the company you'd like to turn into a team. Change its status to Active. With active being the default state, you're good to go.
If you ever decide to rename a company, simply go into Tools " Rename Company. And if you ever want to delete a company completely, return to Companies and click on Remove Company.
 Send emails at scale

