 NEW: BrowserGrow.com is now available!
AI agents to grow your business & do your marketing on autopilot in your browser
NEW: BrowserGrow.com is now available!
AI agents to grow your business & do your marketing on autopilot in your browser

NEW: BrowserGrow.com is now available!
AI agents to grow your business & do your marketing on autopilot in your browser

You've received several emails from people who want to sign documents electronically. But how can you add an "electronic signature" to the message without using one of those third-party services that we usually hate for privacy reasons (and security)?
There are many ways to type your name and other details on paper, but what about typing them directly onto an email? Can you use this method to make electronic signatures legally binding? It turns out yes — as long as you follow certain rules. Here's everything you need to know if you're looking for a way to put a digital stamp on your correspondence.
Before getting started with our guide, there’s something important to consider regarding any kind of service where someone else signs paperwork for you. If it involves money changing hands, things get more complicated. So let’s start by clarifying exactly what “free” means here.
The most common form of online document signing today comes courtesy of companies such as HelloSign and Eversign. These solutions don't charge anything upfront, which makes sense because they offer a lot of value after they collect their monthly fee. The fees range between $5-$10 per month depending on the number of users you require, plus extra charges if you ever decide to cancel your plan. This model has proven successful enough so far that these companies have been acquired by larger corporations including Amazon and Microsoft.
On top of that, both companies also provide additional features such as real-time permissions control, multi-user collaboration tools, secure file storage, etc. That said, not everyone needs all these perks, especially when working remotely. In fact, some users would rather pay less each month and only use the basic functions provided. For example, HelloSign offers a free version called HelloSign Personal Edition while its Pro subscription costs just under $6/month.
If you fall into this category, we encourage you to try out the free option first. You might find that it works perfectly fine for your purposes! However, even if you end up sticking with paid plans, at least you won’t be paying high annual rates anymore. Plus, you’ll still receive access to premium features whenever needed. We will discuss this further later in the article.
Now that we got all that clarified, let’s move on to the actual steps required to set up a simple electronic signature.
To begin, open your preferred web browser and head over to docs.google.com. Once inside, search for “Insert Signature - Forms & Documents” and click Create Form. A new window should pop up asking whether you want to edit existing forms or create a brand new one. Choose Edit Existing since you already have the necessary files saved somewhere on your hard drive.
Once again, search for “signature” and select Insert Signatures. Then choose Text Boxes followed by Plaintext Input Field. Finally, drag and drop the box next to “Name” and replace it with whatever label you wish to give to it.
Next, go back to your original screen and rename the box containing the data you typed earlier. Simply highlight the text and change its title to My Name. You may now proceed to save your changes.

This part actually requires two different actions. First, you must enable support for electronic signatures in Gmail itself (which is turned off by default). To turn it on, log into your account settings page via https://myaccount.google.com/preferences#gmail_settings. Underneath General Settings, scroll down until you see the heading Mail and look for Enable mail forwarding. Click Change next to it and then Check All next to Forwarding Options. Next, enter your desired email address and confirm your choice.
Also, ensure that you allow incoming messages from anyone by clicking Allow Notifications underneath Advanced Security Setting. Now, return to your inbox and compose another message. When sending emails, you'll notice that a small envelope icon appears next to every recipient's name. Hover over it and check the menu labeled More Actions -- Email Signature. You'll see options to attach multiple attachments, forward the message to others, and generate a link to download.
Finally, pick Attach Files and Upload Document... followed by Select File. Browse through your computer to locate the document previously uploaded. As soon as you hit Send, it should automatically appear embedded within the body of the email. From here, recipients can simply copy and paste the contents to print the signed document.
In order to digitally sign a PDF, you'll need a program capable of handling rich media content. Adobe Acrobat Reader DC is probably the best tool available right now due to its numerous useful features. One of them being the ability to embed images, videos, audio clips, hyperlinks, equations, tables, charts, maps, shapes, notes, stamps, annotations, smart objects, 3D viewports, linked views, video backgrounds, and much more. Just keep in mind that you'll need to purchase a separate license for editing.
Once downloaded, launch the application and navigate to Tools -- Preferences. Switch to the Editing tab and mark the checkbox beside Show Electronic Signature Toolbar. Press OK and wait for the toolbar to show up. Inside, you'll spot a button labeled Embed Image or Video. Hit it once and browse through your PC to extract the image you'd like to include within the signature.
After doing so, switch back to the main interface and look for the section labeled Annotation Clips. Scroll down until you reach the bottom and expand the Annotations area. Find an empty space and drag it towards the center. Right below it, you'll see a tiny pencil icon that looks similar to the old clip art icons used in Word. Drag it up and release it anywhere above the rectangle. This creates a blank frame around the image.
From here, switch back to the previous panel and double tap on the newly created marker. You should immediately see a camera icon appear. Tap it once to bring up the annotation editor and press Done once you finish adding your signature.
A new window should pop up allowing you to customize the appearance of your electronic signature. Keep in mind that this feature isn't 100% foolproof yet. Some elements, such as fonts, font sizes, colors, background color, and spacing may not render correctly due to technical limitations. Fortunately, it's possible to adjust individual properties manually.
For instance, you could enlarge the size of your initials or increase the distance between them. Alternatively, you can play around with the alignment by dragging the corners inward, outward, leftward, and rightward. Lastly, increasing the thickness of lines will help emphasize your writing style.
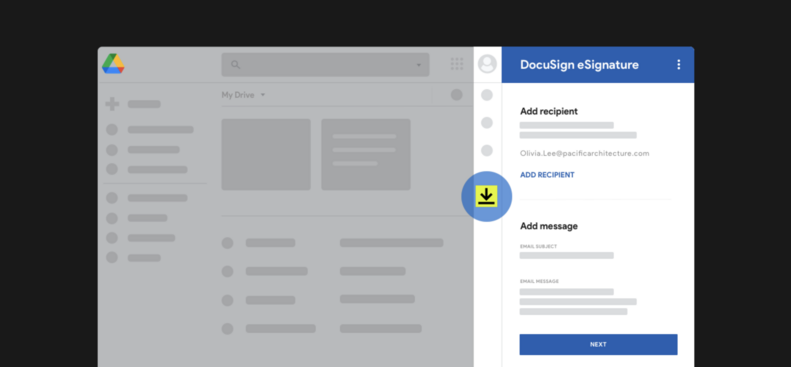
As mentioned before, you can always opt for a paid solution instead. For example, Docusign allows you to upload photos, drawings, graphics, graphs, tables, and spreadsheets along with handwritten annotations. Other popular providers such as eSignLive and Sqwiggle work similarly well. They often come equipped with templates built specifically for business clients.
However, if none of these appeal to you and you just need a quick fix, you can rely on these methods. After all, creating a signature doesn't take too long and the results speak for themselves.
If you've ever signed up for anything online — and who hasn't these days? — then you know that the sign-off line at the bottom of every e-mail can be annoying. You might as well just print out a letter, staple it together, and mail it yourself. But thanks to technology, there's no need to go through all those steps now.
Electronic signatures are available in many different forms. Some companies offer them as plugins so users can attach their own digital signatures right into emails. Others, including most major web services, allow users to create custom signatures from templates. And still others simply provide preloaded signatures that users can edit slightly. The result is pretty much the same whether it’s a form letter or a personalized note.
So if you want one thing above everything else when sending out an important message, make sure to use an electronic signature. Here's how to set one up in Gmail.
Setting up an electronic signature is easy with Gmail. In fact, you can start by creating a new account. Then head over to Settings (in the top toolbar) " Accounts & Import " Create Account. On this page, under Personal Document Setup, click Manage Signature. This will take you to another screen where you'll see several options for setting up your signature.
The easiest way to create a simple signature is probably using what we call “the canned signature." Click the link labeled Canned -- select Signatures -- and choose either Simple Text or Rich Text depending on which type works best for you. Next, fill out the rest of the details such as name and title. Finally, scroll down until you find the option called Include signature field. Make sure this box is checked. Now you're ready to begin typing!
You may notice that the Signature section has two tabs – Plaintext and HTML. Both types work fine but some people prefer one type of formatting over the other, especially for long signatures. So feel free to switch between both if you wish. Just remember to keep the checkbox next to each tab unchecked whenever you change back and forth.
Now here comes the tricky part. If you don't already have one, you'll need to get permission to send emails from your account. Otherwise, you won't be able to access certain functions within Gmail like forwarding messages to someone else. To request authorization, enter a description for why you should be allowed to send emails from your account. For instance, maybe you'd like to receive suggestions about places to visit while traveling. Or perhaps you plan to run multiple accounts for various businesses. Whatever the reason, include it somewhere near the end of the explanation.
Once you finish entering your personal details, hit Save Changes. That's it! Your signature is complete. To preview it before adding it to any outgoing emails, open up the dropdown menu on the Signature Options button in Gmail and pick Edit Signature. When you return to the main settings page, you'll find your newly created signature waiting for you below the Canvas heading. Simply highlight it and drag it wherever you want inside the body of an email.
Finally, if you want to customize it further, click Preview to view a sample version in action. It shows the default font style, size and color scheme along with the location of buttons like Reply All and Forward. Adjusting this also changes the look of the signature itself.
If you want more control over how your signature looks, you'll probably opt instead to use a plugin such as DocuSign, HelloSign or Wave Secure. These tools give you precise control over fonts, colors and even the placement of elements like photos and links. Plus, they sometimes come packed with additional features like signing documents, scanning business cards, or printing hard copies.
But not everyone wants to deal with yet another plug-in, nor does every company support third party apps. As an alternative, we recommend checking out our list of 10 ways to add a signature to Gmail without installing a single extra app. There are plenty of useful tips that cover things like how to insert images, GIFS, hyperlinks and handwritten notes.
Another popular method for adding a signature to an email is embedding it directly onto the document itself. However, since many of us tend to download rather than print files, doing so would require opening up the file in question first. Fortunately, there are software programs specifically designed to let people sign documents without having to upload them to cloud storage or share them via email attachments.
One example is DocScanner, which allows you to scan a paper copy of a document and save it in PDF format. Afterward, you can import the resulting image into a browser window and add your signature by clicking the pen icon on the far left side. Once finished, you can export the final product straight to Microsoft Word, Adobe Acrobat Reader DC or Evernote. Another similar program called Scanbot lets you do exactly the same thing except its interface feels less cluttered. Instead, it only provides space for a few basic fields like Name, Phone number and Email address.
Lastly, if you happen to be working on something sensitive and don't mind giving away sensitive data, you could always try using Google Drive. By uploading the relevant document(s), inserting your signature, and saving the whole thing as a draft, you can quickly access it later from anywhere. Of course, this means anyone with access to your account could potentially gain full read/write privileges. To prevent that from happening, consider encrypting the entire folder containing said content.
For security reasons, it's generally advised against storing passwords or credit card numbers in your Google Drive drafts folder. So instead, store sensitive info elsewhere and refer to it using unique URLs. One good place to host such links is Vaulty, which makes it easier than ever to manage password vaults.
Google offers a couple of different signature solutions, both of which are completely free. First, if you decide to go this route, you're going to need to enable Two Factor Authentication (2FA). Not only does this protect your account from hackers, it also forces you to input a secondary code that appears on a separate device in order to log in. Since 2FA isn't enabled by default, you'll have to follow these instructions.
To do so, navigate over to Security Checkup and click Get Started. Under the header labelled Set Up New Device, slide Turn Off Password AutoFill to Yes. Then, press Continue. At this point, you'll need to verify your identity by choosing Add Card and following the prompts. Once done, the system will ask you to confirm that you really do want to turn off Password Autofill. Confirm again that yes, indeed, you do want to disable this function.
Next, head back to the previous page and click Advanced setup. Scroll down until you spot the entry titled Allow Access Without Code. Slide Enable to Yes and continue pasting your verification key. From there, you can skip ahead to the last step where you can finally generate your second authentication factor. Once you receive the SMS code on your phone, test it out by logging into your account normally. If successful, congratulations! You've successfully added a 2FA login method to your Google account.
At this stage, you can once again delete whichever codes you generated earlier. Still, it wouldn't hurt to leave them alone in case you forget what they're supposed to unlock.
As you saw throughout this article, there are lots of choices for making a customized electronic signature. Whether you decide to stick with plain old text or experiment with rich media, the sky's the limit. No matter what you ultimately choose to do, just keep in mind that whoever needs to actually review your signature must have physical access to whatever device you use to access your account.
As someone who has never used an email signature in my life (and doesn’t want to), this new feature of Google Contacts that allows you to attach an electronic version of your signature came as quite the surprise. You can now send emails with signatures attached—not just for business but also personal correspondence.
You can either manually type out your name and address or use one of those templates provided by Google. The rest of it can be left blank. But there are some things to keep in mind when creating an electronic signature. For example, does Gmail support attachments? And how will they look once sent?
First off, if you don't know what an email signature is, essentially it's a bit more than just typing out your name and address. It could include all sorts of details about yourself, such as hobbies or interests. Some people even put their company logo right at the bottom of their messages. Here we’re talking strictly about the part where you sign your name electronically. That may seem pretty basic, but many companies still insist on having physical copies of these signatures. So before sending any important document via email, make sure that whoever needs them gets both versions —the real-life one and the digital one.
According to Google, Gmail supports attachments up to 100 MB. With that said, here are answers to the most commonly asked questions users might have regarding using Google Contacts' Signatures option.
Yes, you can set up an electronic signature within Gmail itself. However, because not every service provider offers this functionality, you'll need another app to get the job done. There are several apps available which allow you to write your own signatures. One popular choice is DocuSign, which comes preinstalled on Android devices and works seamlessly with Gmail. Other services offering similar features include HelloSign, FollowUpThen, and Vindaleeo. All of which operate similarly to each other. Once created, you can then share your signature with everyone else involved so they too can see exactly what you meant when signing something digitally.
The process of setting up an electronic signature varies depending on the application you choose. In general though, after opening the desired program, simply click Create Signature. A pop-up window should appear asking you to input your name, title, phone number, birthday etc., followed by a file upload box. Simply drag your chosen image into this field and hit save. Depending on the software you're working with, you may have additional options for customizing the design and layout of your signature. Then just copy down your newly designed signature and paste it onto whatever message you wish to send. Your recipients won't be able to edit it unless they download the same application.
While there are plenty of applications to help you build one from scratch, there are also tools specifically built to quickly craft professional looking signatures. If you'd rather skip the hassle of building one from the ground up, try out DocuSign's easy-to-use template selection. From simple ones to elaborate designs, DocuSign's library includes everything you need to create beautiful signatures without writing anything extra. To access the templates, head over to your profile settings " Edit Settings " Signature & Display Options " Templates. This page provides instructions to select specific styles and sizes of documents that best suit your purposes. Just follow along until you find the perfect fit.
If you prefer to start from scratch, however, you can always take advantage of DocuSign's various premade templates. These come in varying shapes and sizes to accommodate different types of letters and envelopes. They come complete with customizable fields for names, addresses, dates, numbers, logos, and much more. To get started, go back to your Profile settings " Edit Settings " Signature & Display Options and scroll down under Templates until you reach Add New Template. Select whichever style you desire and you're good to go!
Once you've got your signature ready, inserting it onto a message becomes relatively straightforward. First, open up your browser tab and visit the website you plan to send your message through. Next, navigate to the area containing your recipient's email address(s). At the top of the screen, you should notice two dropdown menus labeled Email Address and Attachments. Click on Attachments and you will see a section titled Upload Files. In order to upload files, you must first enable Content Type Support. After clicking Enable, you can proceed to uploading your attachment. When finished, click Save and Continue. Now, enter your recipient's email address and press Send. As soon as you do, you should receive a notification saying “Your signature was added successfully."
Note: While the above steps work well enough for most cases, sometimes you may encounter issues due to compatibility reasons. In instances like this, check out our guide detailing how to fix common Gmail problems.
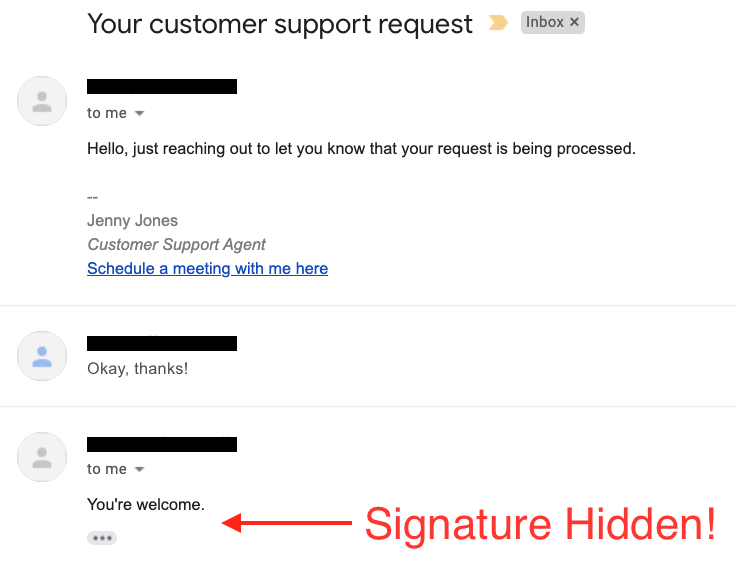
After receiving confirmation that your signature went through correctly, inspect its appearance. Since you cannot preview it beforehand, you must rely solely on what you see once it arrives. Fortunately, the final product looks very polished. We suggest taking screenshots to capture the actual size of your signature (in pixels) since images often vary based on resolution. Below is a screenshot of mine.
Also note that while viewing the signature is nice, you shouldn't actually print it out. Instead, stick to printing hard copies only for extremely urgent matters. Otherwise, avoid printing it out entirely and instead scan it directly into your computer. Scanning makes it easier to crop and adjust your signature, unlike scanning and saving individual pages.
This depends. Yes, DocuSign is completely free, although you will need to pay per transaction in addition to any monthly fees associated with your account. If you would prefer to opt out of this system altogether, there are alternatives that offer similar functions. Two notable examples are HelloSign and FollowUpThen.
HelloSign offers paid plans starting at $19/month, whereas FollowUpThen charges between $9-$49/month depending on whether you require a single user or multiple users. Both provide the ability to create signatures for individuals and businesses alike. Though neither will replace DocuSign in terms of ease-of-use, both HelloSign and FollowUpThen are great choices for anyone wishing to cut costs and give their signatures less room to mess around with.
 Send emails at scale

