 LIMITED SPOTS
All plans are 30% OFF for the first month! with the code WELCOME303
LIMITED SPOTS
All plans are 30% OFF for the first month! with the code WELCOME303

LIMITED SPOTS
All plans are 30% OFF for the first month! with the code WELCOME303

If you've ever sent an important message via e-mail and wanted to sign it with something other than your name, then you may have come across the problem of adding a digital signature. Digital signatures are used in electronic transactions as well as emails. They're also called "e-signatures." There's no need to print anything out — they can be added directly into the body of an e-mail. But how does this work exactly? Let's take a look at what digital signatures mean, why people use them, and whether Gmail supports their addition.
A digital signature ("e-signature" or "electronic signature") is simply text that confirms someone has read (or agreed) to certain terms in an agreement such as a contract. It could say "I accept the offer," or "This letter constitutes acceptance of our new employment agreement." These types of messages aren't usually attached to documents but instead appear on top of the document itself when opened. This makes signing papers faster since there isn't any printing involved. You don't even need specialized software to create these kinds of signatures. All you need is a computer and an Internet connection.
Digital signatures differ from faxed signatures because if you send a signed paper through the mail without a digital signature, it might not get delivered due to security concerns. That means anyone who receives it after it was mailed would still think it hasn't been accepted. A good way to avoid this is by sending a scanned copy of the original form along with the signature. The person receiving it will know both sides were approved. If you want to receive a digital signature over the phone, all you need is a telephone number. Phone numbers alone won't protect against fraudsters though. In order to make sure your phone call gets answered properly, you should ask for verification codes like those found on gift cards. Codes will only work if the recipient knows about them too.
People often use digital signatures because they're convenient. Once you set up your account, you'll never have to worry about forgetting to attach one again. Many companies require employees to include a digital signature so clients can see that agreements such as contracts and job offers haven't gone unread. Plus, most banks now allow customers to digitally sign checks. For example, Wells Fargo allows users to upload photos of themselves to prove identity before signing online check requests. Banks use similar methods to verify purchases made using credit cards. Without a digital signature, some transactions wouldn't go through.
That said, digital signatures aren't perfect. While they help prevent fraudulent activity, they don't guarantee you'll actually receive money once it leaves your bank. As mentioned above, a lack of a digital signature doesn't necessarily indicate that funds weren't received either. Most banks employ several different measures including verifying accounts' balances before releasing funds. However, many consumers believe they shouldn't pay taxes on withdrawals since they didn't physically handle cash during transactions. So while digital signatures provide convenience, they don't always ensure safe financial practices.
Yes! Of course you can. Anyone can write whatever he or she wants in an email signature. People often choose funny quotes or jokes to convey their personalities. And while having a custom signature certainly conveys your personality, it's worth considering which kind of signature best suits your needs. Here are three popular options available currently:
The first option is to download a prewritten signature template and customize it however you'd like. Google provides templates for each major country's language. To find yours, click "More Options" next to the "Send/Receive Signature" dropdown menu. Then select "Create New Template." Depending on where you live, you may end up choosing between English, Spanish, French, German, Italian, Dutch, Polish, Portuguese, Turkish, Mandarin Chinese, Japanese, Ukrainian, Russian, Arabic, Persian, Urdu, Tagalog, Cantonese, Korean, Vietnamese, Simplified Han characters, Traditional Han characters, and finally Greek letters. Each template includes space for personal details and company logos. Clicking on any section opens that section in a popover window. From here, you can change font size, color scheme, background colors, insert images, etc.
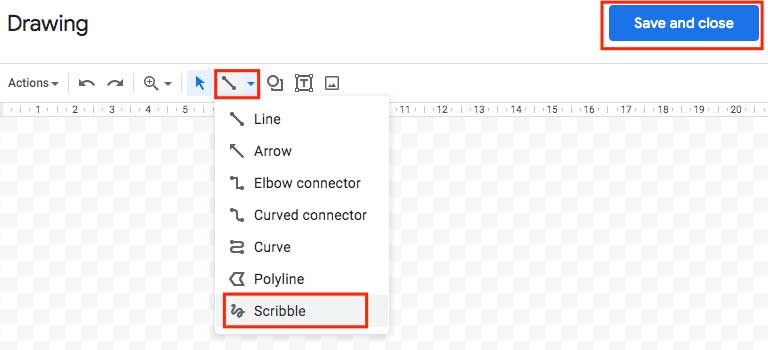
You can also skip creating a new template altogether and start typing your own signature right away. Just remember that Gmail strips formatting from incoming texts unless you switch it on beforehand. When composing an outgoing message, hit Shift + Cmd / Ctrl + N to launch a blank editor window. Type out your entire signature and format it however you wish. Some experts recommend keeping things simple by sticking to two fonts and basic colors. Using bold words and sentences helps break up the monotony.
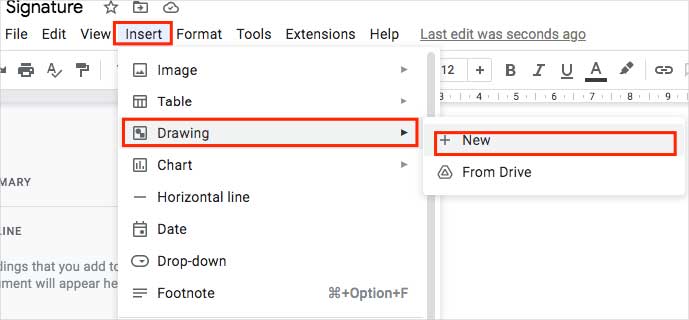
Once you finish, hit Return to save and close the file. Next, head back to your inbox. Select the compose icon and scroll down until you reach the bottom of the page. On the left side, under "Other", you'll notice a box labeled "Attach File". Hit this button and browse to the location where you saved your signature file. After selecting it, you can edit its contents however you like.
The third option is to use DocuSign for Gmail. DocuSign is a cloud-based service that lets you electronically exchange documents. Users can access the platform through desktop apps or mobile devices. With Docsign for Gmail, you can easily connect to your existing DocuSign account for free. Simply log in using your credentials and follow the instructions below to begin setting up your Gmail signature.
First, open Gmail. Go to Settings & Accounts & Sign-in & Security. Look for "Enable secure client login?" Make sure this slider is turned off. Scroll down to "Client Login Verification Method." Choose "Email Code" and enter the code you got from DocuSign. Now return to your inbox and compose a new email. Under "Add Attachment", drag DocuSign Desktop Application (.dss/.dsx files) onto the attachment field. Navigate to Documents in the application and locate the file containing your signature. Drag it onto the body of your email. Below the signature, you can adjust settings such as Font Size and Color Scheme. Finally, hit Send to complete setup.
In summary, yes, you can add your signature to Gmail yourself. Whether you decide to use one of the aforementioned solutions depends on your preferences and circumstances. Whichever method you choose, try to keep things simple. Don't overload your signature with unnecessary elements or graphics. Stick to plain black text on white backgrounds with few alterations. Also, consider making your signature uniform throughout your correspondence. Otherwise, it might confuse readers. Remember that Gmail strip formatting from incoming texts unless you switch it on beforehand. When composing an outgoing message, hit Shift + Cmd / Ctrl + N to launch a blank editor window. Type out your entire signature and format it however you wish. Some experts suggest keeping things simple by sticking to two fonts and basic colors. Using bold words and sentences helps break up the monotony. Above everything else, keep your signature short and sweet. No more than 5 lines are necessary.
When you open up your emails in Gmail, the first thing you see are all those messages that have been signed off with someone's name. That's because these signatures are typically attached as.pdf files and they can be accessed by clicking on the "More" button, which will expand the message window horizontally. The signature file is located at the top of this expanded view and it should appear right after the recipient address.
If yours doesn't, there might be something wrong with either your account settings (such as setting it to receive only one-time links) or with the sender, who may not have added their own signature file yet. You could also try adding a new signature manually via Settings & General Controls & Signature. In both cases, if you don't find any attachment named "Signature", then you'll need to attach it yourself from another program. It would probably be easiest for you to download it online somewhere else, such as DocStoc.com, where you can easily drag and drop documents without needing to worry about attachments. Once the download completes, upload it to Google Drive and copy its link over to your clipboard. Now you're ready to proceed.
Once you've uploaded the signature file, follow the steps below to get started:
Open Gmail. Click on Tools menu at the upper left corner. Select Compose Mail form option. This opens up a blank compose mail screen. Enter the subject line and write out whatever content you want inside the body. After composing what you wrote, click Send/Send Email button. A popup box will ask you whether you'd like to send it immediately or schedule it to go out later. If you choose later, select Save draft instead. Your email will now turn blue so that you know it has sent successfully.
You will receive a notification saying, "Your message was scheduled to be sent today". At the bottom part of this pop-up window, you'll notice two options to set how long ago you last emailed the same person. These allow you to control when exactly the email will hit them. For example, you can say "1 hour ago" if you want the email to go out within 1 hour. Alternatively, you can check the Recipient field and enter their email address directly here.
To sign off the email using your digital signature, click on More Options -& Attach Files. Make sure you look under All Files section and scroll down until you reach Signatures folder. Find the appropriate.Pdf format for your country and language preferences and attach it to your email. Then, simply type what you wish to include in the signature and press Enter key. Next, add more lines just like what you did before but make sure each entry ends with a period. Finally, save the changes and close the window. This concludes the process!
Now that we've covered sending out an email, let us cover receiving one. There are several important things to note here, especially since most people use Gmail for their personal accounts. First, whenever you receive an email, regardless of whose account it came from, you'll always start seeing a small envelope icon next to the From field. This indicates that the email contains an embedded image rather than plain text. When you double-click on it, you'll be able to access an entire album of pictures called Photo Albums. To delete this photo album, head back to the original compose page and click on Edit Photo Album. Simply remove the check mark next to Upload Photos and Videos to drive. Just remember to keep the check mark intact next to Auto generate thumbnails. Otherwise, every time you read through your emails, you'll have no idea what picture belongs to which email. Also, if you accidentally delete the photo albums, you can always create a new ones manually by selecting Create New Folder... from the File menu. Keep in mind that unlike other popular email programs, Gmail allows users to embed images even though they didn't originate from the web. However, please refrain from doing this unless necessary. Doing so will likely result in slow loading times.
The second important point is that to avoid confusion, Gmail automatically appends "/mbox/" onto each incoming email. So, if you were expecting an external hard disk drive with multiple folders, chances are that none exists. Instead, you'll end up getting mbox folder with subfolders containing different types of attachments. Luckily, Gmail provides a way around this problem. By default, you can change the label of the incoming emails so that you can distinguish between various attachments based on their labels. Go to Setting -& Labels. Here you can assign custom names to all your attachments. Then simply highlight all the attachments you wish to filter by certain labels and move them to the corresponding folders. Please note that you cannot rename the actual email itself. After renaming the attachments, repeat the above step again but replace /mbox/ with "" so that your newly renamed attachments won't get mixed up with old attachments anymore. Lastly, if you ever run into issues while trying to locate specific attachments among thousands of files, you can search for keywords within attachments themselves. Type ".name_of_file." into the search bar and voila! You can browse hundreds of files in seconds.
As mentioned earlier, if you want to sign off your outgoing emails using your digital signature, you can still do so provided you downloaded the signature separately. Open up the desired attachment and scan across the header area until you spot the "From:" field. Right beneath this field, you should see a little arrow pointing downwards towards the signature block. Double-click on it and you should be prompted to edit the contents of the signature. As previously stated, once done, simply type your initials and click OK. Repeat this step for all additional entries. Once finished, save the changes and exit. Note that some countries require separate licenses for signing off emails digitally. Therefore, it is best to consult local laws before proceeding further.
For security reasons, Gmail disables the ability to append signatures to outgoing emails. In order to bypass this limitation, you must switch over to desktop version. Switching versions requires going through three steps: 1.) Logging into Gmail 2.) Going to Settings 3.) Under General Control tab, click on Enable HTML Editing. Upon enabling this feature, you should be able to append signatures to outgoing emails. With HTML editing enabled, you can also customize your signature, font size, color scheme and background colors. Unfortunately, you can only choose between light and dark themes. Another downside is that Gmail strips away formatting during conversion. Thus, although you can adjust fonts and colors to match your company logo, you will lose whitespace space and spacing. On the bright side, you can enjoy great customization features including bold, italics, strikethroughs, bullets, hyperlinks, etc. Moreover, you can place these elements anywhere in the template except within paragraphs. Last but certainly not least, you can also add extra icons and graphics by copying and pasting them from elsewhere.
So far, we've mainly focused on creating signatures with general details such as date, location, title, etc. But there are many ways that you can take advantage of to design specialized signatures as well. For instance, you can opt to use special symbols to represent words such as "pounds," "euros," "yen," "dollars," "Swiss francs," etc. Or perhaps you'd prefer to use currency signs to indicate prices of goods. Of course, you can also utilize your existing logos, photos, business cards or anything else that represents your brand. Additionally, there are many websites available online where you can purchase templates designed specifically for companies and individuals. Some of these sites include Canva, Fotor, PicMonkey, and Aviary. And if you happen to live near London, UK, then consider visiting this site, which offers a wide variety of free designs suitable for professional purposes. One interesting aspect worth mentioning is that you can actually buy physical copies of these signatures through Amazon.
Last but not least, if you're looking to learn Photoshop skills, then checkout this website. Although it seems outdated, it offers a lot of useful tips to help users understand basic concepts of Photoshop.
Have questions regarding this article? Feel free to leave feedback in comments below.
Your digital signature is an important part of the electronic communication you have with others. It’s how people know they can trust what you say—or that it was actually sent by someone else (hiding their name and position).
There are three main ways for people to use signatures on emails: as a way to identify yourself, to request privacy, or when signing contracts. A good rule of thumb is this: If you wouldn’t sign something without a signature, then don’t include one.
Here’s everything you need to know about adding a digital signature to your Gmail account.

To turn off your signature in Gmail completely, just go into Settings & “Signature settings and click Edit next to Show Signature at the bottom of every message box. Then select No signature from the dropdown menu. This will remove all traces of your signature from any incoming messages. You may also choose to set your default reply-to address for auto replies, which could be helpful if you want everyone to see who wrote them but only certain trusted individuals to read further.
If you decide to keep your signature enabled, there are several options available for customization. Go to Settings & General " Signatures. There are two tabs here: Default and Saved. The first tab lets you set the default signature format, including whether to show initials, full name, title, company affiliation, etc., depending on whether this is your primary email address. Also under Default, you can customize these fields to match whatever personal details you prefer, such as removing phone numbers so that those texts aren't included in your signature automatically. In addition, you can edit each individual field within the Customize Your Signature area. For example, you can change the font type and size, adjust spacing between lines, and even replace images with icons instead. Finally, you can check the boxes Hide image from recipients and Auto-remove to keep your signature clean while still giving people a visual representation of where the formatting came from.
The second tab contains saved templates you can access quickly whenever needed. These allow you to save specific signatures for different types of correspondence. However, these require you to retype most sections manually. To create new ones, simply tap the plus (+) icon right below your current signature template. Here, you can enter custom names for each section of your signature, along with optional placeholders to insert content later using the same tool. Once done, hit Save. Now you can switch back and forth between various signatures easily via the My Templates option in the sidebar.
Gmail uses spam filters designed to protect users against malicious links or attachments from unknown sources. When creating a signature, Gmail tries to detect elements that look suspiciously similar to hyperlinks or other potentially harmful objects inside the body of the message. As a result, some parts of your signature might get stripped out before being displayed.
This doesn’t mean your signature has been deleted forever, however. Google keeps copies of signatures stored away somewhere in its data centers. They’re accessible through the Saved feature mentioned above. Clicking View button next to your signature shows more details about it, gives you the ability to download a copy, and allows you to share it elsewhere. From there, you can delete it altogether.
You can follow the steps outlined earlier to disable your signature entirely. Afterward, head over to Settings & General " Signature settings again, but make sure Set aside space for signatures is checked. Scroll down to Download your signature. Select Yes to download a copy and Open after downloading to view it. Note that due to security concerns, you won’t always find your original signature file unless you downloaded it previously.
When composing an email, Gmail displays your profile photo and display picture underneath your name. By default, it includes your username, job title, location, website link, social media profiles, phone number, and mailing addresses. Next to each entry, you'll notice small dots indicating whether those items were removed by Gmail's filter system. Unfortunately, many legitimate companies don't appear as often because the service considers them too generic. The following list provides examples of businesses whose logos were filtered out by Gmail.
1. Apple Inc - Apple logo, iWork
2. Amazon Web Services - Amazon logo
3. AT&T Mobility LLC - DirecTV logo
4. Bank Of America Corp - BofA logo
5. Best Buy Co., Inc.- Geek Squad logo
6. Blue Apron Delivery Service, Inc - BlueApron logo
7. Capital One Financial Corporation - Capital One logo
8. CenturyLink* - Centurylink logo
9. Citrix Systems Inc.* - Citrix Online Banking logo
10. Comcast Cable Communications Management Company - Xfinity logo
11. Dell Computers International Ltd - Dell logo
12. Disney Media Networks Group, Inc. - Disney Interactive Studios logo
13. eBay Inc. - PayPal logo
14. Facebook Inc - Facebook logo
15. Federal Express - FedEx logo
16. First American Payroll Processing, LP - FAPL payroll services logo
17. Frontier Airlines Inc.* - Frontier Airlines logo
18. GameFly Streaming Entertainment Network - Gamefly logo
19. Gap Stores Operating Partnership, L.P. - Old Navy logo
20. Hulu LLC - Hulu logo
21. Intel Corporation* - Intel logo
22. JetBlue Airways Corporation - JetBlue logo
23. Kohler Manufacturing Co. - Kmart logo
24. LinkedIn*, Inc - LinkedIn logo
25. MasterCard Worldwide Plc - Mastercard logo
26. Microsoft Corporation* - Office 365 logo
27. Monster Beverage Corporation - Monster logo
28. Netflix, Inc - Netflix logo
29. Northrop Grumman Corporation - Northrop Grumman logo
30. Orbitz Worldwide Holdings, Inc. - Orbitz logo
31. PlayStation Software Publishing Limited - PSN logo
32. Rakuten Retail Limited * - Rakuten logo
33. ShopRunner - Target brand logo
34. SquareTrade International Corporation - Square Trade logo
35. Staples Incorporated - Staple logo
36. Time Warner Cable Inc. - TWC logo
37. Twitter, Inc. - Twitter logo
38. Verizon Wireless - VZW logo
39. Visa U.S.A., Inc. - Visa logo
40. Wells Fargo & Co. - Wachovia logo
41. Western Digital Technologies Canada, Ltd. - WD logo
42. Yahoo! Inc*. Yahoo logo
43. Zappos.com - Zappos logo
44. Zynga Inc. - FarmVille 2 Logo
45. AOL (formerly known as America Online)* - AOL logo
46. Alitalia S.p.A.* - Alitalia logo
47. Autodesk, Inc.* - AutoCAD logo
48. Avistar Travel Technology Solutions PvdA.* - Avistar logo
49. British Sky Broadcasting plc.* - BSkyB logo
50. Cigna Healthcare Insurance Companies* - Cigna logo
51. Cisco Systems, Inc.* - Cisco logo
52. Cognizant Technology Solutions India Private Limited* - Cognizant logo
53. Deloitte Touche Tohmatsu Limited* - Deloitte logo
54. Ericsson AB* - Ericsson logo
55. HP Enterprise Security Products Business Unit* - eTrust product logo
56. IBM Global Foundries - IBM logo
57. Internet Archive* - Wayback Machine logo
58. Intuit Inc.* - Quickbooks logo
59. Juniper Networks, Inc.* - Juniper Networks logo
60. LogMeIn* - LogMeIn logo
61. Lucent Technologies* - Alcatel-Lucent logo
62. Maxtena Limited* - Maxsoft logo
63. Micro Focus International GmbH* - Micro Focus NFQLogic logo
64. NDS Group NV* - Netgear logo
65. Oracle Corporation* - Sun Microsystems logo
66. SAS Institute Inc.* - SAS logo
67. Symantec Corporation* - Norton Antivirus logo
68. Teradata Corporation* - Teradata logo
69. VeriSign, Inc.* - Verisign/SecureID logo
70. VMware Inc.* - ESX Server virtual machine logon screen
71. Yandex Marketing Automation Oy* - Yandex logo
72. Zoom Video Communication Inc.* - Zoomlogo
73. Adobe Systems Incorporated* - Acrobat Reader DC logo
74. Accenture PLC* - Accenture logo
75. Allstate Insurance Company* - Allstate logo
76. American Airlines Group Inc.* - AA logo
77. Airbnb Inc.* - Airbnb logo
78. Alibaba Group Holding Ltd.* - Alibaba Cloud logo
79. Alaska Air Lines Inc.* - Alaska Air logo
80. ALK Electronics USA Inc* - Samsung logo
81. Altria Group Inc.* - Philip Morris USA logo
82. Amadeus IT Solution s.r.l.* - SAP AG logo
83. Anheuser-Busch InBev SA / Interbrew* - Budweiser logo
 Send emails at scale

