 NEW: BrowserGrow.com is now available!
AI agents to grow your business & do your marketing on autopilot in your browser
NEW: BrowserGrow.com is now available!
AI agents to grow your business & do your marketing on autopilot in your browser

NEW: BrowserGrow.com is now available!
AI agents to grow your business & do your marketing on autopilot in your browser

HubSpot is known for its robust CRM system that’s easy to use and full of features. However, despite being an extremely powerful tool with many useful functions, it can still be difficult to navigate around when trying to find what you need.
That's why we're here to help answer one of our most frequently asked questions about how to create a filtered view within HubSpot. We'll also show you some other ways you can make navigating through your lists easier. So without further ado, let's get started!
There are two main methods in which you can filter data on HubSpot. The first method will allow you to sort out your company’s sales leads into different categories based on certain criteria such as product type or location. This option allows you to see only those who have purchased a specific item, for example.
The second method gives you more flexibility but requires creating multiple views/filters. You can select this option if you want to look specifically at a particular department or team within your organization. For instance, if there were three teams working together on marketing campaigns, then allocating them separate views would enable you to visualize their progress separately using graphs and charts. In addition, you could even set up notifications for each group so they stay updated regarding the status of projects.
Let's take a closer look at these options below:
After selecting Create Filter, click New Filter. You should now see a new box pop up where you can enter your desired search term(s). From here, you may wish to change the field names of any columns you don't require. Once done, hit Save & Apply.
Now, head over to your Lead tab (or whichever column you chose) and you should see your newly created filters appear next to the usual sorting options. Simply drag and drop them onto your preferred position. If you'd like to delete a single filter, just right-click on the title bar and remove.
Once everything has been placed according to your needs, click Save Changes. Now, whenever you open your lead management page, you should see your chosen fields along with their respective filters.
If you ever decide to edit your filters again, simply repeat steps 1 - 3 above. Your changes will automatically update themselves once saved.
Yes, you can actually perform searches across various columns while filtering data in HubSpot. Just follow these simple rules:
Selecting Notes under Column Groups will bring up the Notes section. Here, you can input text fields to filter down your results.
You can always access the Note section via Filtering Leads " Notes after logging in to HubSpot. It’s located towards the bottom of your screen.
This feature makes searching through your notes much quicker because you won't have to scroll back and forth across numerous pages looking for keywords. Instead, you can quickly narrow down your selections by typing directly inside the relevant boxes.
For greater control, try adding additional parameters to refine your query. Or else, you might end up missing valuable information that could aid your decision making process.

One way to keep things tidy and organized is to rename contacts and move duplicates to folders. To do this, head over to the My Content tab and select All Data. Next, hover over the plus icon (+) and click Rename Contact. Enter your choice of name in the popup window. Keep in mind that duplicate records cannot be renamed, nor can they be moved to another folder.
Another thing you can do is hide inactive accounts. Head over to Settings " General " Manage Accounts. Click Show Account Details, then tick Hide Unused Accounts. This action enables you to reduce clutter on your dashboard by hiding unnecessary details related to unused accounts.
However, removing accounts completely means losing access to important tools such as reminders and auto-responders. But if you think it's best not to bother keeping track of them anymore, feel free to deactivate them instead.
To deactivate accounts, select Find More Actions from the left sidebar menu. Choose Deactivate account. After entering the necessary credentials, confirm whether you really want to cancel the subscription.
Lastly, you can organize your contacts in groups. By doing so, you can easily differentiate between similar types of clients, suppliers, etc., thus improving your overall efficiency.
Head over to the Admin Homepage " Categories " Create Category Group. Select Add category group. Give your collection a suitable name and assign it to a few selected contacts. You can reorder your categories by dragging and dropping them anywhere on the grid.
Once finished, review your settings to ensure that they suit your preferences. When ready, hit Save Changes.
As mentioned earlier, you can filter your entire database by clicking Create Filter. Alternatively, you can opt for choosing Multiple Views/Filters per Record. There are several advantages to doing this. One of the biggest perks is that you can create subgroups for better categorization.
For example, if you own a restaurant business, you may want to divide customers into different departments depending on their order history, age range, gender, etc. You can achieve this goal by creating separate views for each client profile. Then, by simply changing the value assigned to each individual parameter, you can instantly adjust your graph accordingly.
Here are a couple of tips for setting up multiple views/filters per record. First, go ahead and check off Split Records. Second, consider grouping items together to save time later on when viewing leads. Lastly, remember that by default, HubSpot splits a maximum of 100 records per page. Therefore, if you have thousands of leads, you may run into performance issues. That said, increasing the number of rows allowed per pagination step does improve things slightly.
To increase row limits, visit Preferences " System and turn on Unlimited Paginations. Finally, test your setup thoroughly before publishing it live. Do note that this option isn't currently available worldwide.
We hope you enjoy exploring HubSpot as much as we enjoyed writing this post! And please leave us your thoughts, ideas, feedback, or suggestions in regards to this article.
HubSpot's CRM is packed with features that make managing customer relationships easier and more efficient for both salespeople and support reps alike. One feature users often ask about are how to add filters to their lists within HubSpot so they can easily find specific items without having to scroll through hundreds — if not thousands — of entries every time.
So what exactly does it mean when you "filter" data in an app like this? And how can you use those same filtering options to sort out your own company’s customer service or marketing department? Let’s take a look.
First things first, let’s talk about what a “list” actually means in HubSpot. A list is basically just a group of people (or companies) who have been assigned similar categories under one umbrella name. For example, there could be different departments inside of a single organization where employees work together as part of a team. Or perhaps you have several clients who all need different types of services rendered by your business. In most cases, when we think about creating new lists in our apps, these kinds of scenarios come up.
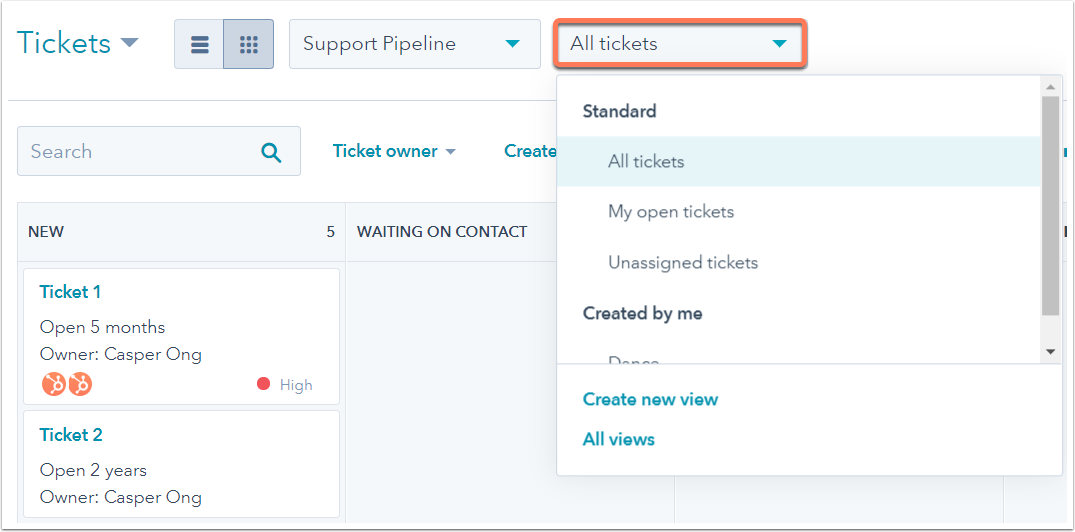
Now that you know why you would want to do that, let’s get into how to set up some simple filters in order to see only certain information. Once again, HubSpot has a handy tool called “Filters” which allows us to quickly pull down any type of record we might want to search for. Here’s how to access them.
When adding a filter in HubSpot, you'll notice two icons appear directly next to each entry once you hover over the person/company’s card. The icon looks like an eye symbolizing that this item will show up whenever you perform searches using that particular field. That said, while searching based off of email addresses works fine, other fields such as phone numbers won't necessarily pick up results. So keep this in mind before entering anything too personal into your system.
Once you click that eye symbol, however, you’ll see three additional boxes pop open. These areas allow you to select whether you want to view everyone who matches the criteria across all departments, just the ones within your current office location, or even just those located nearby. You can also check whether you’d like to include customers who haven’t made purchases yet but still may become future leads. This option depends entirely on how many prospects you're trying to reach. If you plan on calling them soon anyway, then you should definitely enable this box.
Next, you can decide if you'd rather see just those who live outside of your region. Finally, you can toggle whether you want to see all records regardless of status. It’s important to note here that you cannot display multiple values simultaneously unless you’re looking to filter by two separate sets of parameters. But don’t worry, you can always edit these settings later after setting up your filters!
If you have multiple offices or locations, consider enabling the second dropdown menu titled Office(es). When doing so, you’ll be able to select between the various spots you currently manage. Just remember that this change will affect everything else tied to that area, meaning if you have someone listed under New York City but you now select Dallas instead, that individual’s entire profile will automatically update. However, you can simply modify his or her address if necessary.
Finally, if you chose to filter by Status, HubSpot offers four options: Active, Lost, Pending, and Closed. While none of these will limit anyone’s ability to interact with you via text message or call, it’s worth pointing out that inactive accounts aren’t included in these results — only closed deals or canceled orders.
After completing your selections, hit Save Filter. At this point, HubSpot will prompt you to assign names to each category. Simply give them whatever title best suits your needs. By default, HubSpot assigns generic labels like Sales or Support, but feel free to rename these yourself if you prefer something more meaningful. Next, tap Continue.
You’ll receive another popup asking if you’d like to save changes. Tap Yes, and HubSpot will begin updating its database. Depending on how much data exists already, this process could take anywhere from a few seconds to half a minute. Afterward, you’ll return to the previous screen — Filters. There, you’ll now see a total count of how many records were affected by your changes along with the actual number of records matching your selection. From there, you can continue tweaking the settings until you’ve reached the desired outcome.
To start, head back to whichever section you used previously to build Lists. Clicking on People brings up a window showing all existing profiles. To add a new member, click +Add Person and fill out any basic details needed.
Then, switch over to Companies and follow the exact steps outlined above. Again, you’ll arrive at the same page upon completion. All you need to do afterwards is confirm by clicking Create Filter.
Just because you've created a List doesn't mean you can immediately tag it as such. First, verify that the appropriate sections are selected. Now, click Edit Labels underneath the Tags header. Select Add Label and enter a descriptive term to help identify your newly categorized groups.
For instance, maybe you’re working with a client whose primary language isn’t English, thus requiring you to translate correspondence into Spanish as well as provide customer support. Thus, tagging this account as Hispanic lets you avoid wasting time hunting around for the right keywords.
Also, remember that you can reorder the tags by dragging and dropping them anywhere on the bar. Keep in mind that if you ever delete a label, everything associated with it will disappear as well. Otherwise, it’s easy enough finding your way around.
On the main screen, you can adjust the color scheme, font style, background image, etc., depending on your preferences. Also, look towards the bottom for the Export button. This function allows you to export all of your customized layouts as HTML files. Alternatively, you can copy the URL link straight to Safari, Chrome, Firefox, or Microsoft Edge.
Lastly, you’ll probably run into a situation where you’re tempted to add an extra column for your new categories. Don’t fall into that trap. Doing so defeats the purpose behind grouping items together. Your goal is to streamline communication, not complicate matters further.
As long as your layout remains organized, you shouldn’t encounter any problems whatsoever.
Smart lists are essentially filtered views that highlight specific elements of a larger dataset. As mentioned earlier, HubSpot makes it super easy to craft these types of lists, letting you define complex rules that apply to numerous individuals. Below is how you go about making one.
Head back to your dashboard and navigate to Smartlists & Rules. Hit Add Rule and input the following conditions:
Customer State – Is equal to active
Department – Contains equals Texas
Status – Does not contain equals pending
Simply put, this rule states that anyone who lives in Texas and belongs to the Department labeled “Sales” must meet all three aforementioned requirements. Anyone who doesn’t fit this description falls below the cutoff.
Hit OK and HubSpot will generate a unique ID for your rule. You can then paste it wherever you desire so that others can access it. Underneath the rule itself, you’ll find a blue plus sign indicating success. Right away, try running a quick test to ensure everything worked properly.
Again, make sure you're logged in to your HubSpot account before proceeding. Head to Customers, scroll down, and locate an active lead. Find the Customer tab, expand View Details, and select Show Advanced Settings. Enter your new rule’s unique identifier in the Where condition field, and then press Apply Changes.
The result will likely vary slightly since the original data didn’t perfectly match your expectations. Still, it gives you an idea of how effective it can be. Try to experiment with this functionality a bit to figure out what produces the optimal output.
No matter how large your organization grows, you never want to lose track of a single prospect. Fortunately, HubSpot offers plenty of ways to find exactly what you’re looking for. We recommend checking out the Find Feature which provides a built-in search engine specifically designed for locating individuals.
Inside of the Search Bar, type in a potential lead’s name, last name, email address, or mobile number. Then, press Return to bring up rows containing all related information pertaining to that person.
Alternatively, you can utilize the Lookup Toolbar which contains shortcuts to commonly searched terms like Company Name, Phone Number, Email Address, and Social Media Accounts. Plus, you can customize this toolbar per your preference, including removing certain buttons altogether.
You've got all those people who work for you and want to keep track of that information. But what if you could just save yourself some time by filtering out certain employees? Or maybe you're trying to find someone specific with long hair and no beard — this is where it gets tricky.
Fortunately, there are many ways to filter your contacts so they only show up according to criteria you set. It's not always easy figuring them all out, but we'll walk through how to use several different apps to help you get started.
First off, let's look at how you can filter your company's contacts using Google Chrome, which will also apply to other browsers like Safari as well. And remember, these same methods should work on smartphones too!
To start, open up Gmail then head over to Settings & Accounts " Labels " Add another label. You may have to click into More settings first before you see the option below. Once inside, select Create new filter. This gives you an empty field to type whatever search terms you'd like to include. For example, I'm going to call my team members by their job title, so I typed in JobTitle.
Then, hit Next until you reach the next page. Here, you need to name the filter. In my case, I called mine "Company Filters" because I plan to use this later when creating labels within each individual company. After naming the filter, hit Save Filter and Continue. Now, whenever you enter something similar to any one of your keywords (like "Samantha") Google Sheets will pull up results based on your words alone.
Now, back to our original question: How did we put together such advanced searches without having to rely on cumbersome commands? We used Smart Lists in Gmail, which allows us to create lists of data. So, once again, open up Gmail. On the left side of the screen, scroll down until you see Labs, and then select See All. From here, you'll notice two tabs labeled "Smart List" and "Smart Group." Head over to the latter tab and drag four boxes across under Columns, starting with Priority Box, followed by Date Range, Additional Criteria, and Label/Filter.
Once everything is arranged, you'll now see a dropdown menu appear right above the box containing your first keyword ("Samantha"). Select New Smart List, and give it a relevant name. Hit the checkmark icon beside its header, then continue scrolling down the page until you arrive at the bottom. You should be able to access your newly created filter by typing anything similar to it into the Priority Boxes.
This works great for finding individuals within your entire office, including management positions, interns, assistants, etc., because it pulls up everyone whose email address begins with Samantha. If you wanted to narrow it down even further, try adding more details about each person you're looking for. That way, you won't miss anyone important. Of course, you can adjust these rules however you'd like. Just make sure you know what you're doing beforehand.
Remember, you can also change the order of your columns by dragging and dropping them around. To delete a column, simply hover over it, then press Delete. However, if you ever decide to rearrange things, don't worry—you can bring back deleted items pretty easily. Simply highlight the item you wish to restore then click Restore defaults.
If you would like to take advantage of Smart Groups, you must enable it in the Labs section. Go ahead and follow steps 1-4 again, except instead of hitting Save Filter and Continue, you should hit Yes, Enable. Another thing worth mentioning is that if you want to add additional criteria to a group, you'll have to repeat steps 7-10 again.
For sorting contacts on iOS devices, you can use Sortd. The app has three key features that allow users to quickly filter their friends and colleagues: Search, Filter, Favorites. Each feature offers multiple options, allowing customers to control exactly how they view their phonebook.
Search lets you choose whether to display contacts alphabetically, by last name, or both simultaneously. Meanwhile, Filter provides five distinct categories, namely People, Places, Dates, Numbers, and Messaging. These allow you to separate your friends and family from coworkers, clients, and others. Lastly, Favorites makes it easier to manage favorite contacts.
When choosing a category, tap a button to expand its subcategories. When finished, you can customize everything else manually. Below the main menu, there's a slider titled Show favorites. By default, it's already turned on, meaning it shows only people you mark as Favorite. Tap Customize to turn it Off. Finally, if you want to remove a particular category entirely, tap Edit Categories.
As far as actual searching goes, you can search by text message, emails, or by entering names directly. Unfortunately, unlike Google, Sortd doesn't provide support for wildcard searches. Instead, you'll have to specify every detail individually.

Selection is an app built specifically for making contact selection faster than most. Its primary function is to reduce the amount of time spent perusing your phone's contact list. Selección automatically sorts your contacts into groups based on location, relationship, profession, date added, and priority.
The app currently supports Argentina, Brazil, Canada, Chile, Colombia, Costa Rica, Ecuador, Mexico, Panama, Peru, Spain, Uruguay, Venezuela, and United States. Additionally, it contains a special feature known as Quick Selection. With Quick Selection enabled, you can select a specific number of contacts at once by tapping the Plus (+) icon on the upper righthand corner of the screen.
Finally, while it isn't technically a filter, Selección does offer a way to prioritize certain types of contacts. Users can designate certain contacts as VIPs, which means they receive notifications straight to their phones. They can also assign them their own color badge, depending on whether you prefer subtle changes or bold ones.
Here's how to do it: First, navigate to the Home Screen. Next, tap the Menu icon located near the center of the screen. Scroll down until you come upon Preferences. Under General, tap Color Badge Icon Type. Choose One Color Badge, Two Colors, or Three Colors. Finally, tap Set Your Own Icon. A window will pop up asking you to pick between a solid blue, green, red, yellow, purple, orange, pink, white, black, grey, or brown icon. Pick whichever suits your preference best.
Note: Before setting your colors, you might want to test them out on your device itself.
HubSpot's CRM platform is designed to streamline interactions between business professionals and current and potential clients. As a result, it comes equipped with plenty of tools to help you filter your contacts.
From the homepage, head over to My Profile " Account Settings " Manage Profiles. There you will find six sections: Personal Information, Social Media Links, Email Templates, Company Data, Work History, and References. Clicking on each tab will reveal numerous fields you can modify to fit your needs.
Personal Info includes basic information like gender, birthday, marital status, education level, employment history, language preferences, social media profiles, insurance coverage, and credit card issuer.
Social Media links allows you to link various accounts, including Twitter, LinkedIn, Facebook, and Instagram.
Email Templates enables you to design customized templates for sending messages via email or SMS.
Company Data gives you the ability to edit company logos, descriptions, addresses, and telephone numbers.
Work History allows you to change your job position, department, manager, and reporting relationships.
References displays all previous connections made between your account and others'.
Using any of these pages, you can quickly toggle between enabling and disabling each respective profile. Alternatively, you can switch them off altogether by unchecking all applicable boxes. Remember that you cannot disable your personal info unless you deactivate your account completely.
With HubSpot, you can also filter your contacts by selecting Advanced Find Options " Advanced Find. This opens up an expanded version of the aforementioned options. Although slightly less extensive, it still provides you with enough controls to sort your contacts to suit your needs.
What happens after you input your desired parameters? What is filtered and why?
After completing these steps, you'll have a much better idea of which contacts belong to which departments, and which managers oversee teams with fewer resources.
 Send emails at scale

