 LIMITED SPOTS
All plans are 30% OFF for the first month! with the code WELCOME303
LIMITED SPOTS
All plans are 30% OFF for the first month! with the code WELCOME303

LIMITED SPOTS
All plans are 30% OFF for the first month! with the code WELCOME303

HubSpot is an all-in-one marketing platform that helps businesses run more effective campaigns across channels including email, social media, mobile apps, etc., according to their website. It's also known as one of the best customer service platforms for small business owners.
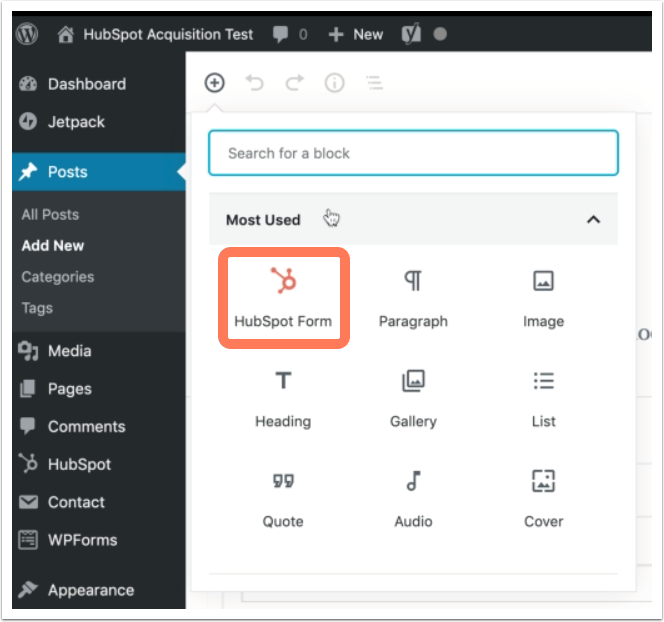
If you are planning to set up a new online store or want to increase sales from current stores, HubSpot could be a good choice. This article will discuss how you can use HubSpot forms within WordPress websites.
Wix has recently added support for its customers who wish to integrate HubSpot Contact Form directly onto their site. You can easily create a contact page using this plugin and start collecting user information right away.
To get started, go to Plugins " Add New and search for hubspot. Click Install Now when it appears in the results list. Once installed, click Activate Plugin.
After activating, open your Wix account (if not already logged in) and select My Products. Then, look at your Dashboard under Content Types " Pages. In here, find the blank space next to Default Landing Page and drag and drop the HubSpot Contact Form block to fill in the empty box.
Click Save Changes once done.
Now, whenever someone visits your Wix site, they'll see the HubSpot Contact Form embedded on your webpage. As soon as they enter any data, such as name, phone number, message, etc., these details will automatically appear in the HubSpot system. With this, you don't have to worry about adding users manually.
You may then proceed to check out other features offered by Wix such as creating multiple landing pages, setting different fields per each page, displaying images and videos, uploading files, etc. If you'd like to learn more about Wix plugins, please visit our detailed guide on How To Use The Best Free Website Builders For Your Business.
If you're looking for ways to customize your homepage and would prefer embedding a form using HTML code rather than downloading another app, we've got good news! There's a way to insert a HubSpot form via HTML codes using WP Elements.
This feature allows you to change colors, fonts, background color, button text, upload pictures, add links, etc. Using elements makes everything much easier since you won't need to download anything. Let's take a closer look at the steps below.
1. Go to Tools " Widgets. Find the Text/HTML tab and click Insert Block. A pop-up window will appear showing various options available for widgets. Scroll down until you come across Simple Input Field and click it.
2. Next, scroll further down to Customize widget settings and click Edit Settings. Afterward, type "form" inside the field labeled Select Code Type, make sure there isn't any quotation marks around it, and hit Enter.
3. On the following screen, copy the code provided by HubSpot and paste it into the input bar located just above the red line which says "Placeholder". When copying the code, avoid putting quotation marks around it because otherwise the element might show errors on your end.
4. Finally, press the blue Button icon on top of the newly inserted form. Another pop-up window will display asking if you want to move the widget to specific position(s). Choose Yes and continue moving along.
5. That's it! Whenever anyone accesses your online shop through a desktop browser, they should now see the form embedded on your page. However, if the person uses iOS or Android devices, he/she needs to tap the green + sign first before entering any data. Otherwise, they'll only see a black screen without any option to enter any info.

The process for integrating a HubSpot form onto WordPress sites differs slightly depending on whether you choose to use Jetpack or not. Below are both methods so you know what to expect.
Method 1: Integrate HubSpot Into JetPack
JetPack offers many useful tools for bloggers and webmasters. One of them is the ability to connect third-party services like Google Analytics, Mailchimp, Facebook Ads Manager, etc. While most people tend to rely solely on the free version of JetPack, some others pay monthly fees to enjoy extra benefits.
However, you can still use HubSpot even though you have paid subscriptions. Here's how.
First, log in to your JetPack dashboard and head over to Services " Connections. Search for HubSpot API and click Create Connection. From here, follow the instructions listed on the popup window to complete the integration.
Once finished, restart your browser and try accessing your blog again. Although HubSpot doesn't offer a built-in live chat functionality, you can enable it under Integration & Features " Enable Live Chat.
On the other hand, if you decide to stick with the free version of JetPack, simply disable the HubSpot connection and delete the previous content you had connected previously.
Then, log back into your dashboard and activate the same HubSpot connection again. Lastly, refresh your WordPress page where you intend to place the live chat module.
Method 2: Embed HubSpot Without JetPac
For those who prefer not to upgrade their subscription plan, HubSpot provides official documentation detailing how to configure integrations between the two systems. Since it takes time to navigate through the documents, let us provide a quick summary of what you need to do.
Start by heading over to HubSpot's Documentation section and searching for "Integrating HubSpot with your WordPress website."
When you reach the result page, browse to Advanced Configuration. Under App configuration, locate the entry named Web Application ID and input your domain address. Make sure that you haven't created a duplicate key yet.
Next, switch over to WordPress side and open SiteOrigin Studio. Head over to Design Mode and select Shortcodes. Look for [hb_livechat] tag and replace it with the unique key mentioned earlier. Then, save changes and close shortcode editor. Refresh your WordPress page to view the results.
Although HubSpot supports several frontend frameworks such as Vuejs, React, AngularJS, Nodejs, Express, Laravel, Ruby on Rails, PHP, ASP.NET Core, Python Flask, Django, Swift, etc., it does not officially support Elementor. Therefore, if you own a website powered by Elementor, you must either update your theme or replace it altogether.
Alternatively, you can consider installing HubSpot Contact Form on WordPress using a regular plugin installation method. We recommend sticking to JetPack due to its easy setup procedure.
HubSpot is one of the leading marketing automation platforms that allows businesses to manage their client relationships more efficiently. Whether it's for B2B or B2C companies, it offers solutions tailored specifically for each industry vertical.
The platform also has a free version which makes its services accessible to all small business owners. This article will guide you through integrating HubSpot's Contact Form 7 plugin onto your website using Wordpress.
Before installing any plugins, make sure you have updated your theme to support them. If not, go ahead and update your site now. Once done, open up your dashboard (e.g., http://yourdomainname/wp-admin) and log out from your account if required. The next step would be to activate your current email address associated with your HubSpot account.
Once logged in, head over to Plugins " Add New. Search for the HubSpot Contact Form Plugin. You'll see three options appear--one for WordPress Business Edition, another for Enterprise edition, and a third for Free users. Clicking on either option should take you straight to the respective download page. Make sure you choose the right one depending on what type of hosting plan you use. In this case, we're going to select the WP Business Edition.
After clicking Install Now, you may need to restart your server before activating the new plugin. It shouldn't take too long since most modern hosts allow servers to automatically reboot when necessary. When finished, return back to your Dashboard. On the left side panel, look for Manage Plugins. From here, scroll down until you find HubSpot Contact Form under Available Plugins. Then click Activate.
As soon as activation is complete, you should see the following message pop up on your screen.
With HubSpot's integration system, you don't necessarily need to change anything within your existing elements to incorporate a certain feature. Instead, you simply need to follow these steps:
1. Go to My Account " Integrations.
2. Select Create Integration. A popup window will then show asking whether you want to create a new connection between HubSpot and WordPress. Choose Yes.
3. Enter Your Server Host Name or IP Address and Domain name. After doing so, hit Save.
4. Finally, enter your details such as User ID, Password, Client ID, Client Secret, Application Type and API Token. Hit Submit once again.
If everything goes well, you should receive a confirmation mail containing information about setting up the new integration.
Integration Successful!
Now that the integration process is completed, you can start adding forms directly on your WordPress site. To get started, let's first set up our domain settings.
To get started, go to Settings " General " Webmaster Tools Credentials. Here, input your username and password for your HubSpot account. Next, check Upload SSL Certificate. For those who are unfamiliar with terms like 'SSL', it stands for Secure Socket Layer Protocol while HTTPS is short for Hypertext Transfer Protocol Secure. These two protocols help protect data transmitted via websites.
For example, https://www.google.com means Google uses secure sockets technology to encrypt communications sent between your browser and the web server during login. With SSL, users' sensitive personal information won't fall victim to hackers.
Next up, scroll down to Enable Automatic Email Notifications. Set it to No. Don't forget to save changes once you've made adjustments.
Next, visit WordPress Admin Panel " Appearance " Editor. Find Posts " Writing. Under Header Text, paste the HTML code provided by HubSpot. Be careful not to delete the space after <form&. Also, ensure there aren't any errors anywhere else on the code.
Finally, copy the entire block of code and replace the original text with yours. Do remember to keep the same formatting structure. Once you're done, press Preview Changes. Check if everything works correctly and refresh your browser.
Although the above procedure involves connecting HubSpot and WordPress manually, you can automate this process further by creating an automated post workflow. Follow these simple steps below:
Head over to Automation " Workflows " Start a new workflow.
Click +Add Step.
Choose Send Mail.
Select Content Repository. Scroll down until you reach Post content.
Enter Post title, Author, Category, Date published, and URL of your chosen blog entry. Leave other fields blank.
Hit Create Action.
You can then access your newly created action at Settings " Customize " Actions. By default, this function will run every time someone submits a comment on your blog. However, you can modify the conditions according to where your comments are posted.
By automating actions like sending emails, updating records, etc., HubSpot helps streamline operations so that your team doesn't spend much time processing repetitive tasks.
Yes, there is. Let's say you wish to add additional fields to your form without having to rewrite the whole thing. There's no problem because HubSpot provides customization tools like CSS, JavaScript, PHP, XML, etc. You just need to know where to locate these files. Below is an overview of where they might be located.
CSS Files
These files contain styling specifications for various areas including background images, fonts, colors, spacing, borders, shadow effects, etc. They're typically found in /libraries/css/.
JavaScript Files
JS refers to JavaScript Object Notation. Basically, these files are used to enhance functionality. Users interact with elements via buttons, links, menus, dropdown boxes, sliders, tabs, etc. JS files can be accessed under /themes/js/.
PHP Files
PHP stands for Personal Home Page. As per its definition, these types of files are responsible for controlling the flow of scripts executed upon user interaction. They're usually stored under themes/php/.
XML Files
They serve the same purpose as PHP but slightly different. Like PHP, they control script execution based on user interaction. Unlike PHP though, they store data rather than instructions. An example could be things like menu items, tab labels, button descriptions, etc. Look for them under /templates/.
There are many ways to add a Hubspot Contact Form to WordPress. Using HubSpot's own tool is definitely the easiest method to work around. Although HubSpot's integration system isn't perfect yet, it still comes in handy especially for people whose blogs are hosted on WordPress.
HubSpot's Contact Form 7 is one of the most popular ways to collect email addresses from visitors that land on your site or blog without requiring them to sign up for an account first. It makes adding forms quick and easy as it integrates directly with Google Analytics.
If you use WordPress, there are several plugins available to help integrate HubSpot into your existing system, but they don't always work perfectly together. Fortunately, we have found a great way around this problem using Squarespace - which uses HubSpot under the hood! This means you will be able to create beautiful contact forms straight out of the box, making integration seamless. We'll show you exactly what steps need to take so that you too can start collecting emails right away.
We've broken down how to set everything up step-by-step below. If you run into any problems along the way, feel free to shoot us a line at support@squarespace.com.
Once you log into your HubSpot account (you only need one), select Integrations " Create New Integration and follow these instructions:
Click Next when prompted. You may receive some warning messages about creating integrations between services. Click Yes if asked.
Enter the name of the app/website you wish to connect with HubSpot. In our example, it's Wordpress. Once again, click Next.
Select whether you want to allow access to all data HubSpot has collected since the last time you connected, or just the current session. The latter option is fine unless you're looking to get more specific information like user IDs. For simplicity's sake, choose Allow access to all data. Click Next once again.
Read through the Terms & Conditions page carefully, then check Agree and Continue. Finally, click Finish. Your connection should now be live!
Now that you have HubSpot integrated into your website, let's look at how to embed a HubSpot form within WordPress.
There are two methods you could use to embed a HubSpot form onto your WordPress website. One involves uploading a new HTML file to your server while the other requires no additional coding whatsoever. Let's discuss both options before moving forward.
The first method involves uploading a copy of the HTML code for your form to your web host via FTP. While simple, this process takes quite a bit longer than simply copying over the same files used for SquareSpace.
To upload a single HTML file, open Filezilla (or whatever tool you prefer) and navigate to where you would normally store media such as images and videos. Select the html folder, locate the index.html file inside, and drag it wherever you'd like within the directory structure.
Next, head back to your computer desktop and download a plugin called WP Bakery Pro. With this plugin installed, you'll see a small button appear next to your post editor after logging in to your WordPress admin panel. Hit that button and choose Upload Plugin From URL. Paste the following link into the field provided: http://www.yourdomainnamehere.com/wpbakery/. Choose wpbakery_form_plugin.zip and press OK.
After doing so, the installer application will extract itself. Now find the extracted folder and open it. Inside you'll find four folders, including wpbakery, containing the necessary CSS and JavaScript files needed to properly display your form. Copy those files to another location outside the wpbakery folder and keep the original intact.
You must also include a PHP script named 'wpshims.php' located within the wpbakery folder. Simply rename this file to something else to avoid confusion.
With that done, you can return to your browser window and refresh your homepage. Find the newly created menu item labeled Add WPSHIMS Menu Item, select the items dropdown, and scroll down until you reach WPBakery Forms. Here you should see three options: Basic Form Builder, Advanced Form Builder, and WebForms CMS. Each offers slightly different functionality depending upon what type of form builder suits your needs best.
For instance, basic users won't require advanced features, whereas advanced users might not care about the extra features offered by basic users.
Basic users require less customization and provide simpler controls. However, they offer fewer features compared to their advanced counterparts. On the contrary, advanced users offer greater flexibility and control but come with a higher price tag.
Advanced users feature dozens of customizations and design elements, allowing them to customize every aspect of your form. They also give users much finer control over each element's appearance, placement, behavior, etc.
As mentioned earlier, you will need to make sure to move the php file named 'wpshims.php'. Otherwise, none of the menus will load correctly.
Finally, ensure you edit the settings appropriately. Head to Settings"WP Bakery Forms and set Use default values to No. Set the Publish date to Today if desired, otherwise change it to a later date. Change the Number of required fields to 1 if needed. Leave others blank. Make sure Save changes is checked. That's it!
All said and done, this method allows you to build beautiful responsive forms without touching a lick of code. However, if you plan to modify the style of your form further, it isn't recommended. As discussed above, you'll need to either move the wpshim.php file or alter its name. Doing so could cause issues when attempting to update your theme later.
So what happens if you don't know anything about code? Don't worry, HubSpot provides a very handy tutorial detailing exactly how to go about building a form using this technique. Just visit https://support.google.com/hubspot/answer/6632952#2 and learn how to insert a contact form into WordPress using WP Bakery Pro.
Another approach is to skip the entire process outlined above and instead rely solely on HubSpot's own built-in form creation tools. To do so, you'll need to login to your HubSpot dashboard and select Dashboards " My Dashboard followed by Contacts " Create New Page. Then, fill in the appropriate details. Afterward, save and preview your contacts page.
This method gives you full control over how your form looks, behaves, and operates. But because it relies on HubSpot's proprietary technology rather than standard HTML markup, it doesn't provide the same level of consistency across browsers. Therefore, it's better suited for static websites and blogs, rather than ones designed to function as a fully functional front end.

At this point, your form should already be published on HubSpot. Navigate to Contacts " Pages and find the contact form you'd like to enable. When viewing the source code, you'll notice a few things. First off, the title is surrounded by underscores (" _"). Second, the input names contain dashes (-). Third, there is a section titled "#required". Fourth, the label text contains asterisks (*). These symbols indicate special characters that trigger certain behaviors based on user interaction.
To fix these errors, highlight the relevant sections and replace the underscore with hyphens ("-"):
Input Name="email"
Label Text="#required"
Title="Email Address *"
That's it! Now, test your form. Ensure that filling out the form reveals the labels you expect, shows validation error messages when invalid entry types occur, and prompts users to enter a valid email address.
When testing, try entering non-alphanumeric characters, incorrect capitalization, spaces, etc. Also remember that many people tend to misspell common words and phrases, so you should consider incorporating spellcheckers into your form.
Squarespace offers a similar service to HubSpot regarding integrating third party apps into your website. Again, however, you'll need to pay attention to detail in order to successfully pull it off.
First, you need to register for a free trial account with Squarespace. Upon signing up, you'll immediately gain access to the entirety of Squarespace's platform. Within the dashboard, search for Elements and select Embed Code. Enter the relevant code shown on the screen here:
https://github.com/squarespace/contact-form-7/blob/master/js/jquery.embedded.min.css
Then, paste the rest of the embedded code into the left sidebar navigation bar. You can adjust the width of the widget as well as hide it entirely if you prefer.
Make sure to remove the previous placeholder image by clicking the X icon next to it. Otherwise, the form won't validate properly.
Lastly, ensure that you select Yes when prompted to confirm removal of the Squarespace logo.
 Send emails at scale

