 NEW: BrowserGrow.com is now available!
AI agents to grow your business & do your marketing on autopilot in your browser
NEW: BrowserGrow.com is now available!
AI agents to grow your business & do your marketing on autopilot in your browser

NEW: BrowserGrow.com is now available!
AI agents to grow your business & do your marketing on autopilot in your browser

HubSpot is an all-inclusive CRM system that helps businesses manage clients and customers from lead generation to marketing campaigns. It's easy to use, has simple reporting tools, offers email support, integrates with other apps like Google Calendar, Gmail, and Office 365, and provides the option to create templates. It does this while still offering advanced features like customizable dashboards, multi-user collaboration, real time notifications, and more than 500 integrations.
To get started using HubSpot, users need to signup on one of two plans -- Standard (free) or Pro ($15/month). The free plan allows up to 10 active users per account but limits users to only viewing basic reports. If your team exceeds this limit, consider upgrading to the Pro version as it will allow unlimited users and custom branding. After signing up, HubSpot automatically imports data from Outlook Contacts into its platform. This includes information about who the person works at, their phone number, email address, job title, etc. However, if there are any errors, they may be found by importing these accounts through another source.
Since HubSpot uses existing Microsoft Exchange (aka Active Directory) groups to track employee profiles, adding new employees to those groups becomes very important. Employees should have full control over creating companies, deals, tickets, and people within them. Therefore, having a way to modify these settings is crucial. For example, maybe you want to change someone’s work location, move them to another department, or rename their position altogether. Having the ability to add additional fields to the default profile makes this possible. Here are some ways to go about doing so...
As mentioned above, HubSpot uses pre-existing Microsoft Exchange Groups to assign jobs and departments. To edit someone’s group, click on People " Manage Groups. Then select Edit Group Details and enter additional details under Additional Information. Once done, save changes. Now whenever anyone adds a customer to HubSpot, along with their name, picture, email, phone numbers, website link, notes, and skills, their assigned group will include the newly added field.
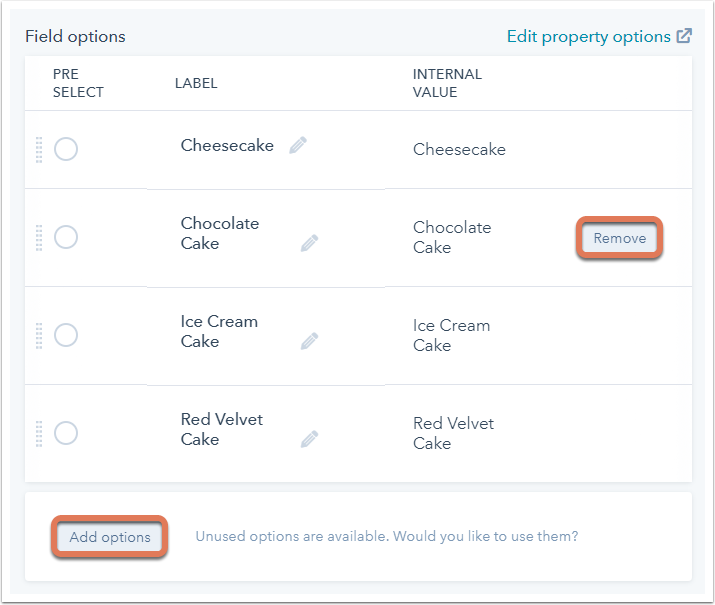
In addition to changing someone’s group, users can also add extra fields to each individual’s profile. Click on People " Account Settings " Customize Profile Fields. Here, you can either choose which fields already exist in HubSpot or create new ones. You can even remove existing fields in case you don't wish to see certain ones. When finished, hit Save Changes.
Contact fields help organize individuals and provide relevant information based on what they've selected. They're essentially labels used to quickly identify specific types of leads. Since every organization needs different sets of information, fields give users the freedom to add whatever they deem necessary. HubSpot lets users pick a primary category, then add subcategories beneath it. So for instance, instead of choosing “Customer Support,” users could specify whether they prefer Email Support, Phone Calls, Live Chat, Social Media, Help Desk Ticketing System, or something else. There are no limitations to how many categories you can create and use.
After selecting a category, users can further narrow down their selection by clicking Add Field next to Name & Address. Select Yes if prompted to continue. A popup window will open where users can type in additional information. Some examples are Company, Job Title, Department, Contact Type, Website URL, Notes, Birthdate, Birthday, Gender, Location, and Relationship Status. Upon saving changes, the new field will show up in future searches. In order to delete a field, simply right-click on it and select Delete Selected Field(s).
If the field doesn’t apply to the business, feel free to remove it. Just remember not to delete anything related to Lead Generation.
For users looking to filter out unwanted information, HubSpot gives the power to hide certain fields. Right-click on any given field and select Hide All Values. Also, if you find yourself needing to sort through large amounts of data, you might want to utilize filters. By going to Tools " Filters, you'll be able to view records based on date range, status, priority level, product line, vendor, client, etc.

Customizing a form means making adjustments to the text boxes, dropdowns, buttons, colors, images, fonts, layouts, and overall design. With HubSpot Forms, you’re able to adjust everything from background color, font style and size, image placement, button sizes, and much more.
Click Design Rules to start editing. From here, you can drag elements around, resize them, arrange them however you'd like, duplicate items, rotate objects, and more. While designing forms, keep in mind that the layout should match your brand guidelines. That said, after completing customization, you can always return back and rework things until you're happy with your final choice.
The best part about HubSpot Forms is that users aren't limited to just personalization options. Under Design Rules, you can also tweak general rules like hiding empty spaces, adjusting element spacing, setting margins, removing page breaks, showing/hiding comments box, and more.
By default, contact fields are optional. Meaning, users can leave them blank during initial registration. But since some industries rely heavily on accurate data, they might want to ensure everyone fills out these fields before proceeding. Thankfully, HubSpot allows administrators to turn fields into Required fields. Doing so requires following several steps.
First, click Tools " Integrations. On the left side of the screen, look for Microsoft Excel Services. Next, expand Other Data Sources and scroll down until you spot LinkedIn. Hit Continue once again. Finally, click on Integration Setup and wait for integration process to complete. Users should now notice that the respective fields become required upon entering a value.
However, if you would rather force these values regardless of whether they fill out the rest of the form, check out our guide detailing how to make mandatory entries via code.
Lastly, we recommend checking out our list of useful tips for improving your sales conversions.
We hope you enjoy learning with us! As long as you stay motivated, strive to improve, and take action, success will follow. Good luck in your endeavors.
If your clients use the same email address on multiple platforms and devices (e.g., Google Calendar), they may be missing out on a great opportunity. If they're using different apps, then there's no way of syncing those data automatically. To solve this problem, you could ask them to create an extra profile on HubSpot CRM. You can even send them a link to it from within Gmail! But what if you want people who sign up for your services to fill certain information in right away - like name and mobile number - so you don't need to bother them later? Well, now you can do just that. In order to do so, users must first log into their accounts before creating any new contact record.
When someone logs into his/her HubSpot account through the web portal, he/she will see several tabs at the top. The "Contacts" tab is where all existing contacts reside. A person can edit these records by selecting one of them and clicking Edit Contact Details. This action opens up another window where details related to that specific contact would appear. We'll talk more about how to design forms below.
But what if you'd rather not go through that process every time you register a new client? How else can you easily add fields to HubSpot contacts without needing admin rights? That's exactly why we've created this guide which explains everything you need to know about adding fields to HubSpot Contacts.
We'll start off by explaining how to configure fields in HubSpot for both regular users as well as administrators. Then we'll move onto discussing some common field types available in HubSpot. Finally, we'll show you how to change field settings after adding them to contacts. So let's get started...
Yes, HubSpot has customizable fields similar to other popular cloud-based CRMs. As mentioned above, users should already be logged into their accounts to view these options. Here's what you can find under Customization -> Fields for your particular platform version:
Mobile Number Field Type
This type allows you to choose whether a customer needs to enter a phone number via text message or SMS. There are two dropdowns: Either requires confirmation code OR either sends verification code immediately.
Email Address Field Type
Similar to the Mobile Phone option, you can pick between having customers enter their emails via text messages or instant messaging applications. However, instead of choosing Yes / No for sending confirmation codes or verifying instantly, here you only have Yes / None.
Name Field Type
The Name field provides flexibility in terms of formatting since you can select among various label formats like First Middle Last Name, Given Names, Surname Only, etc.
Address Line 1 & 2 Field Types
These allow you to determine whether customers need to input their street addresses separately. For instance, you might require people to provide separate numbers for each unit in case they live in apartments. Or maybe you only need to collect the country but not the city.
City Field Type
Just like the Street number field, you can decide whether you want people to give you the full range of cities they list. Alternatively, you can only accept certain ones based on your region.
State Code Field Type
HubSpot offers state abbreviations across regions. Similar to zip codes, you can specify which states you wish to receive.
Country Code Field Type
You can tell customers to input their countries' ISO 3166-1 alpha-2 codes instead of long names. It works similarly to ZIP codes.
Date Of Birth Field Type
People often forget birthdays. By allowing them to simply click a checkbox next to Yes, you can guarantee that they won't miss any important events. Otherwise, they can write down their DOB themselves.
Phone Numbers Field Type
Customers can opt to input their primary and secondary phone numbers. They can also include landline phones along with cellphones. Just remember to keep this section short and simple because most people tend to overlook lengthy form elements.
Website URLs Field Type
For websites, you can choose whether to open links directly in browsers or direct them to your website homepage. Some people prefer opening sites inside browsers while others like to navigate straight to pages.
Social Media Profiles Field Type
Do you plan on collecting social media profiles for your clients? With this field type, you can enable them to share their Facebook, Twitter, LinkedIn, Pinterest, Instagram, and YouTube usernames.
Now that we covered basic customization features, let's discuss the rest of the commonly used types found under Customization -> Standard Fields.
To customize standard fields, you need to first ensure that you're running the latest version of HubSpot. Once you confirm that, head over to Settings menu and scroll down until you see General Properties. Click on it. Now you can begin editing property values for individual fields.
Let's say you want to modify the State field type. From here, look at the bottom part of the screen and expand the Select Property dialog box. When you hover over each item, you'll notice that each pop-up shows its respective value. Let's take California as our example. Under CA, you'll see three subcategories: Abbreviation, Full Name, and Shortcut. Expand each of these further and you'll eventually arrive at the following:
Abbr: CA
Full: California
Shortcut: california
Once you finish doing so, hit Save Changes and repeat this procedure for each field you want to adjust. Make sure you save changes before closing your browser. Afterward, return to your Contacts page and review the edits.
There's also a feature called Preference Groups. These help organize items together and are located under Preferences. Each group gets its own preferences pane containing items relevant to it. For instance, if you have a team of consultants working remotely, you can assign them to a single preference group and control which items they see.
Fields in HubSpot fall into four categories: Text, Date, Checkboxes, and Multiselect Boxes. Their functions vary depending on the type. Below is a brief description of each category:
Text: Allows people to describe their experiences or feelings. Ideal for questions.
Date: Helps people schedule appointments or meetings. Also useful for reminders and anniversaries.
Checkboxes: Gives users the ability to mark items checked or unchecked. Great for picking favorites or deciding yes / no.
Multiselect Boxes: Lets people select multiple answers from a given selection. Good for entering lists.
Below is an example of inserting date fields into a template:
Click Create New Template, enter title, and press Enter.
Select Form Layout, then drag and drop Date Field into the column area.
Change the Label to something meaningful.
Repeat steps 5-6 for as many columns as needed.
Afterwards, place the cursor somewhere near the middle of the row and type in whatever you desire. Repeat step 4 for additional rows.
Then, go back to the main interface and look at the left sidebar again. Find Forms and doubleclick on Insert Field. Choose whichever field you want to insert next. Change the Label according to your choice, and watch as the contents materialize.
Finally, close your browser and refresh your Contacts page. Look at your newly added fields!
As discussed earlier, changing field properties isn't too hard once you get familiar with HubSpot. Although, sometimes things happen that we cannot anticipate. What happens if you accidentally delete a field? Can you recover deleted fields? Fortunately, the answer is Yes!
First, locate the desired entry in Contacts. Next, follow the path shown above and look for Delete Icon. Click on it. This will reveal five previous versions of the chosen field. Hover over the version you want, and click Restore. Confirm restoration by hitting OK twice.
Note that restoring deleted fields doesn't mean you can undo updates. For instance, if you accidentally changed a field's format, you can still revert to the original setting by copying and pasting it back in.
That being said, deleting entries shouldn't ever occur unless you lose files during file transfer. Backups come in handy for situations like this. Don't worry though, we cover backups in greater detail later in this article.
Absolutely. HubSpot covers almost anything you can think of, including event management, marketing campaigns, sales tracking, and project planning. And best of all, it does so seamlessly. Whenever possible, try to avoid complex workflows by utilizing built-in templates. Using prebuilt solutions saves valuable time and energy. Additionally, HubSpot integrates with hundreds of third parties, meaning you can effortlessly connect it with your business partners.
In fact, HubSpot was developed specifically for small businesses looking to automate day-to-day operations. If you're interested in learning more regarding pricing plans or enterprise accounts, feel free to reach out to the Support Team.
Have you tried adding fields to your Contacts yet? Do you have any feedback for us? Share with us in the comments below.
HubSpot's Contact Management feature is one of our most popular features. The ability to store and manage your leads, customers, prospects, partners, clients, vendors, etc., this tool allows companies to keep track of all its relationships at once.
One way to use it is as an internal collaboration platform where salespeople can share information about existing deals or potential new ones. Another is using it as an e-signature solution so users don't have to print documents anymore. You could even use it as a CRM if needed.
In addition, there are many other ways to utilize this powerful application. One thing we've noticed though is that sometimes people need to be able to quickly add more data to each individual record. This would allow them to enter more details into a lead, customer, prospect, partner, client, vendor, etc., without having to go back and forth between different tabs/windows every time they want to update something.
This article will focus specifically on how to create fields within contacts -- but before getting onto those steps, let's first discuss what exactly fields mean within HubSpot.
Fields are basically just extra data points that exist alongside every single person, which is why these records are referred to as "contacts." Fields include things like email addresses, phone numbers, physical address, birthdays, relationship status, interests, website links, notes, attachments, etc.
If you're adding your own custom fields (not from any third party), HubSpot has built-in support for these types of fields. In fact, you'll see a Field button right next to the Notes section under the Create Person tab. Clicking on this icon opens up several prebuilt templates for text boxes, checkboxes, date pickers, etc. These provide customizable labels and instructions for entering additional information.
The best part is, you can choose whether to display these fields per record or across multiple records by checking the Show [field] box above each respective template. If you select Show [field] then only the selected field will show per record while keeping everything else hidden.
For example, let's say you wanted to offer two free months of premium service to anyone who signs up through your site via email. To accomplish this task, you'd click on Add New Record & Choose Form Template. Then, select Premium Service Member Signup and you'll get another window with a few basic options already filled out for you.
Once again, you can customize the label for each specific field by clicking Edit Labels underneath each option. Or if you prefer, you can simply leave them blank and edit later.
If you ever come across someone who doesn't have certain fields populated, you can always ask them to fill these out directly within the app itself. It's important to note that HubSpot does not require users to sign in prior to creating entries for others.
That means that if you were looking to collect names, emails, dates, locations, etc. from colleagues outside of your organization, you wouldn't necessarily need admin privileges to do so. However, you might still want to consider doing this because some functions may not work properly unless you have proper permissions. That said, we highly recommend setting up HubSpot profiles instead of giving everyone permission to view/edit the same profile.
Also, if you notice something wrong after saving a new entry, just rerun the wizard again until it's correct. There shouldn't be any issues with the database integrity since the system automatically checks for errors during saves. On top of this, HubSpot uses a number of security layers to ensure that no unauthorized changes happen to anything stored.
Now that we've discussed what fields are, let's talk about how to actually add them yourself. For starters, you can either type in the desired data manually or import it from another source.
To do this, head over to Settings & Data Import. Then, scroll down to Find External Data Sources and look for the appropriate file. Once you find it, select it and click Upload File. From here, you can navigate to whatever location contains that file and upload it.
Next, switch over to People & Preferences. Now, hover over My Tools and expand the bottom menu. Here, you can select Customize Forms Templates. Afterward, select whichever template suits your needs and hit Save. Finally, open up the page where you added the field(s) you wish to add.
You should now see three main sections along the left side of your screen. Each represents an input area for various pieces of information. So far, you've probably seen Name, Email, Phone Number, Website, Address, Date Of Birth, Relationship Status, and Birthday listed. Those are the standard fields you'll typically encounter. But depending upon your industry, there may be more specialized fields available too.
On top of this, there are four buttons located beneath each section: Next, Previous, Delete, and Cancel. What happens when you press these buttons depends entirely upon where you currently are within the wizard. Let's take a closer look at the relevant pages below.
Let's start off with Next. When you reach this point, you'll see the following five areas: First Name, Last Name, Nickname, Full Name, and Additional Information. Depending on which elements you chose earlier, you may or may not see all of these. And, yes, you can change the name of fields throughout this process. Just try typing in something completely random and save it. Then, delete the old entry and replace it with the newly saved version.
When it comes to previous, deleting, and canceling, it gets pretty straightforward. Basically, whenever you press Previous, the default action takes place. Whereas pressing Delete immediately removes that particular item. Lastly, Canceling closes the current window and returns you to the original list.
But if you got stuck somewhere along the line, please refer to these handy tutorials:
So now we know how to add fields to HubSpot contacts themselves...but how do you actually assign them to individuals? Well, there are plenty of ways to do this. We encourage you to explore all of them in order to figure out what works best for your business. Below are some of the best methods.
After completing the steps mentioned previously, you'll see a small arrow symbol beside the field. By selecting this, you can bring up more actions to complete. As mentioned earlier, you have a couple different options. Either you can link it to an external URL, send it via SMS message, call it, copy it, attach it, embed it, or run it via Microsoft Excel.
However, if you plan on linking it externally, it's worth noting that you cannot modify the destination url. Instead, you must paste it straight into the text box. Also, you can only associate it with one unique contact.
As soon as you finish, you'll receive a notification stating that the transaction was successful.
This method lets you easily generate a PDF report containing all of the information entered into your forms. Plus, you can export it as CSV or XLSX files, meaning you won't lose any data if you decide to move away from the software.
Lastly, if you've been trying to integrate HubSpot with Outlook, you can skip ahead to step six. Otherwise, continue reading.
First, log into your HubSpot account. Then follow these directions:
Click on Start All Programs.
Head to Office 2019.
Scroll down to Mail and tick Enable SyncML Support.
Select OK.
From here, you can begin importing your contacts from Outlook. Follow the prompts carefully and make sure to check the box labeled Include Attachments.
Upon completion, you should now have all of your contacts imported. Simply repeat the procedure outlined in step seven with your new items.

Creating fields works similarly regardless of where you're coming from. Assuming that you know the name of the contact you want to populate, proceed forward with the steps highlighted previously.
If you're wondering how to create a field on the contact object, we suggest taking a look at this tutorial:
Adding fields to contacts in Hubspot isn't difficult. With practice, however, you'll become familiar enough with the application to determine which workflow fits your needs. Hopefully, this guide provided you with all the knowledge necessary to efficiently add fields to contacts.
And remember, you can always adjust this functionality further based on your preferences. Feel free to experiment!
Google Contacts integration is relatively simple. Again, assuming you know the name of the contact you want to add, click Finish.
Alternatively, if you don't know an exact name yet, you can search for it and drag it into the pop-out panel. Alternatively, you can search for it online and grab the ID code.
 Send emails at scale

