 NEW: BrowserGrow.com is now available!
AI agents to grow your business & do your marketing on autopilot in your browser
NEW: BrowserGrow.com is now available!
AI agents to grow your business & do your marketing on autopilot in your browser

NEW: BrowserGrow.com is now available!
AI agents to grow your business & do your marketing on autopilot in your browser

HubSpot is an awesome platform that helps you manage your entire customer journey from lead capture through to sales conversion. It's especially useful for small businesses who don't have the budget or time to build their own marketing automation system.
In this article we'll explain how to set up HubSpot so it can work seamlessly as part of your team's existing workflow. We'll also show you some cool things you could be doing with your data in HubSpot.
If you're already using HubSpot but want to add customisation then read our guide here. If you are new to HubSpot, make sure you check out what it offers first.
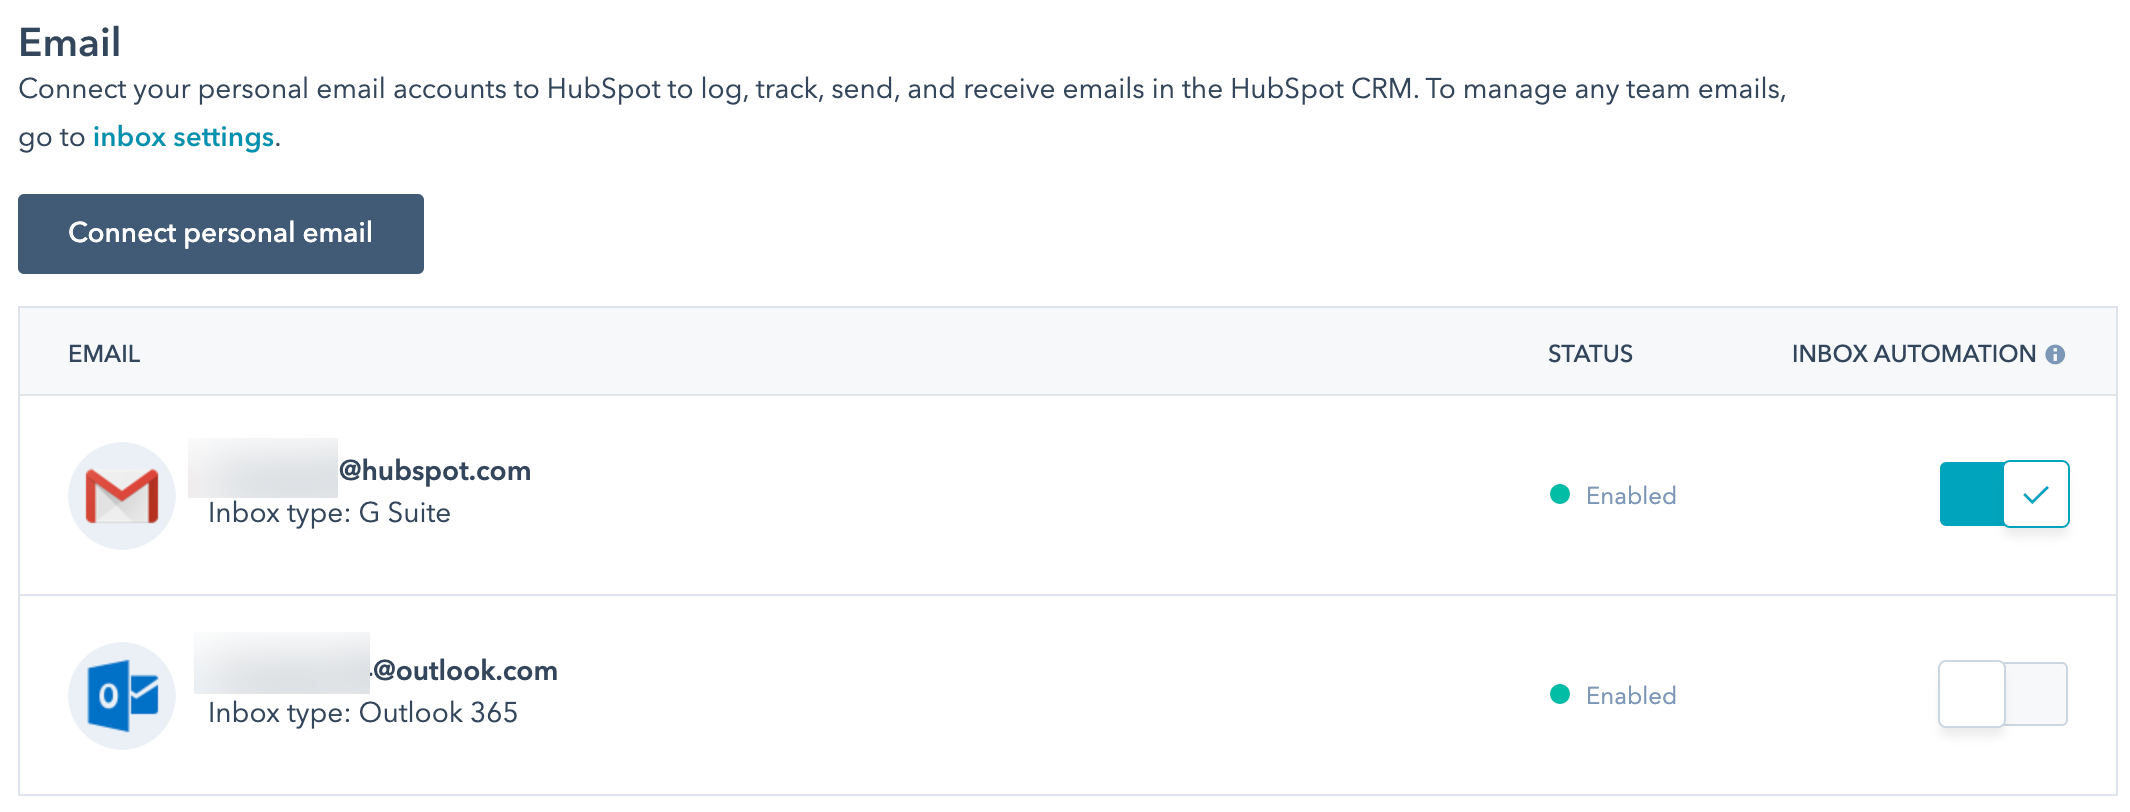
Once you've got everything connected, let's jump into connecting your email accounts to HubSpot!
The quickest way to get started linking your mail client (e.g., Outlook) to HubSpot is by creating a Zap which will automatically forward any incoming messages to a specific recipient group inside HubSpot. This works best if there are multiple teams within your business because each team gets its own unique email addresses.
To create a Zap:
Head over to GoZap [No Longer Available] and select Forward Email To Another Application from the list of available options. Enter your Zap name in Step 1. For example, "Send Mail From Outlook". Then enter your Zap description in Step 2. In step 3, select Microsoft 365 Groups. Finally, choose Create Trigger based on New Arrival. You should see all three steps completed when you finish. Click Save & Test Zap to run the test. The next time someone sends you an email, it will go directly into HubSpot instead.
Now it’s important to note that not every service provider supports Zap integration. So, before setting up a Zap, ensure that any services you use support forwarding via Zap.
Also, keep in mind that Zaps may take several hours to process depending on the volume of emails received per day. Be patient while they sync. Once synced, you won't need to configure anything further.
You might notice that your mail client doesn't appear under Send Emails option in HubSpot even though you created a Zap. That happens because HubSpot only shows default app names like "Outlook". When actually sending emails, the actual sender name appears at the top left corner.
So, just click Add another App and type in the same name as the default application used in Zap creation above. Now, whenever you press Send button in HubSpot, it will open your specified Zap, where you can edit more details about the message such as subject line, recipients etc. After making changes, hit OK to save them.
However, if you'd rather not mess around with adding apps manually, try checking out these third party tools that allow users to quickly setup zaps without needing technical skills.
For those who prefer to stick to Gmail, it's easy to link your Google account to HubSpot. Just follow these instructions below:
1.) Sign in to HubSpot dashboard and navigate to Settings " Integrations.
2.) Select +Add Integration from the upper right section. Search for Connect Service Provider. Type in your preferred search term e.g. Gmail.
3.) Choose Webhooks API and continue.
4.) A pop-up window will appear asking whether you would like to enable web hooks for this integration. Check Yes.
5.) Next, choose HTTP Post Request Method and leave other settings blank.
6.) Set up a new filter in Gmail to forward certain types of mails to HubSpot. See screenshot below for guidance.
7.) On the next screen, copy the URL generated by your browser after pressing Continue. Head back to Integrated Services page and paste the URL into the appropriate field. Confirm your information and click Submit.
8.) Your integration has been successfully configured. Open the dropdown menu labeled My Apps and select +New App. Name it something relevant. Make sure to include "[service]" at the end. E.g. @gmail.com/[Service].
9.) Now, head back to Settings " Integrations and select Run All Actions. Wait until actions complete and close the popup.
10.) Find your newly added app under My Apps. Expand it, find [Integration], and click Edit Details. Copy the Token value found underneath Message Action. Paste it into the Value Field box located near Start Executing Messages. Hit Update.
11.) In case you ever change your password, login to integratedservices.hubspot.com and update your token.
12.) Repeat Steps 4-11 for any additional email providers you wish to link to HubSpot.

It's easier than you think to start integrating HubSpot with Gmail. Follow these simple instructions below:
First, sign in to HubSpot dashboard and select Users tab. Under Manage Users, scroll down to the row labelled Email Providers. Here you'll find a long list of popular services including Yahoo!, iCloud, AOL, Gmail and others. By selecting one of them, you can easily import user contacts associated with that particular service.
Next, switch to Gmail tab. Beneath Import Contacts from selected source, simply select Other > CSV File and upload the file containing your contact info. Leave everything else empty and hit Upload. Within seconds, your imported contacts will populate your Gmail inbox.
Finally, pick up your phone and call someone in your database. As soon as you say Hello, your phone dials their number and plays prerecorded voice saying “Hello [their name], please hold." This feature allows you to track calls made to anyone in your database.
Note: Keep in mind that importing large amounts of contacts can impact performance. Therefore consider batch processing your files during off-peak times. Also, remember to delete old records once no longer needed.
Receiving emails in HubSpot is pretty similar to receiving emails in Gmail. However, unlike Gmail, HubSpot provides two ways to view your email notifications: Desktop View and Mobile View. These views differ slightly between desktop and mobile devices.
Desktop View:
When viewing your emails in desktop mode, you can still access individual threads and reply to conversations without opening HubSpot itself. Simply hover your mouse pointer over the thread title bar and the corresponding conversation will expand. Hovering over the icon beside a thread opens up the full email. And hovering over icons besides individual email subjects reveals the attachments contained within.
Mobile View:
On mobile device screens, the email notification pane expands horizontally across the whole width of the screen. There is no ability to drill down into individual threads. Instead, clicking on a single email pulls up the threaded view panel. Attachments cannot be viewed unless opened individually.
HubSpot does provide a few handy tips and tricks to help you speedily browse through your inboxes. Try taking advantage of these features to improve your productivity and reduce eye strain.
Alternatively, you could opt to download the HubSpot iOS or Android app and enjoy a streamlined experience wherever you go.
Have you tried connecting your email clients to HubSpot yet? What was your favourite feature? Let us know in the comments below.
If you’re new to the world of marketing automation platforms like HubSpot or AWeber, it can be confusing figuring out how all these features fit together—especially if your previous inbox was set up by another provider that uses its own platform (like MailChimp).
This post will walk you through connecting an existing Gmail account to HubSpot so you can use many of HubSpot's best tools for managing your business' newsletters. It is based on our experience using HubSpot since 2014. If you have any questions about setting this up yourself, please reach out to us at hello@hubspotlabs.com.
HubSpot offers two options when adding accounts to their system: Connect via POP3 or SMTP. Most people are familiar with sending mail from Gmail as opposed to having users sign into their own accounts. When we first signed up for HubSpot, they had yet to implement support for importing data directly from Google Inbox, which means most users were entering information manually. However, now there is a way to import your email straight from your Gmail account. The process below shows both methods.
Note: You need to verify your identity before starting the setup process. We recommend reading our guide here on how to get started creating automated campaigns in HubSpot.
1) Go to your Account settings page in Gmail. Click “Settings & Accounts” then pick your primary email address.
2) Select "Send mail as" under Accounts Settings.
3) Choose either Send mail via pop - no authentication required or Send mail via smtp – requires authentication option.
4) Enter your login details for each service. For example, if you enter your HubSpot credentials, you'll also want to include your password for verification purposes. Make sure to check the box next to Use secure TLS/SSL connection (recommended) if possible.
5) Once authenticated, click Save Changes. Your changes should take effect within minutes.
6) Now you're ready to start syncing your messages between Gmail and HubSpot! Here's what happens once you've done this step.
7) On the HubSpot side, go to My Dashboard -> Integrations. Pick "Gmail".
8) Log in to your Gmail account. Next, select More actions... on the bottom right corner of the screen.
9) Find the dropdown menu where it says Email Provider Name. Change it from "None" to whatever name you used during step 7 above.
10) Confirm your change. Then choose Import Users.
11) Follow the steps outlined on the screen. They will ask you whether you'd like to migrate contacts only or labels as well. Since you just added them to Gmail, selecting "labels only" works fine.
12) Finally, confirm your choice and wait until everything has been imported. After a few moments, you’ll see the status message changed to something like Successfully completed migration.
13) That’s it! Now you can access your Gmail messages in HubSpot. Just open the app, select All Activity and find your messages. Alternatively, you may also create a new campaign based off those messages.
This method doesn't give you full control over who receives those emails or other customizable settings such as targeting individual subscribers. To fully customize your newsletter workflow, you'll need to add the custom fields to your subscriber records inside HubSpot.
Below is a list of some useful tips for customizing your newsletter templates.
Yes, HubSpot integrates very nicely with Gmail. Everything looks exactly the same as it would if you received an email from someone else's @gmail.com account. There are several advantages to doing things this way versus integrating HubSpot with your own email client. First, you don't have to worry about losing track of important events because you might miss it in your calendar. Second, it makes life easier for everyone involved—your customers, employees, etc.—if everyone starts receiving emails from the same address. Third, it gives you more freedom to manage your customer relationship without needing to rely on third party services. And finally, if you ever decide to leave HubSpot, you won't lose your entire pipeline of leads and subscriptions.
To make this integration happen seamlessly, HubSpot provides a feature called Smart Text Replacement. Smart text replacement allows you to replace certain words with special codes. So instead of writing [NAME] in your template, you could write [[BEGIN NAME]] and HubSpot will automatically recognize it as [NAME]. By default, smart texts are replaced with placeholder names, but you can edit them to better suit your needs.
In order to respond to emails sent to your HubSpot account, you must enable the ability to schedule tasks. Otherwise, you will receive a reply back saying simply "[Scheduled]" every time you try responding. One benefit of allowing scheduled responses is that you can easily tell apart different types of emails. Emails containing attachments always say "[Attachment]" while others typically contain links to articles or blog posts. Scheduling lets you know if an email contains an attachment or not, and therefore helps you filter these kinds of emails differently.
After enabling scheduling, whenever you compose a response, you can insert a link to an article or event, tag a person to followup later, attach files, run surveys, etc., and HubSpot will let you know when the task becomes due. You can even create a sequence of reminders throughout the day or week, depending on when you plan on following up with someone. Seqence allows you to build a series of emails to remind people about upcoming deadlines or projects.
You can assign multiple seqences to the same lead or user. Each seqence gets a unique tracking code attached to it so you can keep tabs on which ones have already been opened. You can also view a history of past interactions with that particular contact. Seqences can range anywhere from 1-99, with 5 being the highest number allowed.
Seqs can be triggered by incoming email notifications, manual triggers, or even cron jobs. Seqences also allow you to capture the date and time that you composed a specific email. These dates help you visualize how long it takes to complete a given project, giving you a clearer picture of productivity.
The beauty of HubSpot is that it allows you to turn emails into tasks and tasks into projects. You can organize them however you wish, including separating them into categories. Categories allow you to break down large projects into smaller chunks. HubSpot also allows you to categorize subcategories and additional tags, making organizing much simpler than trying to remember everything in a single category.
Another great tool HubSpot includes is Subscription Manager. With subscription manager, you can create separate lists of contacts for various industries, products, or interests. HubSpot creates automatic filters based on preconfigured parameters, letting you sort contacts according to the type of content they subscribe to. For example, you can group tech professionals together, or political activists. Or maybe you want to put everybody subscribing to fitness magazines into a single folder.
With subscription manager, you can also search for leads across all folders and groups. Of course, you can still perform searches by industry or product too.
Once your subs have been organized, you can review them quickly by clicking on the Groups tab on the top navigation bar. From here, you can browse through all active subscriptions by title, topic, keywords, company, state, city, country, gender, age, phone numbers, and more.
Lastly, you can share your plans with team members via Share Plan Folders. This feature gives you the power to collaborate on planning strategies with your teams. Everyone working on a campaign can stay updated and informed. Team members can also invite collaborators to join a campaign.
All HubSpot systems operate offline. Therefore, HubSpot cannot read the contents of your emails, nor can it modify anything contained therein. HubSpot never touches your email itself. Only after you download it onto your computer does HubSpot become aware of the fact that it exists. At that point, it downloads the file and stores it locally. HubSpot performs basic operations on submitted forms, such as marking duplicates, removing bad addresses, and fixing broken links. But none of these actions involve opening or altering the body of the email.
However, you can prevent HubSpot from downloading your email altogether by disabling the Download Attachments button in Preferences. This prevents HubSpot from saving the email to disk, preventing it from performing duplicate detection and linking issues. Also note that HubSpot cannot delete the downloaded copy of the email unless you explicitly request it. You can delete the local copies of the email by going to Manage Messages in File Explorer.
For more info, check out our overview of HubSpot's privacy policy. You can learn more about protecting your private data here.
HubSpot is an all-in-one marketing platform that allows you to create personalized user experiences for your customers, while also managing customer relationships from lead nurturing to sales tracking. The service has several pricing plans available so there’s no need to worry about spending too much money on the wrong solution.
If you want to get started using HubSpot but are not sure how it works or where to begin, this article will explain how to use HubSpot by connecting emails in Google Chrome. This guide assumes you already have set up an account at HubSpot and created some contacts. If you don't yet have an account or any Contacts, please read our free beginner's guide first!
Using HubSpot without setting up an email address can be done via its website. However, if you prefer to start out with Gmail, we'll show you how to quickly add an email address to HubSpot through Gmail.
Once you've added your new contact information to HubSpot, follow these steps to link them together:
Select "Contacts" under My Account on the top navigation bar of HubSpot's web app.
Click Create Contact. You may see other options such as Add Email Address, Change Password, etc., depending on what features you're looking for. Select Create New Contact.
You should now see your newly created contact listed under All Your Contacts. Click on their profile picture (the same icon used when hovering over individual items) next to Edit Info to open up editing settings for your contact. From here, select Connect Emails.
Note: Before continuing, make sure that your phone number field doesn't say None. Make sure that the text box reads Phone Number instead. Also, you must enter your mobile carrier name manually. For example, if you type Verizon Wireless into the text box, you won't receive automatic notifications.
After selecting Connect Emails, you should then fill out the following fields: First Name, Last Name, Mobile Carrier, Primary Language, Gender, Birthdate, Birthday, Zip Code, Street 1, City, State/Province, Country, Work Telephone, Cell Phone, and Home Telephone. Don't forget to click Save after entering each piece of data.
Now, let's take a look at how to connect your personal email accounts like Outlook and Gmail to HubSpot.
In order to access your Outlook account within HubSpot, you will need to sign in. Once logged in, go back to HubSpot's home page. Then locate the Sign In button located on the upper right portion of the screen. After clicking on Sign In, you will find yourself inside of Outlook. From here, navigate down to Tools & Accounts and select Mail.
You will see two different tabs labeled Personal Folders and Other Folder. Choose Other Folder. Here you will see three boxes titled Microsoft Exchange ActiveSync, POP3, IMAP4rev1. These represent the types of connections you have available. To choose which connection you would like to use, simply check off the desired option.
For instance, if you wanted to use IMAP, leave both the POP3 and SMTP unchecked. Next, scroll down until you reach Manage Other Servers. Under Other Services, input Hosted Server Settings. Below this section, enter your server details including Username, Password, Port, SSL Certificate Filepath, Protocol, Domain, and more. When finished, hit Submit.
Next, return to the previous window and switch to Personal Folders tab. Within this tab, input Login Information. Input your username, password, domain, port, protocol, and ssl certificate file path. Finally, press Submit again. Now, you have successfully connected your Outlook account to HubSpot.

To connect your Gmail account to HubSpot, head back to the main menu located at the top of the HubSpot homepage. On the left side of the menu, you will notice that there are links to Blogging, Content Marketing, Customer Support, Help Center, Reports, Scheduling Meetings, Sales Funnels, Surveys, Social Media Management, Thank You Pages, Training Videos, YouTube Channel, Twitter Feed, Wiki, and more. Each of these pages contains icons representing various functions.
The closest icon to us is located directly underneath Welcome Page. It looks similar to the Facebook icon. Simply hover over the image and a pop-up panel containing instructions will appear. For those who haven't discovered this feature yet, once you mouse over the icon, a small arrow will appear pointing downwards toward the center of HubSpot. Doing so will reveal additional instructions.
Under the Welcome Panel, you will see a dropdown menu labelled With Gmail. Selecting this option will allow you to automatically populate certain sections of HubSpot with your Gmail content. By default, HubSpot includes five preselected entries. They include Blog Posts, Articles, Newsletters, Invoices, and Orders. But feel free to adjust these settings by changing the selection below From / To date range.
Finally, under the With Gmail header, input your login credentials. Enter your full email address followed by the @ symbol and your password. Hit Continue. Upon doing so, you will be taken to your inbox. At this point, you may either continue adding existing messages or delete them entirely.
From here, you can customize further by adjusting the size of your signature, turning your emails green, enabling auto reply, replying from multiple addresses, and more.
Lastly, when you finish customizing your email, click Send Test Message. A message containing test text will immediately arrive in your inbox. Please note that sending this message requires you to enable Allow Remote Messages from Unknown Senders in Gmail security settings. Otherwise, you will receive an error stating that the sender was unknown.
When testing your setup, remember to keep track of your time spent per task. That way, you will know exactly how long it takes to complete every step.
With HubSpot's integrated CRM software called Desk, users gain easy access to important aspects like leads management, sales forecasting, pipeline reporting, and more. One thing worth mentioning regarding Desk is that it does not support integration with third party apps, nor can it sync files stored in cloud storage services. So, if you'd like to pair Desk with your Dropbox account, Google Drive, Evernote, etc., unfortunately, this isn't possible.
However, if you only wish to use Desk for simple tasks like creating reminders and notes, importing contacts, scheduling meetings, and viewing recent activity reports, HubSpot offers a simplified version of Desk called LiteDesk. Unlike standard Desk, this tool connects seamlessly to Gmail and integrates many popular integrations including Zoho, Freshworks, Hootsuite, and others.
While the majority of functionality between Standard Desk and LiteDesk remains identical, there are still minor differences. For starters, LiteDesk lacks advanced customization tools, whereas Desk provides greater control over templates, branding, and colors. Additionally, LiteDesk cannot sync files uploaded to cloud storage services. Lastly, LiteDesk displays fewer widgets than Desk.
Here's how to easily connect your Gmail account to HubSpot through LiteDesk:
Log into your Gmail account. Go to More " Settings " Forwarding and Blocking. Scroll down past the list of supported domains and uncheck Prevent forwarding outside this domain.
Head back to your desktop browser and visit hubspot.com. Log in with your normal credentials. Once signed in, you will see a gray horizontal line across the middle of your screen. Hover over the vertical dots on the far right of the line to expand the sidebar.
At the bottom of the expanded sidebar, you will see the Connections button. Click on it. Then, enter your Gmail username and password. Press OK.
Depending upon whether you chose IMAP, POP3, or neither, you will eventually land on the final dashboard displaying a Successful Connection message. Congratulations! You have just linked your Gmail account to HubSpot.
Unfortunately, unlike Standard Desk, HubSpot currently does not offer an official method to connect Gmail to DeskCRM. As a result, the process outlined above is the best workaround for linking your Gmail account to DeskCRM.
 Send emails at scale

