 NEW: BrowserGrow.com is now available!
AI agents to grow your business & do your marketing on autopilot in your browser
NEW: BrowserGrow.com is now available!
AI agents to grow your business & do your marketing on autopilot in your browser

NEW: BrowserGrow.com is now available!
AI agents to grow your business & do your marketing on autopilot in your browser

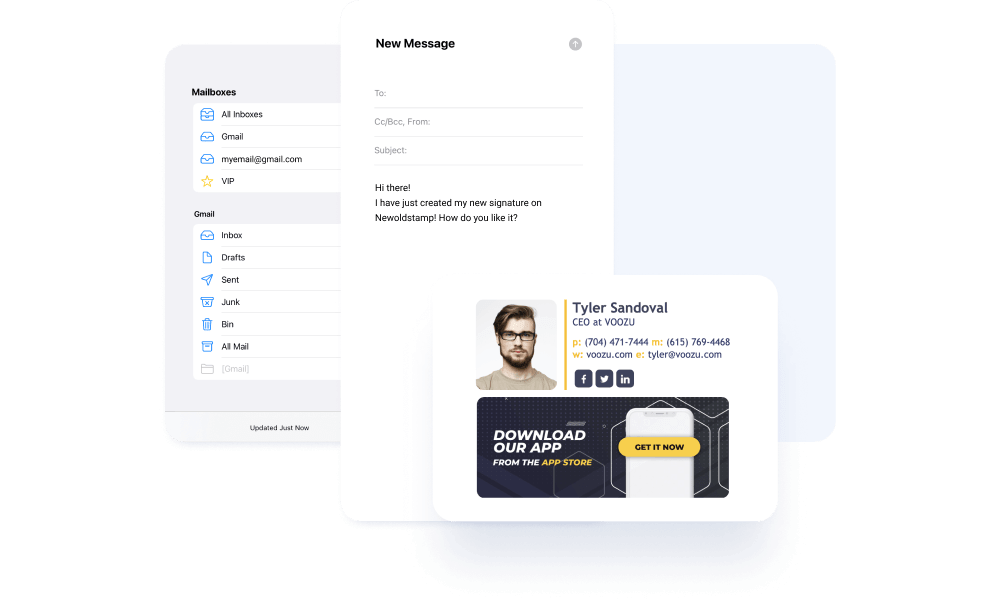
Gmail's default message signatures are pretty basic. You can't use an image as the background and you have limited formatting options for adding images (or anything else) inside messages. That means if you want to customize your own message look with something other than what comes by default, you'll need to get creative.
This article will show you how to create custom signatures that work across multiple Google products including Gmail, Inbox, Calendar, Contacts, Drive, Photos, Sheets, Slides, Meet, Groups, Forms, Voice, Hangouts, Ads Manager 360, App Maker, and more. The methods we're going to discuss also apply to any service using OAuth2 authentication such as Twitter, Facebook, Dropbox, etc.
The process of creating these signatures varies depending on which product you'd like them for. For example, there may be certain parts that only appear on one platform whereas others might span all services. Let's start from the top and go down through each section. Here are some helpful links to help guide you along the way:
Create a new user profile in Gmail
Add a photo to your Gmail avatar
Change your Gmail address picture
Set up two-factor security via SMS verification codes
Get started signing emails now!
To begin setting up your first personalised Gmail signature, click Create New User Profile " Edit next to Signatures at the bottom of this page. This opens up a window where you can choose whether you would prefer to upload a file, insert HTML code, or enter plaintext. We recommend uploading files because it allows you to format rich media, but feel free to experiment with whichever method suits best for you.
You can then change the Signature dropdown menu to Personalise My Email Address. Select Upload File/Insert Code/Enter Text. If you select Insert Code, you can paste the following snippet into the box provided. It should look similar to this:
"a href="https://www.example.com/" target="_blank"" img src="https://www.example.com/logo.svg"" /
Then just follow our instructions above regarding inserting your chosen avatar. Once you've signed in, you'll see your new signature has been added automatically. Clicking it brings up the editing pane where you can adjust settings such as font size, colour scheme, line spacing, and so much more. Feel free to play around here too.
Now let's say you want to set up a unique signature per social network or website. To do this, simply repeat steps 1-6 above for every site you wish to include. Then copy the same block shown above so that it looks different for each site. Save the final result, and when ready, open Settings & General Preferences " Accounts. At the very end under Other Options, scroll down until you find Signature templates. Copy the link for the profile you created earlier. Now whenever you send out an email from that particular device, your custom signature will display instead of the standard Gmail signature.
A neat trick is to make this template mobile friendly. Just remove everything except the title bar containing your name and replace it with a smaller version of your chosen image.
If you don't already have a company logo, you can easily download stock photos online. Or, you could even search specifically for logos since they tend to come in lots of variations and colours. When you take advantage of either option, make sure to check the licensing agreements before incorporating your design into your signature.
For those who have their own designs, it's easy enough to edit an SVG vector graphic. You could export it as an.SVG file, import it into Canva, and place it wherever you want within your signature. Alternatively, you can draw your logo directly onto a canvas in Photoshop. If you're looking to spice things up, try making an infographic of sorts showing off your accomplishments and skills. Finally, maybe you'd rather not spend time designing anything yourself—we've got great news for you too. There are plenty of websites offering royalty-free clipart, vectors, icons, and illustrations for everyday projects. Don't forget to double check copyright licenses before importing anything though.
Once you've settled on graphics, fonts, and colours, head back over to Customize Your Email Signature. Under Templates, click Manage Current Template. From here, scroll down past the existing signature blocks until you reach yours. Right below it, you should see a button labelled Add Image. Hit it and drag whatever graphic you'd like underneath the current signature. Make sure it fits nicely without overlapping anything else. After copying the URL, return to the previous screen and hit Save Changes. Repeat this process for every element you want to incorporate into your signature.
When finished, you'll notice a small greyed out area appears beneath your newly inserted images. This indicates that the rest of your signature isn't being used right now. Unfortunately, there doesn't seem to be a solution for this problem yet. However, this shouldn't cause any major issues.

There are many ways to style headers in Gmail. But if you really want something specific, why not consider building your own? First, head over to Gmail Studio (the official app store). Inside the toolbar at the top, type Header Design " Start Editing. A popover will appear allowing you to input elements such as font styles, sizes, colours, borders, and shadows.
After choosing a layout, you can drag various items around to position them however you please. Of course, you could always skip this step entirely and manually write your own CSS styling. As long as you keep consistent spacing between elements, Gmail Studio won't mind. And remember, you can always delete individual sections once you finish playing around.
Finally, after you're done arranging your content, tap Done. Next, tap Backspace twice to erase the extra whitespace surrounding your entire header. You can then save the changes by tapping Export Headers. Open the resulting ZIP archive, locate the XML document, and copy its contents to Notepad. Paste them into a separate TXT file. Finally, rename the TXT document according to your desired filename. Now, whenever you compose an email in Gmail, a preview of your header will appear alongside your subject line.
Footers aren't quite as complicated as headers. To build one in Gmail Studio, first click Footer Design " Start Editting. You can then proceed to arrange elements in the order you desire. Remember, you can move items around freely within the editor itself, so no need to worry about spacing.
Tap Done when you're satisfied with how things look. Next, tap Backspace twice to reduce the amount of white space surrounding your footer. You can then save the changes by clicking Export Footers. Browse to where you saved your modified XML file and extract it. Find the main FOOTER tag in the document, then copy the innerHTML property value to your clipboard. Go back to the Home tab and click View Source. Paste the copied HTML into a blank notepad application. Rename the file appropriately. Now, anytime you receive an email in Gmail, a preview of your footer will appear beside the sender info.
As mentioned previously, most people usually leave their email addresses at the end of their messages. Since everyone knows this practice works well, it makes sense to stick with it and avoid confusing readers further down the thread. Thankfully, it's relatively easy to add a signoff to Gmail. All you need to do is highlight the last word in your email and press Enter. This auto-inserts your domain name at the end of your message.
If you’ve ever sent out a message on the web that included more than one person’s name and address (like if you were sending a group invitation), then you know how useful it can be to have a custom signature at the bottom of every email.
A signature gives people quick access to important info about who you are—your name, title, phone number, website links, etc.—without having to scroll up from the subject line. It also lets them quickly respond with “Thanks!” or “No problem!” without leaving their inbox. The only downside is that most email programs don’t offer much flexibility when adding signatures except for changing fonts, colors, and maybe some basic formatting options. Thankfully there are ways around this limitation.
Here we’ll show you how to use images as email signatures using popular desktop apps like Microsoft Office 365, Apple Mail, Google Chrome, Mozilla Thunderbird, and others. You could even try making your own customized signature file (.PNG format) and attach it to each outgoing message manually. The results will vary depending on which software you choose to send emails through. In general though, we found these solutions worked pretty well in our tests. We tested all five methods below by sending messages to ourselves first before moving onto testing with real users.
This method works best if you want to include multiple graphics inside your signature. To set up a simple background graphic for your email header in Windows Live Mail, follow these steps:
Select Insert " Text Box. This opens up the sidebar where you can type any text you need. Click New Line and press enter so that the new box appears under the existing box. Press Ctrl+B to open the font menu and select Fixed Width. Change it to 0 pixels. Then go back to the top toolbar and click Format Borders... If you don't see the border option, make sure AutoFormat Borders isn't selected. Finally, drag the right edge of the box to adjust its width until it's exactly what you want.
Now repeat those same steps above but instead paste an.HTML code into the current text box. Paste in whatever HTML code you'd like to appear alongside your signature, such as a link to your blog or social media account. For example, here's what inserting a Twitter user picture looks like in WLMail:
Once everything is laid out correctly, hit OK to insert your text box and give yourself room to work within the borders. Once finished, hit Save & Send/Compose. Now your banner should be inserted into the body of your message just beneath your recipient’s name.
Outlook offers several different ways to customize your email signature including uploading a graphic and creating templates. Here's how to get started:
Open the compose window. Select Tools tab > Options… button and check Show Signature in Message Field. Next, click Customize Ribbon… button and select Signatures. A pop-up pane displays showing various types of signatures available to you. Choose Create File…. Under Image Files, browse to find and select your desired image. Alternatively, double-click to upload a local file via Browse. When done, select Ok.
Repeat step 2 to add logos to other tabs in the customization panel. These logos would ultimately replace the default icons displayed next to certain contacts’ names in your Contacts list. However, keep in mind that they won’t display properly in older versions of Outlook prior to SP1.
You may also opt to design your own template for inclusion in future outgoing messages. Just head over to File > Open Template Gallery… and pick a theme that suits your needs. After selecting a template, click Edit Fields… button and double-click on DefaultSignature field. Add your desired text and/or images. Hit OK to save changes.
In addition to editing fields already present on your default template, you can edit additional fields by selecting Design Mode… button and double clicking on Fields Available to You… field. From there, simply change values according to what you'd like to include in your signature.
Note: If you decide to delete fields after saving your signature as a template, note that deleting unused fields might cause compatibility issues with outlook 2007 onwards. Deleting fields while still maintaining compatibility means you'll have to retype them later.
To easily add a signature to messages received on your iPhone, start composing a new mail and tap the attachment icon at the bottom left corner. Tap + and select Photo Library. Find and select your preferred photo size. Drag and drop the image wherever you wish within the message. Your iPhone automatically inserts the image in the body of the e-mail below your recipients' name.
Alternatively, you can always download third party apps to achieve similar functionality. There are lots of choices, both paid and free. One of the most popular free iOS apps called Email Signature Maker Lite allows you to customize your signature in seconds. Simply type in your desired text and tap Done. That’s it!
With Email Signature Maker Lite installed on your device, whenever you receive an email with attachments you now have two options: 1.) Tap the attached files icon and select Attach Photos Instead. Or 2.) Double-tap the main body of the mail to bring up the Compose window. Within the Compose screen, look towards the very bottom of the page and you’ll notice a small arrow pointing down to More. Tapping that brings up another popup menu allowing you to select between attaching photos or documents.
Yes! As long as you're aware of limitations imposed by the program. For instance, if you wanted to place an avatar or profile pic in your signature, the easiest way to do so is either downloading and printing it yourself or finding someone else’s pre-made version online. Unfortunately, many companies block external resources from being used in outgoing messages. So unless you’re working for an organization that doesn’t care, you probably shouldn’t bother trying.
Also, remember that not everyone has a good enough internet connection to view a large image embedded directly into your signature. Most often, this kind of thing will end up cluttering up peoples’ screens and slowing down downloads. Embedding smaller images and keeping them to a minimum helps avoid this issue. And finally, because of the nature of email clients, anything placed outside of the actual message itself must somehow fit into the space provided. Otherwise, things can become messy really fast.
That said, there are plenty of great places to find quality images for personal use. While you’re at it, why not share your favorites with us in the comments below.
If you’re looking for ways to personalize your emails and make them more professional without paying anything, there are several simple options available. One of those options is adding a custom signature with just about any word processing program installed on your computer.
The easiest way to get started creating signatures that look good is by using Gmail. You can easily send out documents as attachments via this service, which means you don’t have to worry about formatting issues when sending out PDFs or other files. If you use Google Docs, it should be easy enough to export a document to Word first so you can then attach it to an email. Otherwise, you could always create a new document from scratch or use one of these methods to convert an image into a vector graphic before attaching it.
Once attached, open up the email and click “More Options" at the bottom right corner. Choose either Plain Text (for basic info) or Rich Text (if you want something fancier). The latter will give you plenty of customization choices because you can change font colors, fonts, sizes, bold/italics, etc. But if all you need is some basic info, plain text works fine too.
To start off, type in whatever message you want in the box provided. Then go ahead and select the dropdown menu next to “Type." Select HTML Mail Signature from the list. This will allow you to enter code that looks exactly how you would normally format something in Microsoft Word, Pages, or similar programs. It also gives you access to many different styles such as Blockquote, Heading 1-6, CodeBlock, Ordered List, Unordered List, Table, Image Gallery, Button, Links, Hyperlink, and Signatures—which includes multiple templates you can choose from. Click the blue Create button to finish setting up your signature.
Now, whenever you compose a new email, you’ll see this section pop up under “Send To" where you can customize what goes in your signature. Just keep things uncomplicated and avoid going overboard. A short bio with your name, title, company name, phone number, website address, social media links, and maybe even a photo of yourself is sufficient. Don’t bother including every single detail about your life unless they’re absolutely necessary. And while we’re talking details, try not to include too much unnecessary fluff like quotes, jokes, or inspirational sayings. Save that stuff for LinkedIn instead.
You may find yourself needing to send out hundreds of signatures per week, but why pay someone else thousands of dollars for help when you can just save time doing it yourself? Here’s how to set up a quick signature in less than five minutes:
Go back to your inbox settings page. Scroll down until you reach “Signature & Header". Hit Edit Email Settings. Now scroll down further until you come across “Basic Profile” and hit edit again. In here, you can add additional elements to your profile, depending on whether you want to maintain branding throughout your business. For example, if you work for multiple companies under various titles, you might opt to only show one of each. Or if you work with brands on specific projects, you probably won’t want to mix and match. Either way, pick your own preferences!
Under Basic Profile, you also have the option to upload an avatar picture. Once uploaded, you can drag and drop it anywhere within this area. Keep in mind the dimensions must be square, no matter what size it ends up being once downloaded onto your device.
Next, head over to the left panel and navigate to “Custom Templates.” From here, you can search through dozens of professionally designed email signatures and download them directly to your account. As long as the creator has allowed for public usage, you should have full permission to crop and modify images as needed.
Lastly, you can add your own signature image by heading back to your inbox settings page. Scroll down past “Advanced Features” to “Signature & Header” once again. Under “Show Custom Signature,” click “Choose File...” and browse to wherever you saved your customized file. Make sure to check out our guide to uploading an image to Dropbox first.
While the above method allows you to quickly design a signature on your own terms, most people prefer having someone else take care of their entire digital presence. So let’s explore two popular services: Constant Contact and Typeform. Both offer tons of premium designs that you can choose from to suit your needs. After selecting your preferred template, fill out the rest of the form fields however you wish. When finished, submit it as an attachment. That’s pretty much it. These services usually charge $20-$30 per month.
Constant Contacts offers both pre-made and DIY templates. Pre-made ones tend to stick closer to the aforementioned guidelines, whereas you can really play around with DIY templates. They typically range anywhere between $15–$50+, allowing users to fully customize everything according to their specifications.
Typeform is another great tool that lets clients sign up for a monthly subscription plan starting at $10 per month. Depending on the amount of customers you plan on signing up, this price point shouldn't break the bank. However, there's also a free tier available as well. With Typeform, you're able to create your very own custom forms quickly and efficiently. Plus, they have a ton of premade designs to choose from as well.
Cursive writing isn’t necessarily everyone’s cup of tea, especially when trying to squeeze everything into a small space. Luckily, if you still want to use it in your email signatures, we can teach you how to manually write it. First, copy and paste your desired handwriting somewhere safe on your screen. Next, grab a regular pen and sharpen its tip slightly to ensure accuracy. Finally, press down hard on the pen’s nib with moderate pressure while slowly dragging it along the line you intend to follow. Repeat this process until you've reached the end of your designated signature.
If you happen to enjoy crafting your signatures on a daily basis, you can use tools like MyScriptFont or HandwritingPalette to simplify the process significantly. All you have to do is draw letters and words onto canvas squares and place them wherever you feel comfortable. Unfortunately, neither of these apps offer mobile compatibility or support exporting signatures, so you'll have to rely solely on HTML editing capabilities if you want to share yours online.
Logos are essential in today’s world of marketing, but they can be difficult to fit properly into an email. Thankfully, though, there are a couple of solutions.
First, consider using a background color to frame your logo. Most logos are generally white boxes with black lettering inside. By utilizing a colored background behind it, you can simply adjust the opacity level of said background to achieve varying degrees of transparency. Simply apply the same technique to your logo itself, making sure to keep everything centered horizontally and vertically.
Alternatively, you can also embed your logo in a transparent PNG file and place it at the center of the table. Use CSS styling to position it however you'd like. Be sure to test it out in different browsers beforehand since Chrome tends to render things differently than others.
When in doubt, remember that simplicity is key. Your goal is to provide the bare minimum for anyone viewing your email, so keeping things clean and uncluttered is vital. Try to limit graphics, photos, videos, and other distractions that may distract readers away from your actual content. Less is definitely more.
 Send emails at scale

