 LIMITED SPOTS
All plans are 30% OFF for the first month! with the code WELCOME303
LIMITED SPOTS
All plans are 30% OFF for the first month! with the code WELCOME303

LIMITED SPOTS
All plans are 30% OFF for the first month! with the code WELCOME303

Are you looking for ways to boost your marketing efforts but don't know where to begin? You're not alone -- there are lots of marketers who want more than just traffic, they also want targeted visitors that can turn into sales or customers. But it isn't easy to find the right solution without knowing what works best for you. That's why we've created this guide to help answer common questions about how to build an email subscription form in HubSpot CRM.
It may seem like building a subscriber base would be easier if all you had to worry about was finding out who wants your products and services. Unfortunately, that isn't always as simple as it sounds. Sometimes potential clients aren't going through their inboxes regularly enough to make subscribing to your newsletter worthwhile. Or maybe you have a product or service that requires some sort of personal information before someone will consider buying from you. In these cases, sending them over to another site or app could result in lost opportunities. Instead of trying to figure out which platform to use, let us show you how to design and integrate your own custom opt-in page using HubSpot CRM.
HubSpot gives users the ability to easily customize different types of emails including newsletters, transactional messages (such as receipts), promotional offers, special announcements, surveys, etc., by combining multiple templates with customizable fields. This allows for even greater control when crafting effective campaigns tailored to each individual user's needs. Whether you need one simple form or several separate ones, HubSpot makes creating signups fun and straightforward. All you'll have to do is choose a template and fill it out! Here's what you should expect once you set up your first signup form in HubSpot.
First things first -- choosing the most appropriate type of eNewsletter for your business depends largely upon two factors: your target audience and industry. If you sell jewelry online, then perhaps a monthly publication highlighting new arrivals might work better than offering tips on how to wear scarves with blazers during winter months. On the other hand, if you run a home decor company, an article covering trends in beach cabanas would probably appeal more to readers interested in interior design rather than fashion accessories. The same goes for any other industry -- whether you own a restaurant, boutique, fitness center, spa, or anything else, you should pick a topic relevant to your audience so they feel comfortable signing up.
Once you decide on the content for your campaign, simply click Create Email Form under New Campaigns " Templates & Forms " Newsletter and select the template that matches your interests. Each option has its advantages depending upon the number of subscribers you hope to attract and the kind of relationship you'd like to establish with those individuals. Keep in mind that while many options offer similar features such as customization capabilities and statistics tracking, only certain programs allow you to track responses within the system itself. For example, Mailchimp doesn't provide the same feature because it uses third party tools to manage subscriptions. Therefore, if you plan to keep detailed records regarding response rates, try selecting a program that includes this functionality.
Next, give your new form a name and description, enter your desired mailing address, phone numbers, and additional contact info if needed. When adding your preferred language, make sure to include every dialect possible since not everyone speaks English natively. After making changes to the settings, preview your creation to ensure everything looks correct and meets your expectations. Once you're happy, hit Save, and Publish. Now anyone visiting your site can access this signup form at no charge. However, if you ever change your mind about publishing the form, edit it instead of deleting it entirely. To remove a published form, go back to Settings " Design " Templates & Forms " My Forms and delete the entry related to the one you wish to modify. Then republish it again.
Email registration forms come in handy for companies that require specific pieces of data from prospective customers prior to agreeing to conduct business. While it's true that you may receive interest from others who wouldn't otherwise follow through with purchasing your product or service, it's important to remember that you should never ask for sensitive details such as passwords, social security numbers, bank account information, credit card numbers, or login credentials. Doing so puts consumers' privacy rights above yours, especially considering how hackers often steal our identities via phishing scams. Additionally, by requiring too much information during checkouts you risk raising customer objections due to lengthy submissions. So unless you already have an established relationship with your clientele, refrain from doing so until after you've gained trust and confidence.
In addition, filling out forms can become tedious for both parties involved. It takes time to read instructions thoroughly, write down answers accurately, and submit completed paperwork. Plus, since you won't see instant results, waiting around for long periods of time can cause anxiety among members of your organization. As such, having a dedicated member handle submitting orders for your team frees up valuable resources and reduces stress levels. Of course, sometimes it still becomes necessary to send out documents containing sensitive information via mail. Though it might take longer to reach a consumer directly, opting to print off copies beforehand can save you money and protect against theft. Just make sure you shred them immediately afterward.

Now that you understand why email registration forms are useful, here's how to put one together yourself. First, open a message window in Outlook or Gmail and compose an email. Next, go to Insert " Object/Form and drag a field onto the body of your message. Select Text Field. From here, browse to your newly added object library and locate the Template that contains the form you intend to place inside the email. Double-click the file to view its properties. Switching views to Layout shows you how wide the text box will appear. Finally, adjust the height and width accordingly to accommodate the size of the document. Hit OK and test out the formatting by composing another email with the form attached. If you're satisfied with the outcome, copy and paste it into future correspondence.
However, if you prefer inserting it manually, go to View " Document Explorer and double-click the.htm file associated with your form. If you selected a different format, switch between Modules and Views to identify the tab containing the image(s) you need. Copy the files into a folder on your desktop and rename them appropriately. Open the corresponding email and navigate to File " Attach... " Browse... and locate your picture(s). Click Choose Files to proceed. Repeat this process whenever you need to send out similar forms. And if you think you'll need to repeat the task numerous times, consider automating it with a script.
If you're interested in incorporating more interactive elements into your signature -- or indeed anywhere else on the web -- HubSpot provides powerful embedding capabilities. Simply log into your account and head to Edit Signature. Under Actions, scroll down and expand Embed Action. A pop-up menu will display featuring various functions that are available for inclusion. Pick either Content Editor or HTML Editor, whichever suits your needs best, and input your code. Then, just replace the default placeholder images with your own. Alternatively, you can upload a photo to Add Image directly from your computer.
To share your finished signature with others, click Share Signature. Enter the person's email address and password to gain permission to publish it. Otherwise, leave it blank, hit Send, and watch your customized version spread across the Web.
Your job as an entrepreneur is to find new ways of generating more leads for your business, and the easiest way to get started is by creating a simple webform that allows people to opt-in to receive updates from you or your company. There are plenty of reasons why this tactic can be powerful—it’s quick, it’s easy, and if done correctly, the results will be impressive.
But what happens when someone fills out the information on your site? How do they actually become part of your mailing list? And how does all the data collected by the form end up being stored? You can use HubSpot Forms to take care of these questions. Here’s everything you need to know about building a basic webform using HubSpot’s intuitive tools.
HubSpot has made its platform available to everyone, so there are no limitations regarding number of users or amount of content. If you have 1 user, then you only see one tabbed area where you can build different types of forms (e.g., contact forms, surveys). However, if you want to give multiple users access to those same tabs, you'll need to upgrade to a premium plan.
With just a little bit of effort, you can set up any type of form on your own domain without having to pay anything extra. We’ll walk through each step below, but before we begin, let me explain some important things to keep in mind while working with HubSpot.
There are several methods you could choose to create a signup form on Facebook. One method would be to simply copy HTML code from another page on your site and paste it onto Facebook. This approach might work, but it also comes with many challenges. For example, if you don’t update the original source link every time you post something new, the old posts won't appear anymore because their links aren't updated. Plus, copying HTML code from your existing pages may not always look great since most sites try to optimize them specifically for mobile devices.
A better option is to create a dedicated landing page on your site solely for collecting names, emails, etc. Then, use HubSpot’s built-in editor to design a beautiful signup page, which includes custom fields such as phone numbers, addresses, birthdays, and preferences. Once finished, publish the new page and integrate it directly into your blog/website. Now, whenever anyone lands on that specific page, they can fill out your online form immediately.
If you're interested in learning more about making a special Facebook Landing Page, check out our guide here. It shows you exactly how to go about setting one up and getting it integrated within your site.
The downside of doing things like this is that you will lose control over who sees the signup form. On top of that, you also risk losing visitors' privacy by publishing personal details publicly. That said, if you don’t mind giving away certain parts of your audience’s private info, this approach is fine too. Just remember that there are other options, especially if you prefer not to put public information on your site.
For people who run websites with lots of incoming traffic, sending regular newsletters via email is often necessary. But instead of manually crafting individual messages, you can automate the process with HubSpot’s Email Marketing feature. Basically, you can set up a signup box right next to the newsletter subscription button on your homepage. When someone subscribes to your newsletter, they’re automatically added to your Mailchimp account. In turn, this makes them eligible to receive future communications from you.
To get started, open the Form Builder (or any other contact form plugin you use) and select Create New " +" Other " Newsletter Subscription Box. The wizard will help you customize the message inside the box, along with adding images, videos, buttons, etc. Next, upload your logo image to the top left corner of the screen and click Add Logo Image. From now on, every time you change anything related to the box, you’ll see your customized icon pop up instead of your default placeholder.
It goes without saying that you should include a brief description at the bottom of the box explaining what subscribers will gain once they subscribe. Also, consider enabling auto-capture so that subscriptions happen instantly after clicking the “Subscribe” button.
Finally, enable Auto-Send Emails to ensure that new members are included in all subsequent mailings. After applying these changes, test your newly created form to make sure everything works smoothly. To view your new form, visit https://yourdomainname.hubspot.com/forms/.
Now, your new email signup form looks even prettier!
Yes, you definitely can embed a signup form in an email. All you need to do is follow the steps above to create a signup form as described earlier. Once you've got it ready, head back to the Form Editor and select Embed " +" Insert Form Inside Message. A popup window will show up containing your brand new form. Simply drag and drop the box wherever you'd like it to go.
Once again, you can customize the text and appearance of the entire thing to suit your needs. At this point, you can also switch between editing the actual form itself or previewing it in real time. Test your embedded form first to make sure everything works properly.
As mentioned previously, HubSpot offers various plans depending upon whether you are a beginner or advanced user, including Starter ($19 per month), Professional ($39 per month), or Enterprise ($99 per month) packages. Depending on your budget, you can pick either one of these pricing tiers.
Also, note that unlike most platforms, HubSpot doesn't charge additional fees to host your forms or store them in its database for you. So, you don’t have to worry about upgrading to a higher tier later if you decide to increase your subscriber count.
And lastly, the best part is that your customers won’t notice a difference in quality whatsoever if you decide to publish the form on social media platforms rather than your website. As long as you maintain high standards throughout, the final product will come across looking as pretty as ever.
After creating a clean, attractive signup form, the hardest task remains ahead of you — convincing potential clients to share their name and email address. Luckily, HubSpot provides a couple of tips and tricks to improve your conversion rate. First, make sure your call to action button is prominent enough. Second, encourage readers to fill out their details by offering a discount or bonus. Lastly, offer a clear explanation of what they will get in return.
You can also leverage HubSpot’s unique engagement metrics to track activity levels among your target market. Within the dashboard, you’ll see detailed reports showing which elements of your forms worked well versus others.
Overall, HubSpot Forms is a convenient tool that helps you streamline your marketing efforts. With HubSpot’s robust analytics capabilities, you can easily monitor performance, measure ROI, and analyze trends over time. Best of all, this software is completely free to download and use.
If you're looking for ways to increase engagement in the marketing funnel, adding forms can be one of the most effective tactics. Forms allow visitors to share their contact information by filling out fields like name, phone number or address -- giving them something tangible that they can give you directly. They also provide an opportunity for consumers to learn more about what it is you offer before making any decision about whether or not to engage further.
HubSpot offers easy-to-use tools to help marketers design engaging forms that boost conversions while minimizing effort. With just a few simple steps, you'll have a fully functional form ready to use right from within our platform. In this article we will show you how to quickly set up and customize a new webform as well as explain exactly what a Web Form Blueprint is so you understand why it’s helpful. Let’s get started!
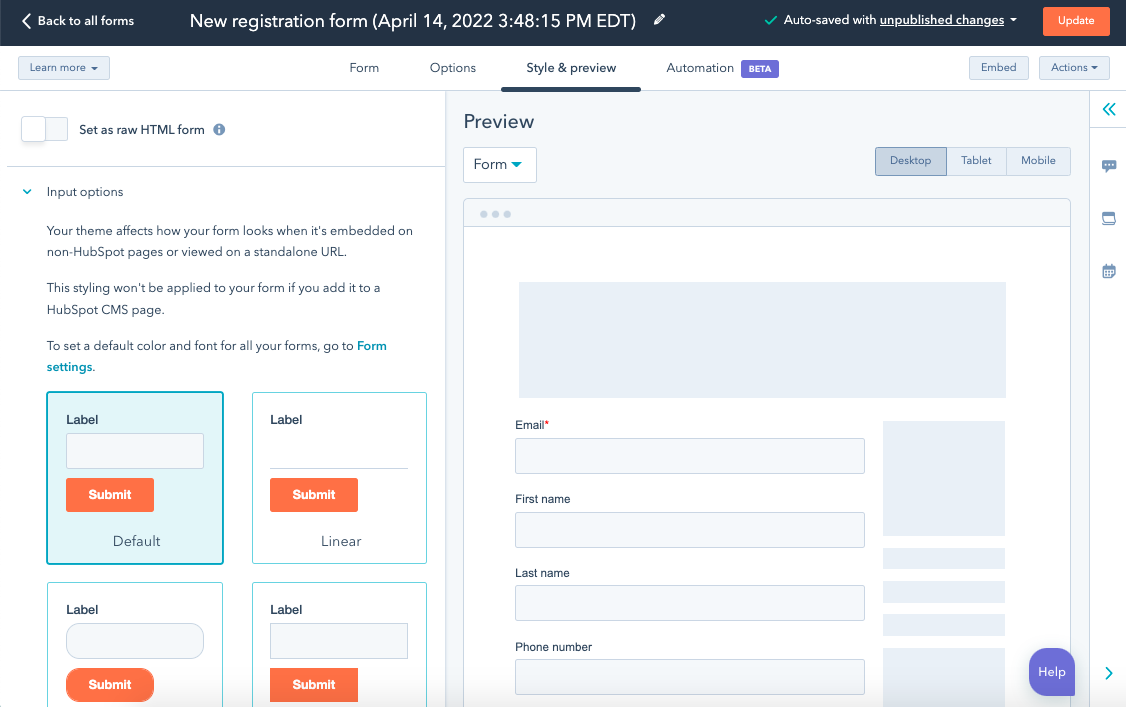
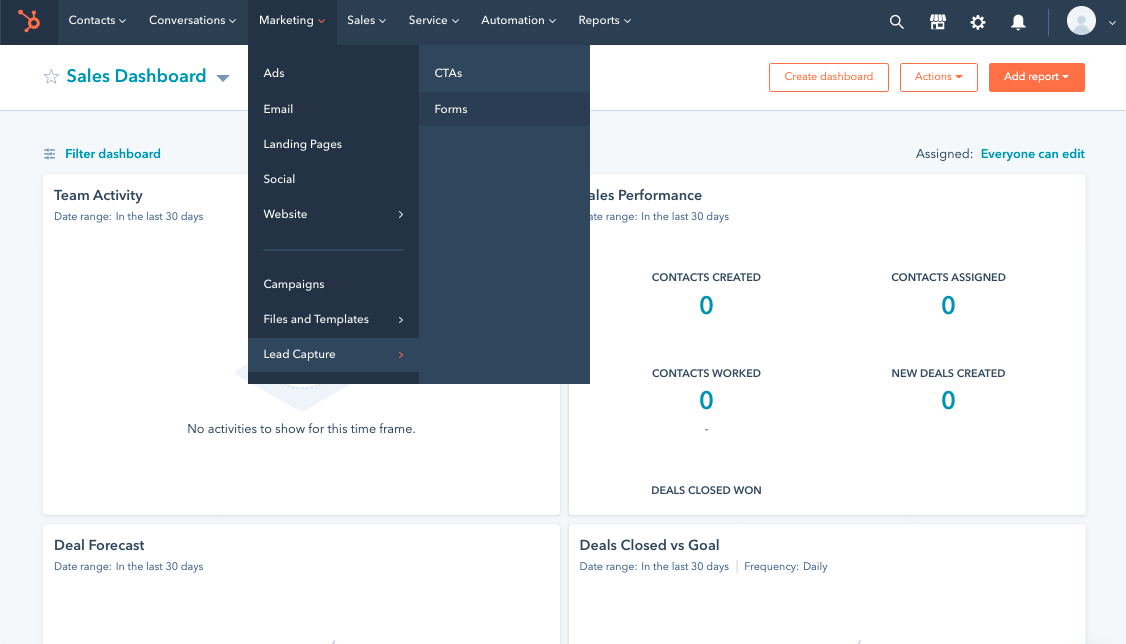
To begin creating a form using HubSpot, simply navigate to the Design tab at the top of the screen and select Create New " Blank Form (Web). The default settings are already filled in for you based on selections made when setting up your account. If you want to change these options, go ahead and click Edit Settings instead. You may choose to remove certain sections if you wish. For example, you might delete the Personal Information section because you don't need to collect personal details from users who aren't interested in taking part in your program or campaign. This makes the process quicker and easier since there isn't much data entry required.
Once you've created your form, you should see it appear under My Forms on the left side panel. From here, you can edit the title, description, colors, fonts, images, etc., but you won't be able to make changes until after publication unless you check Preview first. Once completed, you can then publish the form. To do this, hover over the Publish button next to your form, and click Publish. Your newly published form will now be visible in its own menu item on the left sidebar.
You can also access the same menu where you saw your previously uploaded forms. Simply hover over My Forms again and click View All Forms. Here you can preview each individual form individually, which allows you to view different elements such as backgrounds and colors.
While viewing a form, you can tweak formatting settings and even copy templates that others have used successfully for similar campaigns. We highly recommend copying other people's work once you've gotten comfortable working with the tool. It saves time and helps ensure consistency across all pages.
The final step is to add the form to your site. Click + Add to Site below the form. Then enter the URL of the page on which you'd like your form to reside. Finally, scroll down the list of available places to upload your form, find the correct location, and hit Save & Continue Editing. Now, whenever someone visits your chosen page, they will be prompted to complete your custom form.
Now let’s look at some specific things you can do with our form editor.
Signup pages are usually embedded on landing pages, and function similarly to traditional online registration forms. When a user lands on this page, they fill out essential information to receive updates via email or SMS text message from you. A signup page typically has three primary areas: a heading area, input field area, and confirmation/thankyou section.
When designing a signup page, think carefully about each element. Make sure that every piece flows together seamlessly without being too distracting. Don't try to cram everything onto one single page -- keep content brief and relevant to your audience. Also consider using bolded subheadings to emphasize important points.
Adding your company logo, tagline, mission statement, or slogan can really put a face to your brand and build trust among prospective customers. Adding a photo of yourself or team members gives potential clients instant recognition of who runs your business. Having a clear call-to-action ensures that everyone understands what you expect them to do next.
One trick to ensuring that you have enough space for all of those items is to take advantage of tabs. SignUp4Less uses tabs to organize the many pieces needed to craft a successful signup page. By utilizing tabs, you can separate sections into distinct spaces and move around the order in which they display on the page. Tabs can come in handy in situations where you have two competing calls to actions, or perhaps you would prefer having the social media buttons closer to the end than the beginning.
Additionally, remember to include instructions regarding how to submit feedback -- either through a provided link or button. And lastly, always include a prominent way to confirm entries. Remember, no matter how enticing your giveaway sounds, consumers must feel confident that their privacy is protected. Without providing reassurance, you risk losing credibility and trustworthiness.
With HubSpot's drag and drop functionality, you can easily add additional components such as videos, graphics, testimonials, and audio clips. Just double-click on the component you want to insert and drag it into place. That said, you should avoid overwhelming your visitor with too much visual clutter. Keep visuals minimal and clean. Avoid banners, large headers, and clip art. Instead, focus on keeping things crisp and uncluttered.
Finally, remember that a good signup page doesn't only require great design; it requires great psychology. Users shouldn't feel pressured to register during their visit. Give them room to breathe and enjoy.
Let's say you wanted to send emails to visitors who opted into your newsletter. How could you improve upon that experience? There are several reasons why sending a welcome note is beneficial. First, it provides another point of connection between you and subscribers. Second, it reminds readers that you care about their preferences and interests. Lastly, a friendly tone shows appreciation for the customer's willingness to open communication with you.
A welcome email template is included with every subscription package. While it was designed specifically for newsletters, it works equally well for promotional emails and regular correspondence. Additionally, it includes a prewritten letter explaining your intentions with the reader. Feel free to replace the words "Dear Subscriber" with whatever feels best for your industry.
So far, we've focused mostly on desktop applications, but mobile apps exist for both Android and iOS platforms. These versions contain slightly fewer features than their counterparts due to limited processing power and storage capacity constraints. However, mobile app developers often utilize simplified layouts and streamlined navigation to reduce load times as well as conserve internal memory usage.
Here, we will explore how to optimize mobile signups. Mobile signups differ somewhat from standard ones but follow essentially the same principles. Before publishing anything, test your mobile version thoroughly. This means testing with various devices and operating systems to determine compatibility issues.
Your mobile signup should consist of a header image, background color, font style, and iconography. As mentioned earlier, including a logo or branding imagery conveys professionalism and builds trust among viewers. Furthermore, incorporating icons and illustrations can make navigating menus less cumbersome. Last but certainly not least, choosing a light theme allows for better readability in low-light environments.
For optimal results, mobile signups should incorporate short lists and multiple choice questions. Lists encourage visitors to narrow down choices and limit distractions. Multiple choice questions promote quick decisions and prevent confusion. Short answer answers tend to yield higher conversion rates compared to long ones.
Lastly, keep the overall layout as uncomplicated as possible. Minimalistic designs convey simplicity and ease of use. Long lines of code distract users' eyes away from crucial information. Focus on keeping things readable and concise.
In summary, learning how to create a basic HTML5 form in minutes is useful for any marketer. Whether you're trying to generate leads, grow a subscriber base, or simply manage client communications, knowing how to embed forms on websites is critical. Our intuitive interface makes editing forms straightforward, regardless of technical expertise level. So go ahead and get creative!
Email opt-in pages act as gateways to your inboxes. On these pages, users agree to subscribe to your mailing list and become eligible to win giveaways. Email opt-in pages are very similar to signup pages, except rather than registering for services, they request permission to join your mailing list. After completing the requested tasks, users gain full privileges to participate in your promotions.
Answering common questions about the purpose of an email opt-in page is key to crafting a compelling headline. What does your target audience want? Do they know how to unsubscribe from future mailings? Or is the goal merely to gather names and addresses for future sales pitches? Should you inform users that they can stop receiving emails at any time? Is it okay to ask for the user's consent to track behavior trends?
All of these questions revolve around consumer expectations and privacy laws. Be mindful of these regulations to protect your users' rights. Some states impose strict penalties for violating ePrivacy legislation, so be careful not to cross state borders unintentionally.
Another thing to consider is the number of emails you plan to send out. Sending too many invites can annoy your audience and turn off prospects. But sending too few invites can result in missed opportunities. Try experimenting with different numbers to figure out what generates the highest response rate.
 Send emails at scale

