 LIMITED SPOTS
All plans are 30% OFF for the first month! with the code WELCOME303
LIMITED SPOTS
All plans are 30% OFF for the first month! with the code WELCOME303

LIMITED SPOTS
All plans are 30% OFF for the first month! with the code WELCOME303

Email signatures are usually boring and unoriginal. But you can spice up yours with a customised signature block using Microsoft Word on a PC running Windows 7 or later versions. If you’re looking to keep it simple but still want something unique for every job application or personal message, this guide will show you how to make one from scratch.
A signature block is just a single line at the end of each letter sent via email. It contains all the necessary details about who wrote the email, including their name, title (e.g., CEO), company information (phone number, address) and possibly other relevant links. The most common use for a signature block is to include your contact information, so people know where to find you if they need to get hold of you urgently. You should also include any relevant social media profiles such as Twitter, LinkedIn and Facebook. Signature blocks have been around since the 1980s when computer terminals couldn’t display graphics — they were used instead to type out letters, numbers and punctuation marks. They haven’t changed much over time except for being tidier than ever before.
The best way to learn what goes into making a good signature block is by creating one yourself. Here we go step-by-step…
Signature Block 1: Simple Contact Information
This first example uses basic formatting guidelines along with some useful Microsoft Office templates which cover everything from business correspondence to birthday cards. This particular template comes from Vertex42's Free Templates collection.
1. Open a new document in Word 2016 and click File " New Document. Or right-click anywhere within the Ribbon tab and select Insert " Text Box. A box will pop open displaying several tabs called Headings, Lists, Borders etc. Select Blank Line under Border Tab. Click inside the newly added field then press Ctrl + B to set its width to 0 pixels. Right-click the empty space again and choose Format Field...
2. Go to Font dropdown menu and pick a font style/size you would prefer. Then check Apply format to current field only and OK. Next highlight the entire phrase “Your Name here” and change its size as desired. To adjust spacing between characters, hover over Home ribbon icon and drag left or right until you reach preferred settings.
3. Highlight the three words below the highlighted phrase and resize them accordingly. For the sake of simplicity, let’s say you want to shrink them by 5%. Hover over Home ribbon icon once more and drag down slightly to reduce the height of these sections too. Finally, highlight the two lines above the last section and shrink them by 15%—this will separate the signature block from the rest of the content.
4. Now follow these steps one by one:
a. Type in Your Address here. Under Header Labels, change Firstname to Personal Info. In Email Fields, change Full Name to Personal info.
b. Below Your Address here, input Phone Number. Change Area Code and Exchange to 000. Make sure Country code matches location country code in the phone number. Set Telephone area code to 00.
c. Input Mobile Number. Again, under Header Labels, change Phones Numbers to Mobile. Leave Default Mailbox unchecked because there isn't enough room for us to fit multiple addresses in this column. Also leave Display Name blank unless you want to give your mobile phone number a nickname.
d. Above Your Address here, enter Company Name. Under Business Details, put your full legal company name. Check Use same fields as contacts for matching names.
e. Enter Additional Notes. Add anything else you'd like to share with recipients such as website URLs, mailing lists, etc.
f. Create another line after Additional notes and save the changes. This creates extra separation between business information and additional notes.
5. Once finished adding the data, insert a breakline (Ctrl + Enter). We recommend doing this even if you don’t plan on sending an actual email.
6. On top of the page, scroll down till you see a small white bar labelled Footer Tools. Drag it to the footer position (bottom of the screen.)
7. At the bottom of the window, you'll now see four icons appear. These represent different areas of the footer.
8. Select Table Tools. That opens up options related to tables, cells and rows.
9. Choose Cell Horizontal Rule.
10. From the Style dropdown, choose Solid horizontal rule.
11. Double-click the cell directly beneath the word “Footer” to open up customization tools.
12. Select Modify Cells….
13. Scroll down till you spot the following sentence: “Additional information regarding this letter may be found on our website.” Delete it.
14. Instead, paste in the URL of your site or blog underneath this sentence. Make sure you update the hyperlink to match the domain and file path of your own webpage.
15. Press Enter and watch the magic happen!
16. Save the final version of your signature block as a.docx file. Keep it handy for future references.
A signature block serves one main function: it gives readers easy access to your contact information without having to look through a long list of names and titles. However, it could also act as a catchall for any additional notes you might want to share with others. It’s basically a quick reference point for anyone interested in contacting you further. And while professional companies often use signature blocks on important documents, individuals tend to ignore the feature altogether. Don’t worry though, with just a few tweaks you can turn your standard signature block into a super impressive one.

Yes, they absolutely do. According to research conducted by BrightLocal, nearly half of U.S.-based consumers said they read their email messages completely. When asked why they did this, 49 percent cited convenience and 35 percent mentioned the ability to respond quickly. So it makes sense that many people opt not to take advantage of the convenient signature option available in the compose window. Thankfully, there are ways to incorporate a signature block into your everyday routine.
If you send hundreds of emails per week, consider setting up your default mail client to always append your signature onto outgoing messages. Alternatively, try signing off regularly throughout the day. Many online services offer users the opportunity to sign off daily or weekly reminders. There are even apps dedicated to helping you manage your digital signature across various platforms. One popular app is SignNow, which lets you seamlessly write out signatures on iOS devices.
Another great solution is Gmail's native signature tool. With a little tweaking, you can transform your signature block into an eye-catching graphic. Simply follow these instructions:
Open a new Google Doc and head to Layout Options " Design.
Click Edit Page Elements....
From the Page Element Types dropdown menu, select Image Map.
Select Upload image...to browse for your signature logo.
Once selected, hit Done.
Change the Width value of the map element to whatever feels appropriate. You can play around with colours, fonts and sizes to suit your preferences.
When done, switch back to Normal view and tweak the positioning of elements to your liking.
Hit Preview Changes...and wait for the magic to unfold.
You're almost ready to send out those emails now! Just remember to edit your signature whenever you start typing in a new message.
Adding a signature to an email can sometimes feel difficult. That's especially true if you've never written one before. Luckily, Microsoft has made it extremely user friendly with built-in functionality. All you really need to do is copy and paste text into a designated box. Follow these simple instructions:
Go to Settings " Accounts " Emails " Send me notifications about new emails. Enable Turn on notifications.
In the Compose window, click the blue arrow next to Reply.
Type or paste in your signature and submit.
That's it! While this method works fine on its own, it can become pretty tedious if you need to repeat it frequently. Fortunately, there are plenty of third-party programs designed specifically to simplify this process. By simply uploading your existing signature block, these applications allow you to customize and personalize a whole host of things beyond your inbox. Some examples include:
Gmail - An intuitive program that allows you to upload prewritten signatures straight to your account. Afterward, you can modify them however you wish.
Send Later - Another free service that takes care of the hard part. Allows you to design, preview and download custom e-signatures directly from your desktop.
DocuSign - Offers versatile solutions for businesses and customers alike. Whether you need to attach documents, images or signatures, this platform accommodates everyone.
For larger projects, you may require assistance from freelancers who specialize in designing unique features. Try finding someone on Fiverr or Upwork, both sites filled with skilled professionals eager to earn money completing tasks like this. If you’re unable to source help locally, you can also connect with remote workers worldwide via Skype.
Here's how to set one up.
Gmail offers the option for users to include their own custom signatures with emails they send out from within its platform. These can be used alongside any other type of signature you may want to use (e.g., "Sincerely" or "Respectfully," etc.). You've probably seen these types of signatures before when receiving an email from someone who uses Microsoft Office products as part of their job duties. Here we'll show you how to get started creating your own simple Gmail signature blocks.
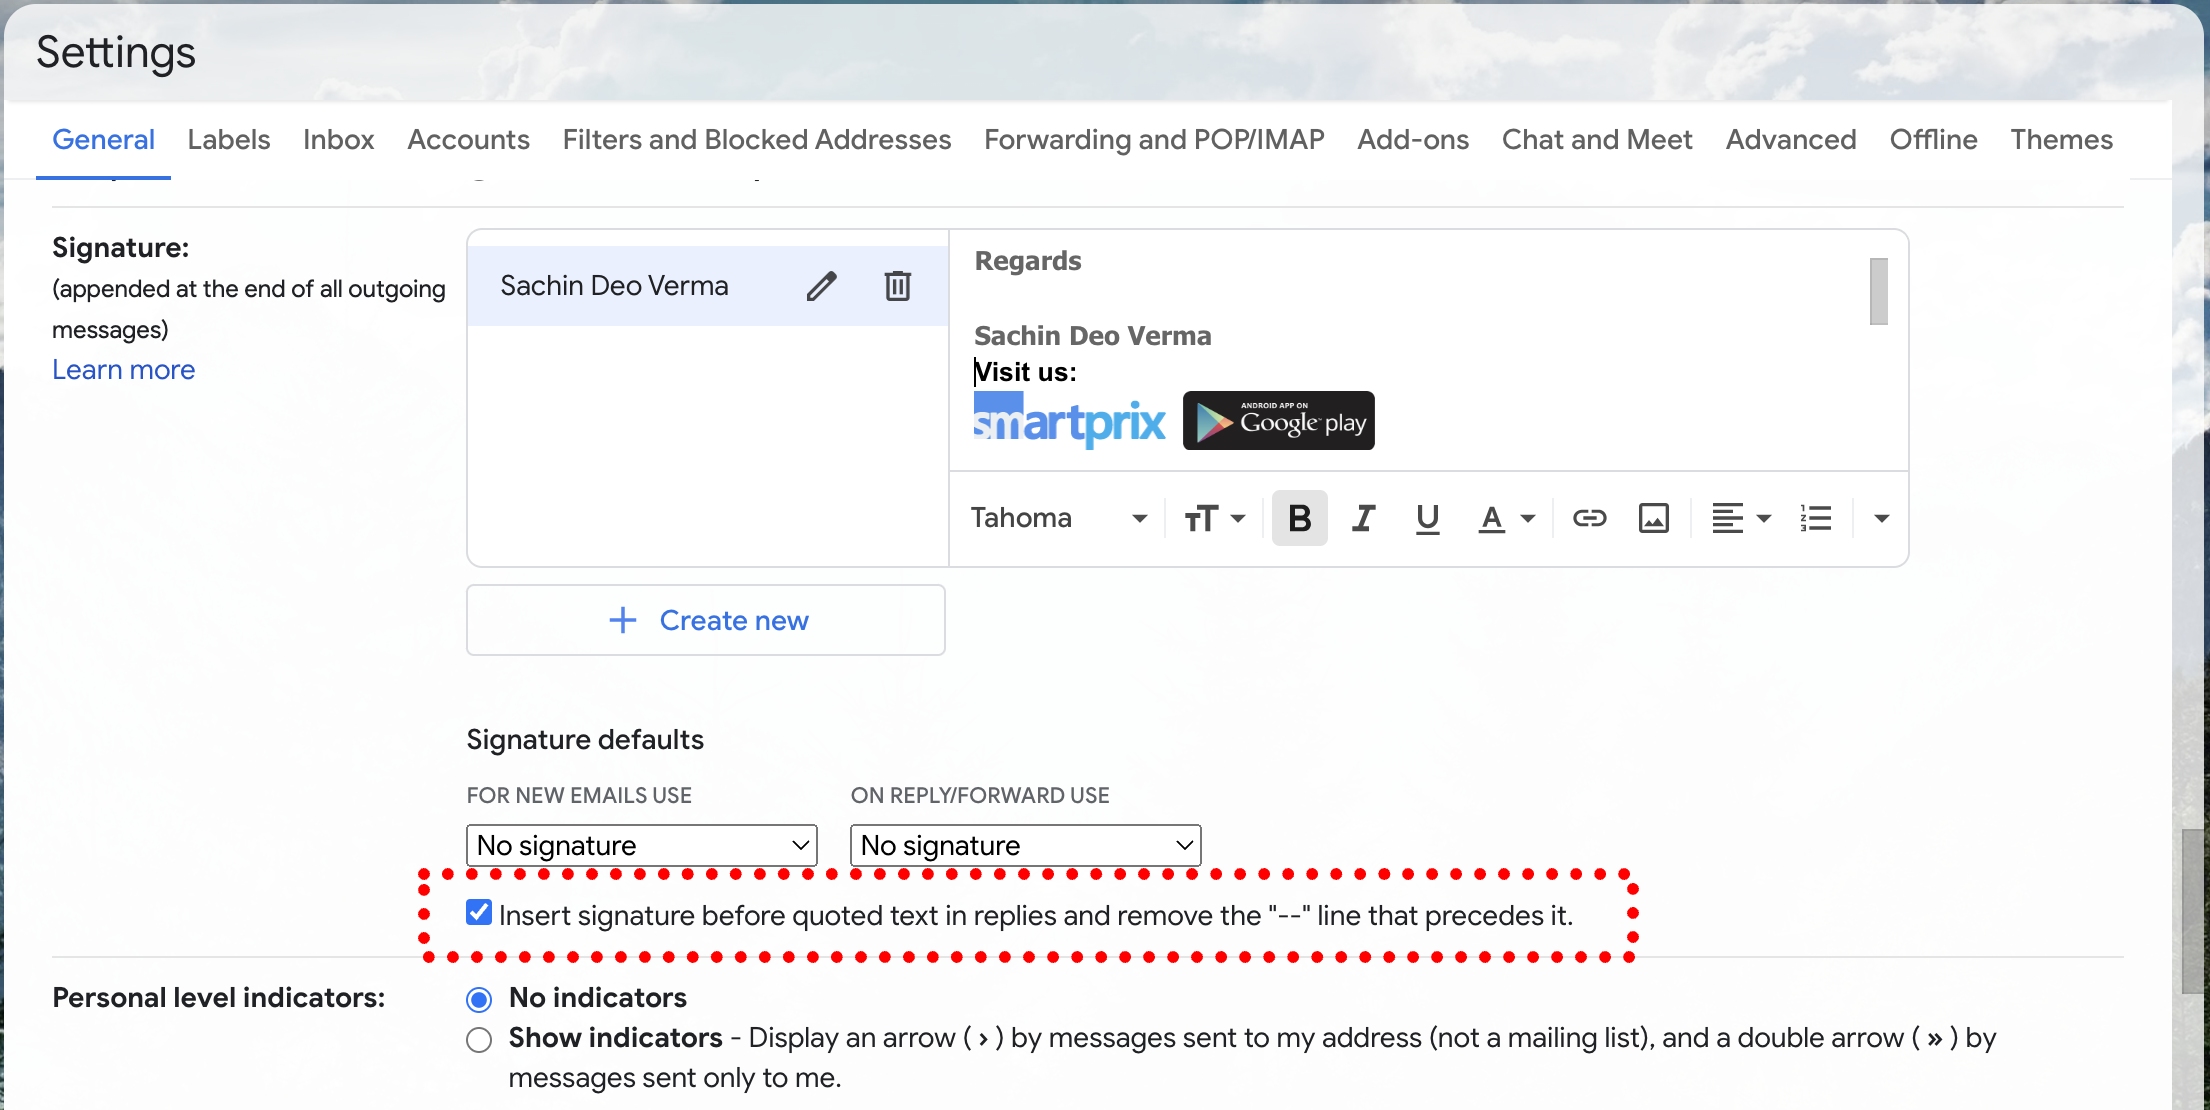
Before getting into the nitty-gritty details, let's first take a look at what exactly makes up a Gmail signature block. It consists of four parts - First Name Last Initial, Street Address Line 1 & 2, City/State ZIP Code, Phone Number. The following image provides a basic idea of how this looks.
So where did this come from? Well, it was actually created by Google itself so that anyone could easily make one just like it. In fact, there are tons of different ways to customize your signature if you go through all of the different available options in Gmail Settings > General tab. If you're interested in learning more about each section individually, here's some info regarding what each field means:
First Name Last Initial -- This will display your full legal name, i.e., John Smith. Your initials will simply be JSM.
Street Address Line 1 -- This would be your home street number. For example, 123 Main Street New York, NY 10001 would have 1234 Main St. listed here. Similarly, 1234 Main St, Apt 5A New York, NY 10013 would also list the same address but with two additional lines underneath it.
Street Address Line 2 -- This would be your home street name. So far, nothing has changed between those two examples above aside from adding more spaces in between them. However, it might help to think of it as having another line beneath them. That way, you'd see something similar to the below picture.
City/State ZIP Code -- This area of the Signature Block is meant to provide your city and state postal code. As such, it only displays the last three digits of your zip code. So if your zip code ends with 000 then that's all that appears under this heading. Likewise, if your zip code starts with 001, then that's what gets displayed instead.
Phone Number -- This portion of the Signature Block contains both phone numbers. One should be your primary work number while the second should be your personal cell. Again, no matter which number shows up first, the rest of the numbers after it won't appear until whichever comes later. Also, since it doesn't contain a space separating the numbers, you needn't worry about entering anything extra besides pressing enter once you finish typing.
Now that you know what it takes to craft a functional signature block, here's how to do it step-by-step using the steps outlined previously.
If you already have a user account associated with your current email provider (i.e., Yahoo! Mail, AOL), then skip ahead to Step 3. Otherwise, follow along with me. We'll start off with our default profile settings. Once things are ready, the final result should resemble what's shown in the screenshot below.
Step #1: Click on Add Account. Then select Other Email Provider followed by Next.
This brings us to the next screen. Scroll down to Personal Details and click on Text Field. Under Plaintext fields, scroll down until you find Additional Information and select Signatures. Type in whatever you wish to represent yourself. You can either leave everything blank or fill out the entire thing. Whatever works best for you.
Once done, hit Save Changes and continue onto the next page.
Step #2: Select Create Profile. Now, choose Edit Profiles. From here, go down to Signature Blocks and click on Edit Default Signature Block.
This time around, you don't need to sign in again because we haven't added any new accounts yet. Instead, open up your existing Yahoo!, Hotmail, or Gmail email account by clicking on the link provided by the respective service.
Next, log into your account and navigate back to the aforementioned page. At the bottom right corner of the window, you'll find a dropdown menu labeled With whom am I communicating?, followed by More Options... Clicking on that will bring up the most recent version of your default signature block.
Scroll down to the very bottom of the page and select +Add Signature Block.
In doing so, a pop-up box containing many preconfigured signature blocks will appear. Choose Simple HTML Source Editor.
You can now insert the signature block you made earlier. To do so, hover over the top bar of the editor pane and drag it anywhere you want on the webpage. When you release the mouse button, the editor pane with your newly inserted signature block will pop up.
Go ahead and copy the contents of the popup box and paste it wherever you want on the webpage. For purposes of demonstration, I chose to place mine inside a paragraph tag. Just remember not to alter the formatting whatsoever.
That's pretty much it for inserting signature blocks into Gmail. Feel free to play around with the dimensions and placement of your signature block as long as you keep the original formatting intact.
Note: Because I'm signed into multiple email services, I had to separate out my signature blocks per email client. Doing otherwise wouldn't allow me to view all of my signature blocks together.
Your signature block should now appear in every single message you write from your computer. But what happens if you receive a reply from someone else who hasn't configured their email client to recognize the signature you wrote? Or maybe you sent out an email to someone whose device uses a larger font size than yours? There's good news for you. Simply adjust the width and height values in your CSS file located at C:/Users/"user_name"/.gmail/freebusy.css. Adjust accordingly depending on whether you intend to shrink your signature or enlarge it.
For instance, if you want to enlarge it, increase the value assigned to maxWidth property. On the other hand, if you want to reduce the size, decrease the value of minHeight property. Do note that changing those values too drastically may cause problems.
By adjusting the properties mentioned above, however, you can ensure that your signature retains its normal appearance even when viewed on devices that support wider screens.
The reason why you can't view your signature block in Outlook is because Outlook doesn't allow third party apps to access certain features. Unfortunately, there aren't any alternatives to solving this problem unless you decide to host your email conversations elsewhere.
However, I highly suggest against going outside of Gmail because of security reasons alone. Since signing in with your email provider gives others permission to read your messages, it poses privacy risks. Plus, since Gmail encrypts your data, it keeps snoopers away from reading what you say without authorization.
On the contrary, hosting your email conversations on platforms like ProtonMail and Tutanota prevents unauthorized viewing of private content altogether. Both of these popular providers encrypt your correspondence by default, meaning it's harder for people to intercept your messages. And unlike Gmail's encryption system, neither of these two offer end-to-end encryption.
But regardless of where your messages travel, whenever you send an email from a regular desktop app, it travels unencrypted across the internet. Sniffers can thus listen in to your conversation(s) and steal sensitive information contained therein.
When sending out digital documents via mail clients, files are often transferred in plaintext form. This allows outsiders to see what's being communicated, including passwords, credit card information, bank statements, photos, etc. While encrypted communication protocols exist, they still require decryption keys, making transmission vulnerable to eavesdropping attacks.
Also, if you don't feel comfortable giving strangers unfettered access to your online communications, consider taking advantage of secure messaging tools like Signal, Telegram, WhatsApp, Confide, Wickr, Tox, etc.
To save time, you can go straight to your email program's configuration panel and change its preferences to reflect your desired signature format. Head over to Preferences " Composer and check out the signature formats offered by your email software. Below is a snapshot of what the signature block creator looks like in Apple Mail.
From the selection given, choose Customized and input your preferred layout. Notice that you can modify various aspects of the signature block, such as spacing, color scheme, background colors, fonts, etc.
If you prefer, you can opt to download a template from the company that built the feature. Some companies, such as Constant Contact, offer templates specifically designed for business owners looking to integrate their signature functionality into their workflow.
Signatures are the last thing you read on an email. They’re usually short texts at the end of them with some personal details such as phone numbers and addresses. Emails without signatures look sloppy and unprofessional. But how can you make yours stand out?
There are many ways to go about adding one. You could use Google Docs for creating it, but we don’t think it will suit all needs. Here are different methods to help you find what works best for you.
You probably know Microsoft Office because most people work on Windows machines. If so, here's how to set up a signature block using Word 2016. The process might be similar in other versions of Office too.
1. Go to File " Options " Mail (or Signature) tab. This opens a new window where you'll see options related to mail accounts. Look for Signatures under Accounts list. It has two parts - Personal and Business. Enter your full name first, then enter your address followed by your title if there is any.
2. Click Add field. In this step, select Name from dropdown menu. Then choose Text Field or Rich Text Box depending upon whether you want only plain-text fields or rich formatting. Finally, type your preferred signature into the box provided.
3. Once finished, click Save Changes. Now whenever someone sends you emails, they should have your custom signature embedded within their messages.
But if you're not comfortable working with office programs, you may prefer a simpler way to create a signature block online.
Here's how to add a signature block in Gmail app
If you use Gmail, follow these steps below to create a simple signature block online.
1. Hover over Compose button and click Edit Message. A small popup appears showing various icons along the top bar. At the very bottom right corner, click +New message form.
The pop-up shows four sections — Basic info, Address, Attachments & Links, and More. Use whichever suits you. For example, you can start off by typing your basic information such as address, mobile number etc., and finish off by attaching files or links.
Once done, hit Done. Your newly created signature block goes immediately after the To line of every email you send.
2. Alternatively, you can also drag and drop the signature block onto the compose screen itself. Thereafter, it gets inserted into each outgoing email.
In both cases, you can customize the appearance by changing font styles, colors, and size. Also, you can change its position by moving it around.
To delete a particular signature block, simply hover over it and a cursor icon appears indicating when you can remove it.
Note that you cannot edit the existing signature blocks once added. So, if you’ve already used the above method, feel free to skip ahead!
Gmail allows users to quickly insert their own personalized signatures anywhere in the email. Follow these steps below to get started:
1. Select Tools " Insert “ Header/footer…”
This brings up a pop-up window containing several tools which allow you to format and design your header and footer. From left hand side panel, scroll down and select Create New Email Signature...
A new window pops up asking you to either import an HTML file or link to a website. We recommend selecting Link to Website since it gives more control over content layout.
2. Choose Web page option to open the web browser. Navigate to the site where you saved your signature file. When done, copy URL of the webpage.
3. Next, head back to the previous window. Paste the copied URL into the field given next to Site URL. Hit Browse and browse to the location of your signature file.
4. Copy and paste the contents of the file into the space given next to Content. Again, use Preview feature to check the final result before saving changes.
5. Checkmark Include signature image. By default, images aren't included in the signature block. However, you can still upload one via Upload Image. Simply navigate to the desired picture and hit Open.
6. Give appropriate title to your signature block. Type in something meaningful.
7. Lastly, adjust Font Size according to your preference. Feel free to play around with the settings until satisfied.
Click OK to save changes. That’s it! Whenever anyone receives your email, they would now see your customized signature. Note that unlike the earlier methods discussed earlier, editing the existing ones is impossible.
However, if you wish to modify it further, try the following third party apps.
Using the aforementioned method, we have managed to build our signatures easily. But sometimes, it would be nice to include additional details such as social media handles, job titles, company names, or even photos. Luckily, there are plenty of services available which offer premium templates for sending better resumes, cover letters, business reports, newsletters, event invitations, or even invoices. Some of them provide ready made headers and footers. Others let you download high resolution graphics and embed them into documents.
For starters, try visiting Template.net to search through thousands of templates. Or visit Canva for designing impressive posters, flyers, presentations, infographics, charts, banners, and much more. And yes, you can always convert PDFs into PowerPoint slideshows too.
Another alternative is Zoho Writer. Its Templates section lets you view hundreds of professionally designed resume templates. All you need to do is switch things around and add your details. Other than that, you can use Document Generator to generate beautiful looking Resumes, Cover Letters, Reports, Invoices, Events Announcement, Newsletters, and Newsletter Posts.
Zoho offers 30 days moneyback guarantee. Plus, signing up for a yearly subscription costs $8 per month, making it affordable enough for freelancers, businesses, students, writers, and everyone else who wants to try out a few services.
Lastly, if you really love getting creative, sign up for 99Designs. This platform connects designers with customers worldwide, allowing them to submit unique ideas for products and projects. Designers bid for your project based on creativity, originality, quality, functionality, price, deadline, portfolio, client satisfaction, among others.
As long as you abide by contest guidelines, you won’t ever run out of inspiration. Moreover, you get paid while doing something fun that helps improve customer experience. Of course, you must pay a fee of 15% for winning contests.

When writing emails, it’d be great to mention your current employer, department, or company name. Unfortunately, it isn't possible in Gmail natively. Fortunately, you can manually type those details.
Follow these steps below to keep track of your company name:
1. On Android device, tap the three vertical dots located at the upper right of the compose window. Scroll down to Find People. Tap Manage Companies.
2. In the resulting popup menu, you’ll notice a Company row with five columns including Company Name, Phone Number, Job Title, Department, and Picture.
3. Tap Company Name. This column contains the company’s official name. Make sure to doublecheck spelling errors.
4. Do likewise for your organization’s phone number.
5. Head over to the same row where you found your company’s name. Under Job Title heading, tap Change Job Title. This displays a popup window giving you ample opportunity to rename your job description. Try replacing it with whatever you deem fit.
Alternatively, you may opt to write everything yourself. After all, it’s entirely up to you!
 Send emails at scale

