 LIMITED SPOTS
All plans are 30% OFF for the first month! with the code WELCOME303
LIMITED SPOTS
All plans are 30% OFF for the first month! with the code WELCOME303

LIMITED SPOTS
All plans are 30% OFF for the first month! with the code WELCOME303

If you're new to HubSpot or are looking for an easy way to organize your data, importing contacts is one of the best things about it. You can use this feature to create groups with people who work at multiple companies, for example, so that when they send emails from their personal email address, only those addresses will show up on the recipient's desktop instead of every company they've ever worked for. HubSpot also makes it very simple to sync all of your contacts across different devices and platforms.
There are three ways to add someone as a contact within HubSpot—you can either upload them yourself using CSV files, import data directly through LinkedIn, or by adding them via SMS/text message. If you already have a spreadsheet full of phone numbers and names but want to make sure everything gets uploaded correctly, we recommend creating a test account first and uploading some sample information manually before moving onto more important stuff. Once you’re ready, here’s what each method entails.
1) Adding Contacts Using CSV Files
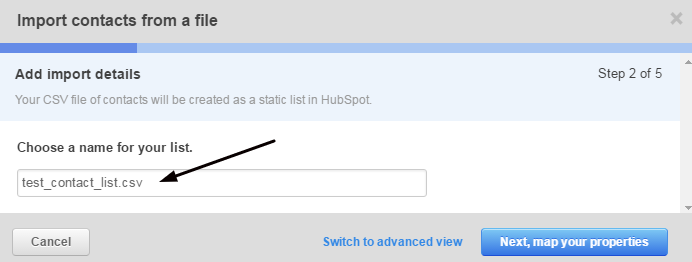
This is arguably the easiest option if you don't need any special features like grouping or syncing. To start, head over to Contact Management " Import Contacts. On the following screen, click Create New File Upload. This should open the file browser where there’s a file called “Contact List". Click Choose File next to the dropdown menu and select.csv file. Then, hit Save.
2) How to Add Your Own Data Into HubSpot
You can skip steps 1-3 above and jump right into step 4. However, if you’d rather not go through the process of making a brand new file, we encourage you to follow these basic rules:
Make sure to name your file something meaningful (e.g., ContactList).
Go ahead and fill out all necessary fields such as First Name, Last Name, Email Address, Phone Number, etc.
Also include additional columns, such as Company, Job Title, Department, Website URL, Birthdate, Gender, Date Joined, Notes, etc.
Finally, be sure to save the resulting text document after saving changes.
Once you’ve completed these four steps, you’ll see a summary page saying Successfully Imported. Now, you can continue testing the accuracy of your imported data until satisfied. One thing worth mentioning is that HubSpot has a limit on the number of records you can upload per day, which means you might have to repeat this procedure two days later if you try to import too many records at once.
Now that you know how to get started, let’s discuss another common question related to this topic: Can I import Activities into HubSpot?
3) How Do I Import Activities Into HubSpot?
The answer to that depends entirely on whether you prefer to view other users' profiles chronologically or alphabetically. As mentioned previously, if you just want to keep track of everyone who works at your current job without worrying about previous jobs, chronological order is probably better since most people won't care anyway.
To choose between viewing contacts chronologically or alphabetically, simply check off Sort my Contacts When Viewed Chronologically under Preferences & Features. Afterward, tap Finish Setup. The final screen shows a link labeled “Sort My Contacts" which opens up a pop-up window with a button labelled “Chronological Order." Hit that button, confirm the sort order, then close the popup.
4) Grouping Contacts In HubSpot
One useful feature unique to HubSpot is its ability to automatically categorize similar contacts together based on certain criteria. For instance, say you had several colleagues working for a single client last year, and now you’re trying to figure out which person handles what again. While searching online isn’t always effective because results aren’t always accurate, grouping contacts according to specific parameters allows you to quickly find relevant info.
In addition to being able to filter contacts by title, department, and industry, you can also assign colors to individual categories. Here’s how it works. Head back to the main contacts management dashboard and scroll down to the bottom of the page. There’s a section titled Categories. Underneath this header, hit Show More Filters. At the top of this expanded panel, you’ll see a few preselected filters including Industry Groups, Team Members, Employees, Partnerships, and Invoices. These are great for finding people who work remotely, but you can adjust them however you wish depending on your needs.
After choosing whichever suits you best, hover over the category you want and press the plus icon (+), followed by Apply Filter. A box should appear asking if you want to apply this filter to existing members or future ones. Select Existing Member. Next, type in the values you want to set for the field. Afterwards, hit OK. Repeat these steps for each column you'd like to group separately.
Lastly, you'll notice that HubSpot offers automatic color coding options. If you want to change the default color scheme, head back to Settings & Appearance. From the Colors tab, look towards the left side of the screen and you’ll see a couple of colored boxes representing various types of contacts. Simply drag the slider next to whatever kind of contact you’d like to change around. And voilà! All matching labels will turn blue.
5) Syncing Contacts Across Multiple Platforms
As mentioned earlier, HubSpot comes with built-in functionality that lets you sync contacts across phones, tablets, computers, and even web browsers. Whenever you sign in to an app on Android, iOS, Mac, Windows, or Linux, your contacts will instantly update themselves. Just remember that anyone whose details you updated manually will still require manual updates whenever you log into a new device.
6) Sending Emails With Personalized Recipients Lists
For starters, consider having one master contact record for each member of your team. That way, no matter who sends an email, the recipient(s) will receive messages personalized specifically for them. But if you’d rather go old school, you can opt to customize your recipients lists on a case-by-case basis.
To access this setting, head back to the main settings page and scroll down to the bottom of the page. Beneath the header titled Customization Options, look towards the far right and you’ll see a section entitled Send Mail Templates. Below this header, you’ll see a dropdown menu containing several templates ranging from standard greetings to sales pitches. By selecting one of these, sending an email becomes much easier than typing out custom subject lines and body content every time.
Next, take note of the green bar underneath each template. It indicates your remaining character count—the higher, the fewer characters you’ll actually write. So if you feel overwhelmed by the amount of words contained within each template, perhaps you could trim excess verbiage beforehand. Finally, below the template selection area, you’ll see three tabs: Greetings, Messages, and Promotions. Each contains helpful suggestions regarding what kinds of content should typically accompany each respective template.
7) Setting Up Auto Replies Within HubSpot
Auto replies allow you to respond to incoming texts or emails automatically. Since HubSpot doesn’t provide native auto reply functions, you’ll need to employ third party apps like Boomerang, FollowUpThen, or FollowUpReminder. Whatever tool you end up going with, you’ll need to enter your desired responses individually while keeping formatting consistent.
8) Automatically Creating Calendar Events Via Text Message
Calendar events offer a convenient alternative to scheduling meetings with coworkers. Rather than calling them, you can send a quick text message that creates a calendar event straight away. Unfortunately, HubSpot doesn’t support automated creation of events unless you purchase a premium plan. Luckily, there are plenty of free tools available.
9) Changing Profile Pictures Without Logging Out Of HubSpot
Just like Gmail accounts, HubSpot user profiles come equipped with profile pictures that display alongside usernames. Therefore, changing yours can help enhance your professional identity. Unlike Gmail though, all you have to do to edit your picture is remain signed in.
10) Removing Duplicate Entries Through Bulk Operations
Duplicates occur frequently during contact imports due to typos or mislabeled entries. Don't worry, removing duplicate contacts is super simple thanks to HubSpot’s bulk operations function.
First, export your entire contact list as a comma separated value (.csv) file. Then, download Notepad++ and open up the exported file. Find all instances of John Doe in the list, highlight them, and delete them by pressing Delete + Backspace simultaneously. Continue doing this until your list looks clean. Lastly, copy and paste the contents of the newly edited file into a blank Notepad++ file, replacing the original.
11) Migrating Old Contacts Into HubSpot
With so many different options for creating, managing, and updating your company's customer data in one place, it can be difficult to choose which is best for your needs. And if you have not yet moved over from another CRM system, finding yourself with two or more platforms to manage might make choosing even harder.
HubSpot has long been considered as one of the top choices when searching for a robust CRM platform that will meet all of your business requirements. It offers great features including sales tracking capabilities, marketing automation tools, social media management, and much more. But what about adding new customers to your existing lists? Well luckily, there are multiple ways you can add your contacts to your HubSpot account. Here we'll go through each method and explain exactly what steps need to take before importing your contacts.
There are three methods by which you may want to transfer your contacts' information from other systems into HubSpot. If they're already on separate databases such as Microsoft Outlook, Google Contacts, Apple iCal, etc., then simply export them using those programs, open up the CSV (comma separated values) file within a text editor like Notepad, and copy-paste them directly into the appropriate fields under Contact Management " Add New Customer.
If you don't use any of these popular applications but still have a large number of people to enter, you can manually create your own CSV files containing their names, email addresses, phone numbers, birthdays, and additional details. Then just follow this same procedure above—copy-pasting them into the right spots. You should also check out the various types of contact records and record formats available here: https://support.google.com/contacts/answer/6397265#format_csv.
Finally, if you have the option to get in touch with your IT department at work, they probably used something called Web Services Exchange (WS-E). WS-E allows companies to exchange certain types of data between software applications without having to rely on third parties. This would mean that if your company uses WS-E, you could potentially upload your contacts via a web browser instead of copying-and-pasting them into HubSpot. However, this feature isn't widely supported across devices, so it may prove somewhat unreliable.
For now though, let's focus on the first two methods listed above. We've provided some links below where you can download free versions of both Windows and Mac OS X clients for exporting your contacts. Once downloaded, simply click on the icon to export your contacts. After the process completes, open up the.CSV file located within the application itself to view your exported contacts. Make sure to keep this.CSV file handy because once imported, they cannot be deleted!
The second most common way to import your contacts into HubSpot involves setting up an external database that contains your entire client list. The benefit of doing so is that you won't lose track of anyone who moves around during transfers. When you set up your initial contacts, you'll see a button labeled Import Data beneath every entry. Clicking on that link brings up a window that asks you to select the type of data you'd prefer to import—in this case, selecting Static List means that you provide only basic contact info rather than full name, birthday, gender, mobile phone, etc.
After clicking OK, you'll receive a message stating whether the import was successful. If everything goes well, you should see the following screen pop up:
As mentioned earlier, once uploaded, the contacts you added will remain active indefinitely unless you delete them individually. So whenever someone makes changes to their profile later down the road, you can update their information. To do so, head back to the main dashboard menu and navigate to Customers & Accounts " Manage Customers. Hit Edit next to each individual contact whose information you wish to change. From here, you can modify whatever information you like. For example, you can edit a person's address, change their phone number, or even move them to a different country.
However, HubSpot does offer a few limitations when editing profiles. First off, you must be logged into HubSpot as an admin user to access and make edits. Secondly, you must ensure that the edited field matches the exact title of the column in your original.CSV file. Otherwise, the changes will not reflect properly. Lastly, HubSpot automatically removes old entries after 24 hours regardless of whether edits were made successfully or not. If you plan on uploading hundreds or thousands of contacts, HubSpot recommends keeping backups of your data.
Now that you know how to import your entire list of contacts into HubSpot, feel free to try out several useful integrations that allow you to better interact with the data. Check out these resources for learning more:


How do I sync my iOS device with HubSpot? | How To Sync Your iPhone Or iPad Address Book Into Hubspot
How do I connect Gmail accounts to HubSpot? | Connect Multiple Email Accounts In HubSpot [Broken URL Removed]
Yes, absolutely! There are actually lots of reasons why you might want to do this. Maybe you have an updated version of your client list saved as an Excel spreadsheet somewhere else. Perhaps you need to send a mass e-mail to everyone on your list, or maybe you're trying to compare your current data against past performance benchmarks. Whatever reason you have, you can easily bring in your Excel spreadsheets into HubSpot to perform those tasks.
To begin, head to File " Open Spreadsheet. A box will appear asking you to browse for the Excel document you wish to import. Find the file on your computer and select it. Now hit Upload and wait until the process completes. Once done, you'll then see your spreadsheet appear in its respective tab.
Next, head back to Home " My Account " Settings " System Preferences and scroll down to find Integrate section. Ensure that Enable Integration is checked and click Save Changes. Finally, head over to Customers & Accounts " Customize Center " Create An Action. Select Send E-mail from Actions Library and fill out the necessary information. Next, select Mail Merge Options from Actions Library and enter your recipient's information. Hit Preview and test out your newly integrated action. If everything looks good, save your integration settings and repeat the process for any future actions you require.
Once again, you'll see your spreadsheet show up within HubSpot once finished. Just remember that unlike the previous examples, this time your data will stay inside HubSpot no matter what happens.
In order to import an Excel file into HubSpot, you'll need to purchase a license. Head over to the Pricing page to determine which package works best for your organization. The cheapest option is $9 per month for unlimited users, while Business Plus gives you 10 GB storage space plus unlimited users. HubSpot provides a 30-day money-back guarantee, so you can always request a refund if you decide it doesn't fit your needs.
Once payment is complete, you'll see a confirmation screen stating License Number XX-XX-XXXXX. Simply log in to HubSpot, head to Home " My Account " Administration, and look for Licenses. Under Installations, you'll see the installed apps along with licenses associated with each app. Double-click on the Excel app, followed by Choose Existing Installation.
From here, select Browse Files, locate the Excel file you wish to integrate, and press Open. Now drag it into the corresponding area titled Workbook 1. Press Apply and continue integrating any remaining sheets you wish.
Keep in mind that you can opt to install multiple instances of HubSpot depending on your size. Depending on the licensing agreement, installing multiple installations could cost less overall since each installation costs based upon the number of concurrent users. For instance, a single licensed user will pay $19 per month, whereas five paid users will only pay $13 per month.
Unfortunately, HubSpot currently does not support importing LinkedIn connections. That said, you can search for individuals in the People pane on the left side of the screen, then double-check to make sure their relationship status is connected. If it is, you can start sending messages straight away.
Alternatively, you can always ask friends to share their LinkedIn connection with you. They can either post their personal Facebook wall or send you direct messages. These methods will give you a quicker response rate than browsing memberships.
No, there aren't any hard restrictions regarding the total number of contacts you can add. However, HubSpot requires that you maintain a minimum level of activity in order to retain your login credentials. Therefore, you may notice problems if you attempt to add too many contacts in a short period of time. Additionally, HubSpot imposes a maximum limit of 100 million customers and 200 billion interactions annually.
If you're using HubSpot for email marketing, customer relationship management (CRM), or sales tracking, it can be difficult to keep track of your client's names if they've already signed up on another service like Gmail or Yahoo Mail.
Luckily, there are ways that you can import lists with their associated emails so that you don't have to worry about losing them when you switch over from one platform to the other. Follow these steps to find out how to import contacts into HubSpot!
In this article, we'll show you how to use Google Contacts as an example because most people who need to move their data will also have a large number of contacts saved in Google Drive or similar cloud storage services. However, the process is largely identical regardless of which app you used to create your contacts list.
We also suggest importing your new contacts at least once every two weeks to avoid any problems later down the line. If you lose someone important, HubSpot provides tools to help you recover lost contacts.
So let’s get started by explaining what contacts look like within HubSpot first...
HubSpot Contact fields
When creating a brand-new account in HubSpot, users may opt to save all of their contacts information directly onto the site itself. This means that you won’t necessarily receive an email notification whenever someone changes their name or phone number -- but you should still check back occasionally anyway.
However, if you want more control over where and how often you sync your contacts, try setting up automatic updates through Google's My Account page instead. By doing this, you ensure that your contacts stay current without having to rely on HubSpot alone. You'll see the option to set this feature up below under "Sync your existing contacts."
Once you choose whether to automatically update your contacts in HubSpot, click Create Account. Then select Sync my accounts and start syncing.
The next step involves downloading your contacts list from either Gmail, iCloud, or whatever else provider you chose above. Once downloaded, open up the files in Excel or some other spreadsheet program and sort the rows alphabetically to make things easier. Also note the names of each person and write those down somewhere safe just incase anything happens to your computer.
Now that you know how to download your contacts, here comes the fun part: actually copying them into your HubSpot account. To begin, click Import/Export Data on the left side menu bar. This opens up a small window containing several different options. Choose the Import tab.
Importing contacts into HubSpot
On the following screen, scroll down until you reach Import From Another Application. Under Other Applications, pick File Upload. A pop-up box will appear asking you where exactly you'd prefer to upload your contacts. Select Browse and navigate to wherever you've stored your.csv file.
Then hit Open. The next prompt asks you to confirm that you wish to proceed. Click Yes. Finally, wait for HubSpot to finish uploading your contacts. It might take awhile depending on the size of your list!
After everything has uploaded successfully, go ahead and refresh the main screen and then view your newly imported contacts. Now that you've got your contacts inside your HubSpot system, let's talk about adding them to specific campaigns.
Adding contacts to specific campaigns is easy. Just hover over the relevant campaign on the right sidebar and press Ctrl + C to copy its details to the clipboard. Go back to the previous screen and paste the details from the copied cell into the appropriate field. For instance, if you wanted to add John Doe to your "New Clients" campaign, you would highlight the New Client text input field and then enter his full name underneath it.
Next, type his email address beneath the corresponding row. When you finish, hit Enter again. Repeat this process for everyone on your list. Make sure not to skip anyone by mistake! That could seriously damage your credibility since clients tend to notice missing entries for certain individuals.
You'll now see your added contacts reflected throughout the dashboard. Of course, feel free to change the category labels or even rename individual columns as you please. But remember, always leave enough room for future additions!
One thing worth mentioning is that HubSpot makes it incredibly simple to delete entire columns within your table. In fact, deleting whole rows is far simpler than deleting single cells. Simply double-click the column header above the offending entry and drag across all empty spaces to erase the entire row.
Another tip to consider is that HubSpot offers an extremely handy search function. So after you've populated your own custom columns, it's smart to organize them further by searching for particular keywords. Doing this helps you quickly identify potential leads based on common interests.
For example, maybe you sell children's books online. Let's say you were looking for a buyer who lives near Seattle. Instead of hunting through hundreds of contacts yourself, why not run a quick query such as "Seattle buyers?" and see if HubSpot brings back any results?
Of course, you could simply browse through the records ourselves too. But wouldn't it be nice to have something automated to handle this task while saving us time? Well, thanks to AI technology, that's precisely what HubSpot does. Here's how it works...
As mentioned earlier, you can easily transfer your contacts between platforms via HubSpot's Export tool. This allows you to convert your.csv file into a.tsv format, meaning that your contacts are properly organized and ready to edit.
To access the Export utility, head back to the homepage and click on Tools & Utilities on the navigation bar. Next, locate the Export button located at the top of the screen. Hit it to bring up a dropdown menu.
From this menu, choose Exports & Reports. Afterward, a popup window will display asking you for confirmation to execute the action. Proceed by clicking OK.
A few moments later, your exported file will load. Press Ctrl + S on your keyboard to save the document locally. Then open up the resulting.tsv file and enjoy!
That concludes our tutorial. Hopefully, you learned plenty of useful tricks during the process. And best of luck keeping your contacts updated everywhere!
 Send emails at scale

