 NEW: BrowserGrow.com is now available!
AI agents to grow your business & do your marketing on autopilot in your browser
NEW: BrowserGrow.com is now available!
AI agents to grow your business & do your marketing on autopilot in your browser

NEW: BrowserGrow.com is now available!
AI agents to grow your business & do your marketing on autopilot in your browser

Microsoft 365 Mail has a feature called "Mail Merge," which allows users to create customized letters or other documents and then use them as templates for bulk mailing. While it's not available in all editions of Office 365 (including Microsoft 365), if you're using one that supports it, this guide will help you get started with creating your first document.
Let’s take a closer look at how to perform a mail merge on different versions of Office 365—and find out what exactly a mail merge is! We'll also explore some alternatives to performing a mail merge.
To begin, open up any template letter or form that you have access to via File " New. You should see options to select either Create new blank document or Use existing document. Selecting Create new blank document gives you more freedom than selecting Use existing document because you won't be restricted by content already present within the document.
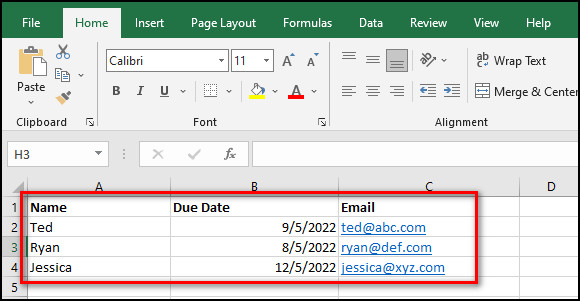
Select Insert & Tables, located under Ribbon " Home " Editing Tools. This opens up the table editor where you will insert data into rows and columns. First, let's make sure we've got our fields set correctly. In my case, they are titled Name, Address 1, City, State Zip Code, Email, Phone Number, Fax, Message, and Yes/No (a checkbox). If you don't know much about spreadsheets, here's what each column means.
You may notice some formatting issues when inserting text into these cells, such as extra spaces between words. To fix those, right-click on the cell containing the problem and choose Format Cells... From there, click Special and uncheck Paragraph group box beneath Alignment section. Click OK once done. Now, add information to each row until completed. When finished, just hit Enter. Your results should appear like below.
If you want to change the font style slightly, go to Font dropdown menu and select something else. Otherwise, leave everything defaulted.
Now, head over to File " Options " Mailings " Mail Merge. Here, enable Quick setup and drag in the letters you created earlier onto the screen. Make sure to pick a recipient list and enter your address details. Once you're satisfied with your settings, select Next.
On the next page, review your choices and click Finish. A few minutes later, you should receive your finalized letter through the mail.
Outlook uses the same process as Word above, except for a few minor differences. For starters, you cannot format individual cells as per previous instructions since Outlook automatically formats all cells upon importation.
Another major difference is that instead of going to Table Editor, you must now go to Data Form Assistant. Go ahead and follow the steps outlined previously. However, after completion, you might encounter errors saying that certain values were inserted incorrectly. These could occur due to improper spacing or incorrect entry of characters.
For example, if my phone number was entered "1234567891" but formatted as 123 456 789 10, Outlook would say that the value wasn't properly inserted. The solution is to manually edit these numbers so that they match their original entries.
Here's another tip regarding entering telephone numbers. Instead of separating digits with commas, try separating them with hyphens. Hyphenated numbers tend to work better against spam filters.
Also, ensure that none of your contact info gets lost during transfer. It's common practice for people who don't pay attention while working on complex projects to accidentally delete sensitive pieces of personal information. To prevent this from happening, copy and paste important information directly onto sheets before importing to avoid loss.


Excel mail merges are similar to word and outlook mail merges, however, there are slight differences. First off, Excel doesn't allow users to modify specific cells' alignment, unlike its counterparts. Secondly, Excel only imports contacts into the main body of the sheet, whereas Outlook does both. Lastly, excel requires that you download additional software in order to run a mail merge.
In short, the following describes the procedure to launch a mail merge in Excel 365.
First things first, you will need to convert your data into.csv files. Head over to Sheet tab " Design ribbon. Then, locate Export button and click it. Check whether you'd like to save your file as Comma Separated Values (.csv) or Spreadsheet CSV (.xlsx). Choose whichever suits best for your situation.
Once downloaded, extract the contents of the.csv file onto desktop. Open the newly extracted folder and double-click on MyData_[number].xlsx. Upon opening, Excel will ask if you wish to install additional packages. Do so. After installation, Excel will prompt you to close the window. Hit Close.
Afterwards, your spreadsheet will load. On the left side, you should see a series of tabs labeled Contacts, Questions, Results, etc., indicating that you successfully imported data. You can proceed to editing your document further by clicking on the desired tab.
Next, navigate to Edit mode by selecting View " Show / Hide Grid Lines. Drag in the letters you created earlier onto the spreadsheet. Ensure that you place them inside the bounds of the actual question columns. Also, remember to include the appropriate separator bar.
Head back over to Layout view and type in your contact info. Below, you'll find a preview of the final product. Right now, we haven't configured anything yet. That happens in the Preferences section.
Go to Ribbon " Review " Manage Fields. Highlight the field(s) you want to customize and press Ctrl + C. Repeat step three again for remaining fields.
Finally, return to layout view and start adding questions. Start with the topmost line and fill in the relevant information. Keep in mind that you must input answers for every single row. Don't worry though, you're allowed to repeat questions down multiple lines. Simply highlight the entire block of questions and replace it with a new instance.
When complete, head over to File " Save As.... Choose XLSM filetype. Give your document a name and press Save. By doing so, you've successfully launched a mail merge in Excel 365!
The easiest way to send a mass email is simply to write yourself a message and attach it to an e-mail account. But if you're looking for a little bit more control, you may consider setting up a mail merge. Let's break down the basics of how to perform a mail merge in Outlook 365.
Open up your chosen letter template in Word and print it out. Under the Document Setup area on the top right corner, you should spot the Mail Merge icon, which resembles two overlapping rectangles. Click on it.
A pop-up dialogue box will show asking for the names of recipients. Type in your own full name followed by a comma. Press OK.
Now, head over to Mailings Settings. Scroll down to Recipient Lists, and click Add Existing List.... Browse to the location where you saved the list you printed out earlier. Double-click on it to bring up the properties panel.
Under General Tab, scroll down and select All Contacts. Finally, select Done.
Then, head to Mailings Menu " Preview, and check your selections. When ready, press Send E-mails to selected addresses. You should now receive copies of the letter addressed to everyone in the list. Remember to keep track of the total amount of recipients you intend to send the letter to.
Alternatively, you can opt to skip the sending part entirely. Just create a new document by heading over to File " New " Blank Documents. Follow the rest of the steps described earlier, replacing Print Letter with Fill Template.
Do note that if you're planning to send lots of letters, you shouldn't rely solely on automated tools. At times, mistakes happen even when utilizing automatic systems. Thus, double-checking your work manually is crucial.
You've got your list of contacts in Excel. You have a bunch of different documents with information that needs to be merged into one document and sent out as a single message. Do you use Microsoft's default Mail Merge tool or another third-party solution?
If so, we'll show you how to quickly set up a mail merge using either method. Don't worry, it takes just minutes! We also offer some tips on getting started if you're new to the process.
There are two ways to export data from Excel for mailing purposes: through VBA (a programming language) or by creating a CSV file. The latter option allows users to import their data directly into Gmail, Yahoo!, Hotmail, etc., but requires more technical knowledge than simply clicking "Export."
Let's start off by taking a look at the simplest way to output data from Excel via VBA. It doesn't require any coding skills whatsoever -- all you need know is where to find this function within the VBA editor. Once you learn how to navigate around these menus, you'll see them everywhere. Here is what it looks like when you open Visual Basic Editor:
Click Tools & References, scroll down until you find Office 16 Object Library, double click its name, then highlight Microsoft Scripting Runtime. Now, go back to Tools & References again and expand the menu item marked COM Addins. Select Windows Script Host Menu Items. Double-click Shell. This will bring up the Shell window. In here, type shell("sendemail"). Hit Enter and follow any prompts displayed on screen.
Here's the code:
Sub SendEmail(strTo As String, strSubject As String, strMessage As String)Dim oFso As New FileSystemObject Dim iMsg As Integer Set oFso = CreateFolder If Not oFso.DirExists ("c:\temp") Then oFso.Mkdir "c:\temp\" End If On Error Resume Next With Application.GetNamespace("Scripting").MailItem _Set.Display 'or.ApplicationShell = True.BodyText = strMessage.From = "".BCC = "".Recipients = "".SendOnBehalfOfName = "".ReplyTo = "".CC = "".Attachments = "".Sent By = "".Sender Name = "".SaveSentenceOnDisk: For Each msg In ArrayList_msg 'create arraylist with values From row 1 To lastrow +1 Msg.Attachments.Add _path & "\file.doc" Msg.Send ExitForNextEnd Sub
Now let's break it down step-by-step:
This line creates a folder named c:\temp\ inside My Documents. Creating folders is extremely useful because they keep everything organized neatly. There's no reason to leave things lying about on your desktop. They should stay together. The next few lines create said directory if necessary.
In case there aren't already many files present, you may want to remove those created during testing. Go ahead and delete whatever remains.
We're now going to create our Message object. Since we only want to work on text, don't bother with attachments. Just get rid of the Attachments="" portion. Also, since most people won't have access to outlook.exe, we're not concerned right now with setting the Recipient field.
Finally, add the following three lines:.SendOnBehalfOfName="",.Recipients=""". These lines are optional. You could run the script normally if you left them out, but you would likely receive errors later on. Make sure to replace the variables with actual names and titles. Otherwise, you might end up sending e-mails containing nonsense characters.
Once you've done this, hit F5 to test it out. If everything went well, here's what your final results should look like:
Note that while this approach works great, it isn't ideal for large lists. That's why we recommend exporting your contact database in comma separated value format (.csv). Users can easily import this file into their preferred email service provider. Alternatively, you can download programs such as Contact Manager Pro [No Longer Available] which allow users to select multiple addresses and automatically generate messages based upon each person's preferences.
Yes, definitely. While Microsoft offers a free version of Mail Merge, most businesses opt for paid services instead. Why pay for something that comes built-in?
Microsoft has made Mail Merge available to nontechnical folks with the introduction of SmartView. All you really need to remember is that, unlike previous versions, SmartView does not force users to print anything before proceeding. Instead, it asks users whether they'd like to perform an action once they finish entering their information.
Smart View works best when used with MS Access databases. However, it supports other popular sources too, including Google Contacts, XLS/XML files, and even PDFs. Although technically it still utilizes VBA, it makes merging much easier due to several improvements introduced over time.
One major advantage of SmartView is that it works with both Mac OS X and Windows operating systems. So, regardless of your computer's configuration, you can always count on having access to this feature.
So, what exactly happens after you choose Smartview? Well, firstly, you'll notice that printing options disappear from the ribbon menu. Secondly, SmartView inserts rows for every entry rather than columns. Finally, it adds additional fields like Date Sent, Subject Line, and Blurb to make your life easier.
As far as pricing goes, SmartView costs $49 per month. A yearly subscription costs $199.95. In addition, companies can purchase extra licenses for teams of four.
Lastly, note that SmartView currently works exclusively with Outlook 2007 and 2010.
Unfortunately, no. Unfortunately, there's no simple workaround for this limitation. At least, not yet anyway.
It seems that the only way to accomplish this task is to employ an automated system that sends emails straight from Excel. Luckily, plenty of tools exist online that help automate the entire process. One notable example is AutoHotkey. Using this program, you can write scripts that carry out pre-defined tasks.
AutoHotkey essentially lets users customize keystrokes and macros. What kind of macros are we talking about? Well, you can tell AHK to trigger certain actions whenever a specific character appears within a particular word. Say, for instance, you want AHK to activate whenever someone types xyz.txt within a Word document. Or maybe you want it to take place whenever someone enters 123 Main Street, Anytown, GA 30677.
With AutoHotkeys' ability to recognize strings, it can determine if a user has entered a physical location or merely a street name. Furthermore, AHK recognizes special symbols and punctuation marks, meaning it can pick apart words that contain numbers.
AHK isn't limited to working solely with Microsoft products. It can interface with applications ranging from Adobe Photoshop to Minecraft. Essentially, it runs entirely independent of any given computer. And this means anyone who uses AutoHotkey can utilize it for free.
Perhaps the easiest way to merge information between Excel and Word is by utilizing software designed specifically for this purpose. Take a look at Exceltter Plus, for instance. This application generates personalized letters and newsletters. Amongst others, it features customizable templates, multi-sheet support, and automatic layouts.
Exceltter Plus costs $99.99 per year ($9.98 monthly), making it quite affordable compared to alternatives. Of course, you can try it out completely risk-free thanks to a 14-day money-back guarantee.
Using Exceltter Plus is fairly straightforward. Simply input your data into the appropriate sheets and proceed as usual. But wait, there's more. After running the wizard, you'll gain access to numerous additional functions. Some examples include adding signatures, inserting images, and formatting headings. Lastly, Exceltter Plus provides users with numerous layout styles to choose from.
If you've ever run into problems sending large numbers of emails (a group email with dozens or hundreds of people on it), then maybe you're not using Microsoft's default desktop app.
Outlook has long been used by businesses and organizations for this purpose, but that doesn't mean there aren't alternatives out there. If you want to save money while still keeping your existing setup, they are worth exploring.
Here we'll look at how to use two popular free options: Google Workspace Mail and Zoho Mail. They both have their own strengths as well as weaknesses so depending on what exactly you need to achieve, one solution may be better than another. Let’s start by looking at Gmail first.
Note: This article was written before the release of Windows 11 which now uses the new Microsoft Email Client instead of Outlook.
The most obvious alternative to Outlook is Gmail. Since its launch in 2004 more than 1 billion accounts have been created across all platforms including Android, iOS, Mac OS, Linux, etc. It also offers features like Smart Reply, Snooze Emails & Follow Up Reminders, Scheduled Messages, Priority Inbox, Conversation View, Quick Links, Undo Send, etc., making it easier to handle several tasks simultaneously.
Gmail does support multi-recipient mailing, meaning you can add many addresses in the To field and hit SEND once. But if you want them sent separately, you will need to create separate messages manually.
To set up multi-recipient mailings in Gmail, follow these steps below:
Go to Compose " Add recipient(s). You should see a popup window asking you to enter the names of the people who you want to receive copies of that message. Click OK.
Select where you would like to move forward after hitting SEND/ATTACH — either Attach file or Create document. Then click Next".
Choose whether you'd like to attach files or insert documents. Select the relevant option depending upon what type of file you wish to include. For instance, if you choose Insert Documents, make sure that each individual address you intend to send the message to is listed under Document settings section. Otherwise, select Attachment Files. Once done, proceed to next step.
Click Finish when done. The rest of the process depends on what kind of message format you selected earlier.
For example, if you chose Attachment Files, you will have to go through similar steps again for every single recipient. However, if you went for inserting documents, you won't have to repeat the above steps since you already included those addresses in Step 4.
Once you finish setting up the recipients, compose your email. As mentioned above, Gmail supports multi-recipient messaging. So you just need to press SEND only once.
However, if you want to stick to the original method, here's how you can set up multi-recipients in Outlook:
Open Outlook. Go to File menu > New Message > Address Book. A pop-up screen will appear showing All Contacts list. Enter all email IDs you intend to send the message to. Make sure to enclose any spaces between words such as First Name Last Initial. Press OK.
Now, whenever you'd like to send the same copy of the email to different individuals, right-click the topmost contact and select Copy Contact Information. Now paste the copied information onto the body of the email.
You can even customize the text within the body itself. Just highlight the desired part and replace it with something else via Edit " Find & Replace.
When done editing, hit Save changes and close the editor. Now, you can open the email and fill in details individually for each person.
In case you accidentally delete some fields during customization, don't worry! Simply reopen the modified draft and change the font color inside the subject line to red. That way, you'll know that certain fields were deleted and you can fix them accordingly.
As soon as you complete this procedure, head over to File " Print Preview. Here, you can check if everything looks good. Hit Close when done. Finally, navigate to File " Forward " Yes. This action will automatically send the finished version of the draft to everyone in the BCC field.
Keep in mind though that BCC function will result in duplicating the number of times the final draft is forwarded to other users. Therefore, it might become difficult to recognize the sender of the email.
That being said, BCC isn't always bad. Sometimes, it serves the exact purpose we are trying to avoid—that is, creating a chain reaction among recipients by forwarding duplicate versions of the same email to others.
Zoho Mail is another great tool for business professionals seeking to automate repetitive actions. With millions of subscribers worldwide, it boasts a robust customer service system, advanced security protocols and privacy policies, along with a slew of useful tools.
Unlike Hotmail, ZohoMail allows you to manage thousands of contacts easily. Its drag-and-drop interface makes adding contacts a piece of cake. Plus, it comes packed with powerful automation scripts for seamless productivity.
It lets you schedule emails to be delivered later, track replies, auto-respond based on conditions, and much more. We recommend giving it a try if you're tired of dealing with spamming emails.
But let us warn you, ZohoMail has recently started charging $5 per month for extra functionalities. Luckily, you can get these perks for free until December 31st 2021.
Microsoft Exchange Server provides excellent solutions for companies aiming to streamline operations. It has been around for quite a few years now and is widely preferred by enterprises.
One thing to keep in mind about Exchange server is that to connect to it, you must subscribe to Microsoft Partner Network (MPN) or Microsoft Cloud Solution Provider (MCP) program. MPN costs roughly $199 per year and MCP goes for $99 annually.
While connecting to Exchange requires paying a subscription fee, doing anything productive afterward is completely free. And unlike Gmail, Exchange gives you access to tons of templates, prebuilt workflows, and integration capabilities. It also enables you to maintain detailed records of conversations, track responses, and implement workflow triggers.
So what are the downsides of using Exchange? Well, compared to Gmail and Zoho Mail, it lacks a lot of handy integrations and automation tools. Also, it isn't compatible with mobile devices. Lastly, it doesn't offer third party apps, apart from Microsoft ones.
On the positive side, it's pretty straightforward to set up. Below are the steps required to begin working with Exchange:
Head over to Start Menu and search for outlook. Right-click the entry and select Run as administrator. When prompted, sign in to your account.
Next, go to File " Account Settings " Manage How Your Data Is Used. Check Allow applications downloaded from anywhere box and Apply Changes button.
Finally, browse to File " Options " Trust Center. Choose Security Assertion Markup Language (SAML) application ID property. Confirm your choice by clicking Ok.
After completing the steps highlighted above, you can send an email to 1000+ recipients quickly. Note that you cannot edit the contents of the email once it is sent. Instead, you can simply reply directly to the message.
Since the above described procedures involve manual labor, you can speed things up by automating them. Open Notepad, input email addresses, name values, etc., and save them as.csv files. Now, using VBA scripting, import the data into an array and pass it on to EWS API functions.
This approach eliminates the time spent copying and pasting info from arrays to cells and back again. You'll also no longer face errors due to missing space characters while formatting the email content.
 Send emails at scale

