 LIMITED SPOTS
All plans are 30% OFF for the first month! with the code WELCOME303
LIMITED SPOTS
All plans are 30% OFF for the first month! with the code WELCOME303

LIMITED SPOTS
All plans are 30% OFF for the first month! with the code WELCOME303

We've all been there. You're sitting at your computer working away when suddenly inspiration strikes and you need to get that email out right now because it's due tomorrow morning! You fire up Microsoft Word and start typing away like mad, only to realize half-way through that you have forgotten something really important about timezones. What if this person lives in another country entirely? Or what if you want to include people who work during daylight hours but live in places where night falls early? If either of these scenarios sounds familiar, then read on to discover how easy it is to schedule meetings, emails and even entire campaigns with ease using HubSpot CRM software (which integrates seamlessly into Microsoft Office).
One quick note before we begin: In order not to confuse matters further, I'm going to refer to "meeting" rather than "conference call", which can also mean similar things depending upon the application being used. The same goes for scheduling events such as birthday parties, school dances etc., so please bear with me while I cut through some confusion over terminology.
Setting up meetings isn't difficult - especially with online conferencing tools such as Google Hangouts. However, sometimes you may wish to arrange an actual face-to-face meeting instead, in which case you'll probably find yourself needing to figure out whether to meet late enough in the day for the other party to still make it home by bedtime. It's a simple question to answer - simply ask yourself "when does their normal sleeping pattern dictate?"
If the answer is "early evening," then you should plan accordingly. Otherwise, try setting up a conference call or video chat session instead.
No, unfortunately. But since most web conferences today use WebEx, Skype or Google Hangout, you shouldn't run into any problems here anyway. One thing to keep in mind though: While many services offer a way to add multiple users to a single account, others require each user to create his own free personal account (i.e. Facebook) in order to participate. Since you won't know until after registration has concluded, it pays to check beforehand.
Note: Some services allow you to sign up without having to create an individual profile first, but you'll typically have to verify your identity later once logged in. This means you could potentially share your login information with friends or colleagues while creating accounts for them separately. That said, this practice seems increasingly common nowadays so don't worry too much about it unless you absolutely must avoid sharing your passwords with anyone else.
The bottom line is that services generally give participants just enough flexibility to choose between attending via audio/video calls vs. joining together virtually. As long as everyone understands their local timezone and adjusts appropriately, everything should go smoothly.

Team members usually aren't located exclusively within one geographical region, so chances are good that more than one member of your group works across time zones. When planning for meetings, consider how often attendees change time zones throughout the day and take special care to allocate sufficient time slots for adjustments. For example, if you were hosting a weekly team lunch, would it suffice to allot 15 minutes per hour for meal breaks? Or perhaps 20 minutes for those whose schedules swing back and forth between east coast and west coast shifts? Or maybe 30 minutes extra for those stuck traveling from faraway cities? And finally, what about travel times themselves? Do you factor in transit time? Is there anything worse than missing a crucial update altogether because your connection was spotty?
HubSpot offers several useful features when it comes to managing remote teams effectively. First off, its robust Calendar tool automatically detects changes in time zones, allowing you to see where conflicts arise. Secondly, the Time Zones feature lets you view scheduled appointments along with associated status messages, including upcoming appointments, reminders and cancellations. Thirdly, if you prefer to manage meetings from afar, HubSpot Mobile provides mobile access to calendars and contact lists, making it easier than ever to stay updated no matter where you happen to be. Finally, thanks to integration with popular collaboration applications such as Slack, Jira Service Desk, Salesforce, Box, Dropbox, SharePoint & more, your company's internal communications flow becomes considerably smoother and less likely to stall out.
In short, HubSpot makes it possible to organize both physical and virtual meetings efficiently and conveniently regardless of location.
Email marketing is a core function of nearly every business today, so why wouldn't you want to maximize your efforts whenever possible? Thankfully, HubSpot allows you to easily customize email templates from scratch and integrate them with email tracking functionality. Using HubSpot's powerful Mail Merge tool, marketers can effortlessly pull data from existing customer records and import mailing addresses directly from Excel spreadsheets. Once completed, email recipients receive personalized content based upon specific criteria, such as gender, age range, geographic area, job title, past purchases etc.
As mentioned earlier, HubSpot integrates closely with popular collaborative communication platforms such as Slack, Twitter, LinkedIn, Github, Basecamp, Tumblr and Hootsuite, meaning you can quickly respond to updates made elsewhere on social media, track replies and comments, and monitor mentions of your brand name. Best of all, HubSpot doesn't place any limits on the number of custom fields available. You could build an email template with dozens of fields to collect as much demographic and behavioral data as you'd like.
While HubSpot excels greatly at automating repetitive tasks such as mail merge, calendar management and event scheduling, it does fall down somewhat when trying to handle complex workflow processes. Many functions depend heavily upon human interaction, however, so HubSpot recommends sticking to relatively straightforward projects requiring little manual input and delegating as few decisions as possible to machines.
So next time you're wondering how to best proceed with your latest task, remember that technology can help. Whether you're looking to automate your life or merely streamline certain parts of it, HubSpot can provide exactly what you need. After all, humans already spend upwards of 80% of their waking hours interacting with computers, so why waste precious resources rehashing old ideas? Instead, let automation handle the boring stuff while you focus on finding new ways to grow your business!
If you’ve ever been asked to set up a video conference call or attend one that has already started, then you might have wondered how to handle scheduling meetings when participants live in various timezones.
The solution is to use tools like Outlook and Skype (or Google Hangouts) which can automatically detect your local timezone and change any times displayed accordingly. This can make it easier to see what everyone else sees—that is, the current date/time. You also won’t need to worry about whether someone’s clock is ahead of yours due to Daylight Saving Time adjustments. If you want to get more specific than this, there’s plenty of online help available. Here we offer some tips specifically designed for people using Microsoft Teams.
Microsoft Teams uses Windows 10's “universal apps” feature, so if you prefer working via the web instead, you can still follow along below. The process described here works best if all users involved are located within approximately two hours of each other. To find out who lives closest to you, check out Meet Now [No Longer Available], where you can search by city, region, country, or ZIP code.
How should you schedule a Teams meeting with someone in a different time zone?
1. Set Up Your Meeting Details at least 24 Hours Before It Starts
In order to ensure that everyone gets their message without delay, you must first create a detailed agenda for your meeting.
For example, in a typical workday, most employees spend several hours per day reading emails or looking through files stored elsewhere on company servers. In addition to needing sufficient notice before such events happen, many companies require approval processes for things like sensitive information.
This means that although the actual event may only take 15 minutes, having enough lead-up time gives you extra peace of mind that no major issues could arise during your session.
2. Create A New Event With All Attendees Involved
Once you’re ready to start planning, open Calendar and select File " New Event. From there, type in the name of your meeting and click Add Guests. Then hit Save & Continue.
3. Select Whether People Should Receive Messages First Or Join Live During Session
Next, go back into Settings and choose Calendars. Select the calendar containing the meeting you just created. Under Options, scroll down until you reach When inviting guests... and select either Start receiving messages first or join live while others view. By default, this option should always remain unchecked unless otherwise specified. Click OK.
4. Enter Any Additional Information That Might Be Helpful For Those Attending
You now have three options for adding attendees. Choose to enter them manually, invite them directly over IM, or import contacts from LinkedIn. We recommend entering names and birthdays yourself because it helps keep track of which person showed up and provides vital info for those joining remotely.
5. Change How Much Notice Is Required For Participants
Under General settings, you can customize how much advance notification you expect individuals to receive. Typically, 30 minutes is enough time to prepare but in certain cases, you might want to ask for additional time to share important documents beforehand.
6. Enable Video Chat And Audio Call On Mobile Devices
Finally, under Advanced Settings, enable Video chat and turn Voice calls off. These features allow everyone attending to connect virtually regardless of location. However, since not everyone carries around mobile devices with built-in cameras, audio calling lets them participate even if their phones aren't handy.
7. Schedule Your Meeting For The Best Possible Times Based On Their Clock
Now that everything looks good, return to Calendar and select your new event. Next, head to Summary section and look for Show details text box. After clicking it, add anything useful related to your meeting including room number, duration, etc.
8. Send An Agenda Ahead Of Time
Before starting, send each participant an agenda outlining topics covered during the session. This way, they know exactly what to expect and better able to focus.
9. Let Everyone Know About Technical Issues
It never hurts to remind people of potential technical difficulties. Make sure to include specifics like internet access speeds, bandwidth caps, wireless connectivity problems, and similar. Also, give them a heads up regarding any software requirements needed to run the event. As long as these don’t conflict with normal usage practices, they shouldn’t cause too big of an issue.
10. Share Preference Preferences So They Can Adjust Alert Sounds
People tend to appreciate being notified about upcoming alerts, especially when they're hard to hear otherwise. However, some folks simply dislike hearing notifications at particular frequencies. Luckily, preferences let you configure sound alert tones based on personal preference.
To begin enabling sound preferences, right-click on your desktop and select Sound Properties. At the bottom of the window, click Playback tab. Scroll across to Notifications and again beneath Program Events you'll spot Manage program volume button. Use it to toggle between sounds of your choice.
11. Turn Off Automatic Sign-On
Remember that anyone participating in your meeting needs to sign onto their own calendars in order to show up. Otherwise, they’ll miss out. Fortunately, Microsoft offers automatic sign-on capability. But there’s a slight problem. Since everyone in attendance probably shares your office network connection, they often end up signing in simultaneously.
To solve this, disable Auto-Join below the Signing method field. Keep in mind that turning it off makes it impossible for non-employee members to join sessions. Instead, consider setting up a separate password protected link that allows external parties to register.
12. Disable Screen Sharing
Screen sharing adds a lot of convenience. Unfortunately, it tends to confuse newcomers. Therefore, we suggest disabling its functionality. To do so, uncheck Allow screen sharing at the top of the same window.
13. Disable Remote Assistance
Remote assistance is convenient for both hosts and guests. But if people unfamiliar with VPN technology accidentally try connecting, they might experience confusion. Thus, it’s recommended to disable remote support on guest accounts. Head to System account properties page and remove Guest Account from Allow programs installed outside of Workplace Applications menu item.
14. Prevent Non-Employees From Accessing Shared Files
By default, every employee account has permission to edit shared resources. While that’s helpful in terms of collaboration, it does pose privacy risks. One such risk involves accidental changes made by unauthorized users. To prevent this, navigate to User Accounts and expand HomeGroup & Family Safety heading. Beneath Limit homegroup membership permissions, double-click on Edit.
15. Enable Data Usage Management Controls
While data management controls limit overall data consumption, they don’t affect individual user activity. Enabling them ensures that nobody streams videos beyond allotted limits. To activate them, go to Network & Internet category and select Connections. Below Connection status header, switch to Maximum upload rate radio button. Finally, hit Apply.
16. Block Certain Websites Within Browser
Do you want to block websites from accessing your computer whenever your browser detects them? There’s an easy way to accomplish that. Navigate to Control Panel " Security & Privacy " Browsing history " History filtering. Look for Filter unsafe sites text. Once selected, press Turn on filter.
17. Don’t Forget About Virtual Background Images
One thing that really takes away from virtual communication is distracting backgrounds. Thankfully, there’s an easy fix. Just visit Personalization " Colors and background and drag the slider next to Picture to 0%. Doing so removes the image entirely.
18. Encourage Participation With Reminders
During meetings, reminders can come in handy. However, if you forget to mark them off your agenda, you might inadvertently fail to address relevant points. To avoid this, open Task Scheduler and select Triggers. Double-click on Conditions and look for Has Occurred=TRUE. Hit Run once more to confirm. Repeat steps 3 - 5 above for Actions.
19. Mute Annoying Ringtone Noise
Ringtones provide essential context cues for incoming phone calls. Unfortunately, they can sometimes become annoying when heard throughout the workplace. To mute ringtone noise, hold Win + R keys together. Type mstsc.exe and press Return key.
20. Automatically Close Apps During Meetings
Some apps continue running in the background after closing windows associated with them. Others refuse to close altogether. Either way, leaving unnecessary windows open wastes system resources. To eliminate this concern, press Alt + Tab keys to cycle between active applications. Alternatively, right-click on taskbar and select Stay on Top.
21. Assign Responsibilities Via Instant Messenger
Sometimes, assigning tasks to colleagues can be done via instant messenger. Although it doesn’t work well for large groups, it’s great for smaller ones. Open Teamwork Online applet and click Get Started. Select Add Person and fill in necessary fields. Next, assign duties via Direct Message.
22. Take Advantage Of Quick Links Feature
Email marketing is still hugely popular. And if your company has more than employees working around the globe then this can make things tricky when trying to coordinate with people who are located in other time zones. Here's how to handle that situation using HubSpot's tools and services.
We've all been there before - you're sitting at work, ready for a big presentation but instead of getting started, you decide you need to check something else first. Then after checking something entirely unrelated, the clock strikes midnight. You realize now that you'll never get everything done on time. But what if you could avoid these late night panic sessions by simply setting up an email newsletter and scheduling it out ahead of time? It won't take long for everyone to start anticipating your emails because you'll have such great content! That's why we created HubSpot Inbox so you can easily manage your newsletters, follow-up messages, and even create new ones without any hassle. We also provide tons of features like integration with Gmail, Outlook 365, MailChimp, Constant Contact, Aweber, etc., which means no matter where your customers are based, you can reach them through their preferred email service provider. If you want to learn more about our easy way to build and grow your business, click here.
Now let's dive into some ways you can use HubSpot to help ensure your next email doesn't go astray due to being sent to someone in another time zone.
Setting up an email campaign couldn't be easier—all you need to do is sign in to your account (or log in), select New Campaign " Create a New Template & Add Subscribers and fill out the necessary details including: name, description, template options, subscriber permissions, and add subscribers. Once those fields are filled out, hit Send Test Invite Now to test out your email. This gives you the opportunity to see exactly how your message looks in various clients, plus allows you to preview the results. After reviewing the feedback, tweak your text accordingly until you receive positive responses.
Once you've determined your plan, you can begin building your list by either signing up for free accounts or paying monthly plans depending upon your needs. To choose between the two pricing models, navigate to Settings & Pricing " Plan Options. When selecting a plan, look under the section labeled Other Services and pick Newsletter Editor. By doing this, you're able to access specific tools within your Account Dashboard that allow you to design templates, edit images/photos, insert videos, upload documents, and customize colors. These additional resources will come in handy during later phases of creating your campaigns since the process may become quite tedious otherwise. For example, if you don't have much experience designing email graphics, you might find yourself having to download several files separately via Google Drive just to complete the task. Alternatively, if you already know Photoshop well, you might prefer to open Adobe Spark Post to pull together elements faster. Either option works perfectly fine.
If you'd rather not pay for HubSpot Premium, feel free to skip down to step #4 below. Otherwise, continue reading to figure out how to create an email campaign in HubSpot.
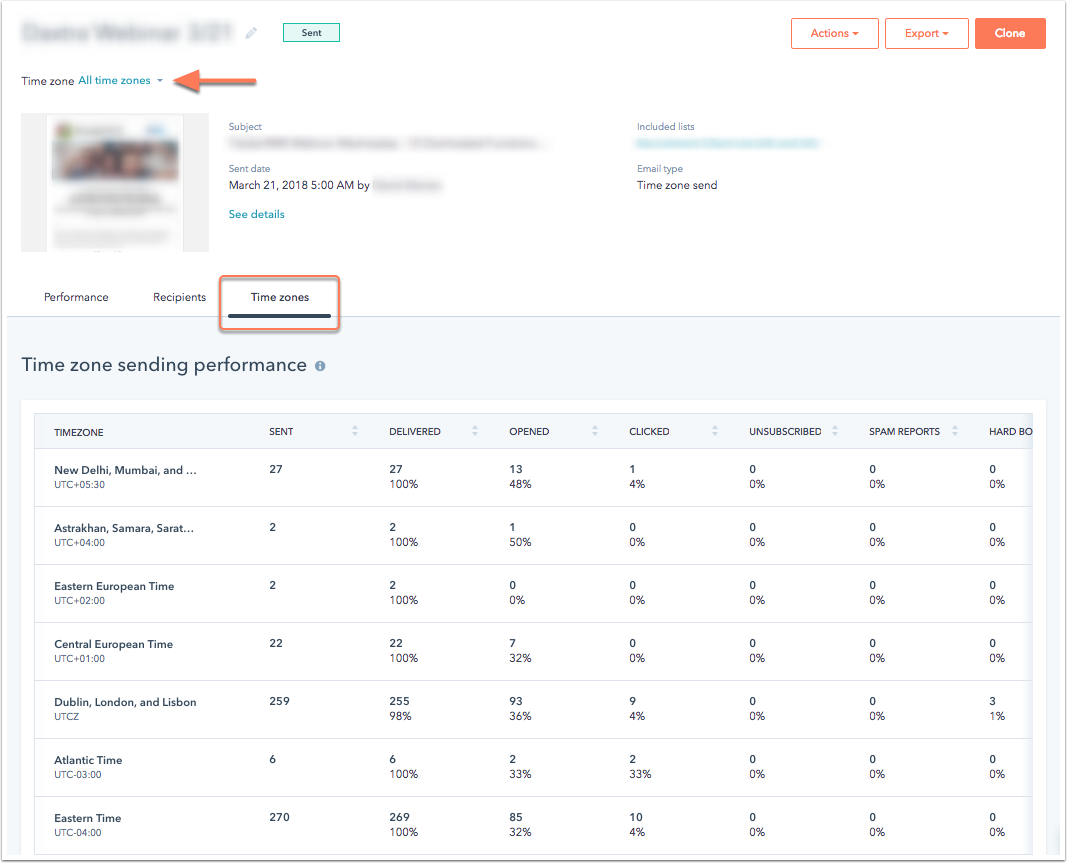
To ensure your emails get delivered on time, you should always keep track of delivery dates. Luckily, HubSpot provides its users with detailed stats regarding when each recipient opens the email, clicks on links, or downloads attachments. The information displayed includes both US Eastern Standard Time and Pacific Daylight Savings Time. So, whenever possible, try to stick to one timezone per day.
For example, if you wanted to deliver important news about a product launch to potential buyers in Europe, you would only want to target those residing in Central European Time Zone. On the same note, if you were planning to send an email offering discounts to shoppers in North America, you wouldn't want to include anyone from Australia, Asia, Africa, or Latin America. However, if you needed to communicate with someone living in South Korea, you would want to offer deals to folks in Seoul Standard Time.
So, once you determine which timezones you wish to cover, head over to My Content Library " Schedules. From here, you can view upcoming events as well as past schedules. Simply scroll to the date you intend to send your email to determine whether anything stands in your way. If it does, adjust the event times according to your preference.
You can also opt to save scheduled items directly onto your calendar. Just visit Calendar " Events " Edit Event Details and enter the title, location, and notes. Select Save Event and confirm that Yes is selected under Allow Editing.
Finally, to stay organized throughout the entire process, you can utilize the Schedule tab on the left side panel. Here, you can sort tasks by type, client, priority, status, etc.
With HubSpot Inbox, you can automate many aspects of your workflow, including sending emails to thousands of prospects every month. One of the greatest benefits of HubSpot Inbox is that you can integrate it seamlessly with your existing email system. Whether you utilize Gmail, Microsoft Office 365 Outlook, Yahoo!, AOL, iCloud, Hotmail, etc., you can rest assured knowing that your data remains secure and accessible wherever you are. Also, if you ever run into problems while away from home, support reps are available 24 hours a day, 7 days a week via toll-free phone number, live chat, and ticket submission form found right under your profile page.
To create an email series in HubSpot Inbox, head over to My Content Library " Series Builder. Enter your recipients' names, subject line, body copy, frequency, and timing. Next, give your series a unique identifier and publish it. Finally, review the settings to make sure the email gets triggered automatically.
HubSpot Inbox offers three types of triggers: daily, weekly, and monthly. As mentioned above, monthly triggers tend to be best suited for those looking to send bulk emails to multiple audiences. While most companies focus solely on crafting compelling sales pitches, HubSpot enables brands to personalize communications by incorporating relevant customer history, preferences, and interests. Furthermore, if you're interested in automating repetitive actions across platforms, HubSpot makes it easy to update website pages, social media posts, blog articles, press releases, and landing pages with built-in integrations.
The beauty of HubSpot Inbox lies in its flexibility. Not only can marketers craft custom solutions tailored specifically to their individual businesses, but also develop strategies that align with larger goals. With the ability to quickly move between platforms and devices, HubSpot helps teams collaborate effectively regardless of physical distance.
As previously discussed, HubSpot allows users to effortlessly switch between timezones to better accommodate global operations. For instance, if you had planned to send a promotional email to a marketer in Tokyo, you would want to make sure he received the email at 4PM EST. Therefore, all future activities related to this particular item would reflect Japan Standard Time.
While switching back and forth isn't difficult, staying consistent can sometimes prove challenging. Thankfully, HubSpot comes equipped with robust analytics tools designed to improve efficiency.
Heading over to My Content Library " Analytics " Messages Viewed History gives you insight into how often, and to whom, your emails end up being opened. Additionally, HubSpot delivers useful statistics to show how effective your emails truly are. More importantly, you can analyze metrics like total views, bounce rate, lead generation rates, etc., to understand how visitors interact with your site, products, and services.
HubSpot's comprehensive suite of analytical capabilities will allow you to gain valuable insights on traffic trends, conversion patterns, and user behavior. Thus, you can optimize your efforts while simultaneously improving overall productivity.
 Send emails at scale

