 LIMITED SPOTS
All plans are 30% OFF for the first month! with the code WELCOME303
LIMITED SPOTS
All plans are 30% OFF for the first month! with the code WELCOME303

LIMITED SPOTS
All plans are 30% OFF for the first month! with the code WELCOME303

Excel is great when you want to gather data from multiple sources and analyze them together — but what if you only need someone else's input on part of that data set or need to ensure clean datasets, such as how to remove duplicates in google sheets? You can't simply copy-and-paste your entire spreadsheet into their inbox because they don't have the original.
In this article we explain everything about sharing an Excel workbook, including where to save it, whether to protect it with passwords, who should see which tabs, and more. We also cover a few ways to send individual sheets over email instead of sending whole files.
Note: This post was written back before Microsoft renamed Office 365 as "Office 2019." If you're using Office 2016 (or earlier), please check out our guide here.
You probably know that you can open up two different spreadsheets side by side within Excel itself. But did you know you could even open them both simultaneously outside of Excel? To do so, right click anywhere inside your sheet(s) and select Open all [spreadsheet name] windows..
This opens each spreadsheet window separately, allowing you to keep editing those particular documents while opening another instance to view the results. It's perfect for quickly comparing information between two separate datasets.
But there are still many scenarios where working on several spreadsheets might be useful. For example, maybe you've got a team of coworkers whose job responsibilities overlap in certain areas. In that case, having all relevant info accessible from every computer would really come in handy! Or perhaps you're collaborating with others on a project involving lots of spreadsheets. Opening them all locally then becomes far too cumbersome.
If any of these sound like problems you may run into often, consider setting up a cloud account with either Dropbox/OneDrive/Google Drive, or SharePoint Server & File Sharing Service. From there, everyone involved will have instant online access to whatever files they need. No longer will you have to worry about copying-and-pasting around the office, nor will you have to wait until everyone checks their emails first thing in the morning. Everyone will be able to access their own version of the document, making collaboration much easier than ever.
That said, there's one caveat worth mentioning. Because most services offer free space to upload documents, anyone given permission to modify a document has full discretion to delete anything uploaded under their account. So be sure to take care not to accidentally leave sensitive information exposed.
As mentioned above, since Excel allows you to open up multiple instances of its software at once, it's pretty easy to create multiple versions of your worksheets whenever needed. However, sometimes you may find yourself needing to collaborate with others via a web browser rather than directly through Excel. Luckily, doing so isn't difficult.
To begin, head to excel.office.com and log into your account. Once logged in, look to the left sidebar menu bar and choose Create new... Then pick Spreadsheet and tap the big blue button labeled Worksheet. Now, enter in the name of whichever file you intend to start creating copies of, along with the folder location you wish to store them in. For example, let’s say you wanted to create three folders called Copy 1, Copy 2, and Original. Your newly created document should appear as a link titled My Documents\Copy1\My Document.
Once done, go ahead and download that file onto your machine. By doing so, you'll automatically get a backup of the original file — no extra steps required! And yes, you can do this process with other types of Microsoft products besides Excel. Just remember to always double-check the destination folder path after downloading.
Now, you can continue adding additional links to wherever you'd like. Simply repeat the process with the next file, and so forth. Keep in mind that you cannot change the name of your main document once added, however. Doing so will result in errors. Also note that if you happen to forget the password protecting the original, you can reset it by logging into your account settings page and clicking Reset Password.
Finally, if you prefer to avoid online storage altogether, you can opt to host your files on a private server. This method requires a bit more technical knowledge, but it does give you complete control over permissions as well as security.

Yes, absolutely. When you add a second tab to an existing Excel worksheet, it doesn't affect the contents of the original. As long as nobody tampers with the active cell, the rest of the cells' formulas remain unaffected. That means you can easily split off smaller sections of the spreadsheet without worrying about losing important data.
The best way to accomplish this is to highlight the range of cells containing your desired data, right-click and choose Cut Cells.... A box labelled Select Rows will pop up. Drag across the rows you intend to cut, release, and watch as those highlighted rows disappear. Repeat this step for columns as well.
Alternatively, you can use the keyboard shortcut Ctrl + X followed by Ctrl+V. The latter option brings up the Paste Options context menu, where you can choose exactly which cells you'd like to transfer. Make sure to hit OK afterward, otherwise nothing happens.
While cutting and pasting larger chunks of data will definitely speed things up later, it's usually preferable to isolate specific parts of a large dataset beforehand. Why waste precious seconds trying to figure out where to drag various bars in a chart? Instead, you can simply highlight the graph itself, right-click and choose Format Data Series..., picking Add Line or Column Labels accordingly.
By taking advantage of such features, you can drastically reduce the amount of time spent manually formatting charts — something that's especially helpful when dealing with thousands upon thousands of points.
It turns out that it's actually very simple to email just one tab in Excel. All you need to do is go to File " Send Email, type in the recipient's address, and fill out the message field. Finally, tick the checkbox next to Attach Files and choose the appropriate.xls file you want to attach. After hitting Next, scroll down to More Options and unselect all options except Mail Merge. Click Finish, and voilà — your friend gets an email linking them straight to the requested tab.
Of course, this won't apply to non-Microsoft programs like Google Docs. But considering the limitations of third party apps nowadays, it's hard to complain!
Have questions regarding this tutorial or comments pertaining to a general point raised? Feel free to ask us below!
Excel is one of Microsoft Office's most popular programs because it makes organizing data easy—and sharing that information convenient too. If you have a large Excel document containing sensitive information (such as customer credit card numbers), then it might make sense to let other people see what's inside without having them change any of those values. Or maybe you want to use your Excel spreadsheets in more than one location but don't want everyone who uses it to get their hands on each others' private details. Whatever the case may be, this guide will show you how to save, share, and protect your Excel documents so they can be accessed anywhere.
Before we begin, remember that there are some limitations when working between different versions of Windows. As such, if anyone accessing the document needs to use newer software like Excel 2016, they'll need to run 32-bit instead of 64-bit version of Excel. And even though these tips still apply today, many of our examples assume you're using Microsoft Office 2010 Professional Edition 64-Bit edition. However, since all major features should also function correctly in earlier editions, hopefully you won't encounter problems while following along!
Now that everything is clear, here’s how you can easily share an Excel workbook with other people...
The easiest way to invite someone else to view a file stored within Excel is through File " Share.... This method allows you to select whether only yourself or whoever has permission can edit the sheet.
To start, open up whatever Excel workbook you'd like to send out. Then click the Send To button located next to the Save & Close icon at the bottom right corner of the screen. Select Other People from the dropdown menu, followed by Add Users.... You'll now receive a message saying “Share Worksheet With User(s). Click Yes to Continue…". Here, enter the name and email address of the person you wish to share the file with. When done, hit Next " Finish…. Your recipient will receive an invitation via email. They'll just need to accept the invitation before opening the file in Excel. Alternatively, you can copy over your entire Workbooks folder onto a USB drive and physically mail it off to the intended party.
If you've given yourself administrative rights to the computer where the application is installed, you can skip this step altogether. Instead, simply go ahead and choose More Options under the Invite Others section. From here, you'll notice options to add recipients via Active Directory, Outlook Mailbox, or Exchange Server 5.5+. Just fill in whichever field best suits your situation and click OK. Once again, the recipient will receive an e-mail notification inviting them to open the saved Excel file.
You can also set permissions manually by clicking Advanced Settings in the top left corner of the window. This area gives you an option to allow edits to certain cells or rows/columns. It also lets you limit read-only viewing privileges. For example, you could grant editing powers to just specific individuals, while giving regular viewers limited ability to browse around.
What happens if the invited user doesn't have the appropriate program installed to open the.xls file? In this scenario, you can try converting the file into something easier for them to handle, such as CSV format. That said, sometimes files aren't converted properly due to corrupted source material. So keep that possibility in mind if things ever reach that point.
In addition to sending an individual Excel workbook, you can also create links directly to particular sheets within that document. Head back to the main File " Share dialogue box. Now, check the Create Link box beneath the Choose Sheet tab. Doing so creates a link to whichever page you chose. The URL bar displays the full path to the selected cell rather than its numerical reference. After hitting Enter, the viewer will immediately jump straight to the desired portion of the spreadsheet.
For larger projects, especially ones requiring collaboration, it may become necessary to assign various roles and responsibilities among several parties involved. Thankfully, Excel offers a feature called Check Boxes which gives us plenty of flexibility in this regard. First, head to the View Tab and scroll down until you find the Data Tools group. There, look for the Insert Checkboxes box near the middle of the pane. Hit OK.
Next, highlight the text boxes you would like to turn into checkboxes. Go to Home " Controls " Formatting " Text Box Properties. Change the Type property to 3D Shapes. Finally, drag them wherever you'd like on the spreadsheet. Each new box appears as a little blue circle with two opposing arrows.
Once you finish dragging these around, head to the Developer Tab and scroll down until you spot the Design Mode button. Turn it On. Right click somewhere blank on the spreadsheet, select Arrange All and pick Horizontal Lines. Drag this across the whole width of the screen. Do the same thing vertically. You'll end up creating grid lines that delineate sections of the spreadsheet.
Go back to the View Tab and double click on the first row. Find the AutoFilter Icon and drag it below the rest of the controls. Highlight the uppermost column heading and drag it above the remaining labels. Double click on the last row and repeat the process with the Filter Icon. The moment of truth arrives once you press F8. A pop-up window asks you to decide which columns you want to filter according to the rules specified. Simply tick the checkboxes for the relevant headers and press OK. Now you can navigate through the filtered table much faster.
Checking out the final product is simple. Press Ctrl + U to toggle Edit mode. At the very top, you should see the Status Bar displaying which fields are currently being edited. Below that, you'll see a list of checkboxes corresponding to every single item displayed. These enable you to quickly switch between various views and filter data however you please. Feel free to customize these settings per your own preferences.
When dealing with a group project, it is important to ensure everyone stays abreast of what's going on. Otherwise, conflicts arise when multiple users attempt to update the same part of the spreadsheet simultaneously. Before doing anything drastic, take a deep breath and ask yourself why exactly you want to merge the data together. Are you trying to simplify the task of finding historical trends? Is it making life easier for future researchers? Maybe you're looking to compare similar sets of figures side-by-side?
If you answered yes to any of these questions, consider using VBA code. This powerful tool enables you to automate repetitive tasks throughout your day. For instance, say you have a bunch of Excel charts showing sales performance over time. By writing a script that runs daily, you can automatically pull all of the pertinent statistics from those graphs and compile them into one neat report. What's great about this approach is that you never actually have to touch the original chart itself. Rather, the report sits entirely within the confines of the macro editor.
It's worth noting that macros are considered advanced functions and require coding expertise. Therefore, unless you plan to collaborate with experts, it probably isn't advisable to tackle something like this alone. Luckily, there are numerous online tutorials available on how to write VB scripts. We recommend searching YouTube for 'VBA Tutorial', 'Creating Macros in Excel', and 'Writing Macro'.
Yes, absolutely! While it does not support real-time synchronization, Excel 2013 introduced a feature known as Copy Anywhere. This nifty functionality essentially copies the contents of one cell to another whenever either of them receives input. Say you want to transfer a formula from one cell to another, you can do so by holding CTRL+SHIFT and selecting both ranges. This trick can come in handy when collaborating on spreadsheets.
Alternatively, you can download third-party applications that offer real-time syncing capabilities. Programs like Google Drive and Dropbox integrate seamlessly with Excel and provide intuitive ways to upload and store files locally. Even better, they often include dedicated tools designed to aid in collaborative efforts. For example, Google Drive comes equipped with built-in tools like Doc Sharing and Chat. Meanwhile, Dropbox provides direct integration with Gantt Chart, allowing you to track progress alongside other team members.
Whatever platform you prefer, you'll definitely want to pay attention to security considerations. Ensure your account credentials are secure by setting strong passwords and choosing unique logins. Also, avoid storing confidential info on public computers. Lastly, make sure to delete old backups after long periods of nonuse. Always practice good digital hygiene when browsing online, including avoiding suspicious websites.
Excel allows you to save your files to SharePoint, SkyDrive, or any other cloud storage service, but what if you want to make sure that only one person can view a particular spreadsheet at once? Or maybe you'd like to add some extra security so people on your team can't see certain information while others may need to be able to change data without worrying about conflicts? In this article we'll show you how to use sharing options available from within Excel 2013 when working on collaborative projects with colleagues or clients.
Note: If you're using older versions of Office such as 2010, 2007 or 2003 then Microsoft has removed the ability to create shared spreadsheets and instead recommends creating separate documents for each collaborator. To learn more check out our guide detailing how to keep yourself safe using excel online collaboration tools.
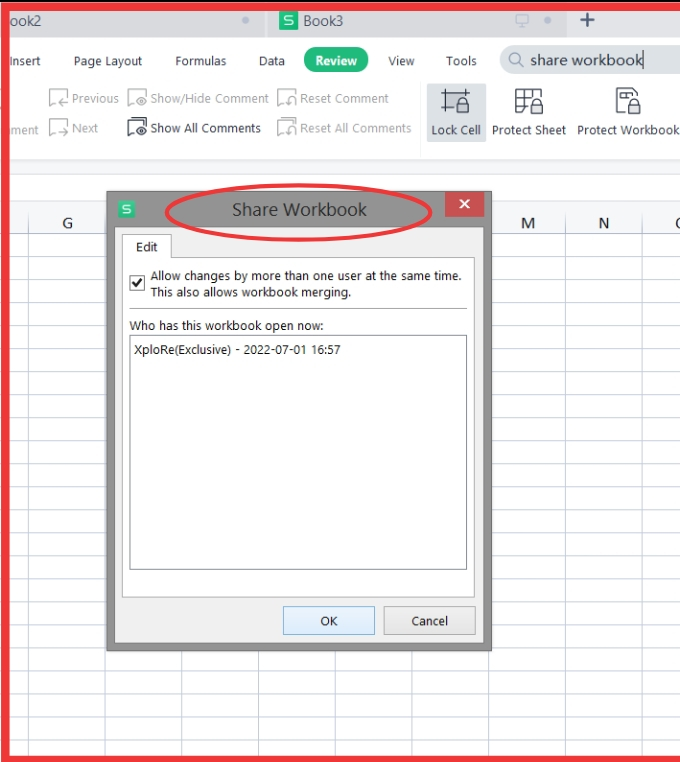
Yes! You can have multiple users editing different parts of the same sheet simultaneously — but not directly interactively. The best way is to open up Excel, go into File " Options " General (or right click the ribbon option) and under Advanced settings select Enable XLSX Viewer which will give all users access to read-only copy of the current document. This means they won't be able to type new formulas or delete existing ones, but anyone who's familiar with the application should be fine. It also gives them the chance to download the latest version of the file whenever updates are made.
If you don't want everyone to see every single cell on the sheet, simply double click on the name of the document itself (e.g. MySpreadsheet.xlsx) in Windows Explorer to bring up the Properties panel and set both Read Only and Hidden properties accordingly. Alternatively, just press F5 to run through the entire file without opening it.
The next step would be to choose whether these users will be allowed to actually enter values themselves or just review those already entered. For example, let's say you've got two teams collaborating on a project where each group needs their own copies of a specific part of the spreadsheet. Team A might be responsible for entering monthly sales figures, while B may be inputting expenses incurred during the month. By default, everyone on either side could potentially modify the numbers being worked upon by the other party in realtime. However, there are ways around this problem.
First off, you'll probably want to ensure that no one else outside your company knows the actual password used to unlock the file. That's because anyone with this knowledge could easily bypass read-only permissions by changing the value manually before another user sees it. As long as nobody else knows the login credentials, though, you should be good enough. And even if someone did know, they wouldn't necessarily be able to change anything anyway since each tab requires confirmation first. So feel free to leave things unlocked unless you think otherwise.
On top of that, you can also enable a feature called Trust Centre Settings that disables editing altogether. This setting is useful for keeping sensitive fields hidden away completely until the final stages of a project. When enabled, collaborators must request permission to edit any field before making changes, ensuring that nothing gets accidentally modified. They can still refer back to earlier tabs to find previous answers, however, so it doesn't hinder day-to-day usage too much.
You can disable this functionality entirely if needed, although it does mean less oversight over potential errors. Just head straight to Tools " Options " Trust Center Settings and turn Allow edits and warnings off.
By doing this, users will only be able to look at cells containing information, not alter them. This makes it great for hiding important details or preventing accidental modifications.
No, unfortunately. There isn't currently a method to lock individual sheets down so that only one user can see them at once, nor can multiple people have simultaneous access to the same file. In order to get round this limitation, it's possible to save a copy of the original file locally and then send it via email to whoever needs it. This way, they can view it offline, allowing several people to collaborate on the same document together.
Alternatively, you could consider using Google Drive as a central location for storing everything. Since Google Docs integrates seamlessly with Gmail, this gives users instant access to whatever doc they require. Users can then upload it to the drive for the rest of the world to see, giving you total peace of mind that your data is always backed up securely somewhere far away from prying eyes.

Sure thing! Head straight to File " Save & Send " Make Response Available Online... and follow the instructions provided in the pop-up window. Once saved, the link to the file will appear underneath its title in the Ribbon menu bar. Anyone who clicks this link will instantly gain full remote access to the file. Of course, you can adjust the settings further depending on exactly what you need done.
To protect against potential abuses, you may wish to limit who can access the file in question. Check out our guide explaining how to grant restricted access to external links sent to colleagues.
Once you've given the link, recipients can log in via Internet Explorer or Chrome. From here, they can navigate through the various tabs of the shared file as well as manipulate the content inside. Note that you cannot restrict viewing privileges to only certain members of staff. Everyone listed in the People section of the User Account Control dialog box will be granted remote access to whichever document was selected.
As mentioned previously, you can also opt to store your data centrally on the web. Simply locate the relevant file and select Edit " Copy Link. Then, paste the URL anywhere you please.
It depends on what kind of system you prefer. You can assign permissions individually to different groups based on role, or alternatively just apply blanket controls across the board. Either way, the process is relatively simple.
Head straight to Tools " Security " Change Permissions… and select Add. Give the desired account(s) a unique name and description and hit OK. Now, whenever you try and open the file, Excel will ask you if you really intend to proceed. Click Yes if you do and you'll be prompted to confirm the action.
This is also where you'll come if you ever decide to revoke access to a particular member of staff. Open the Security section again and delete the entry associated with unwanted accounts. Afterwards, they'll be unable to perform any actions whatsoever until you re-allow them.
Do you have additional tips for managing collaboration between Excel users? Let us know in the comments!
 Send emails at scale

