 LIMITED SPOTS
All plans are 30% OFF for the first month! with the code WELCOME303
LIMITED SPOTS
All plans are 30% OFF for the first month! with the code WELCOME303

LIMITED SPOTS
All plans are 30% OFF for the first month! with the code WELCOME303

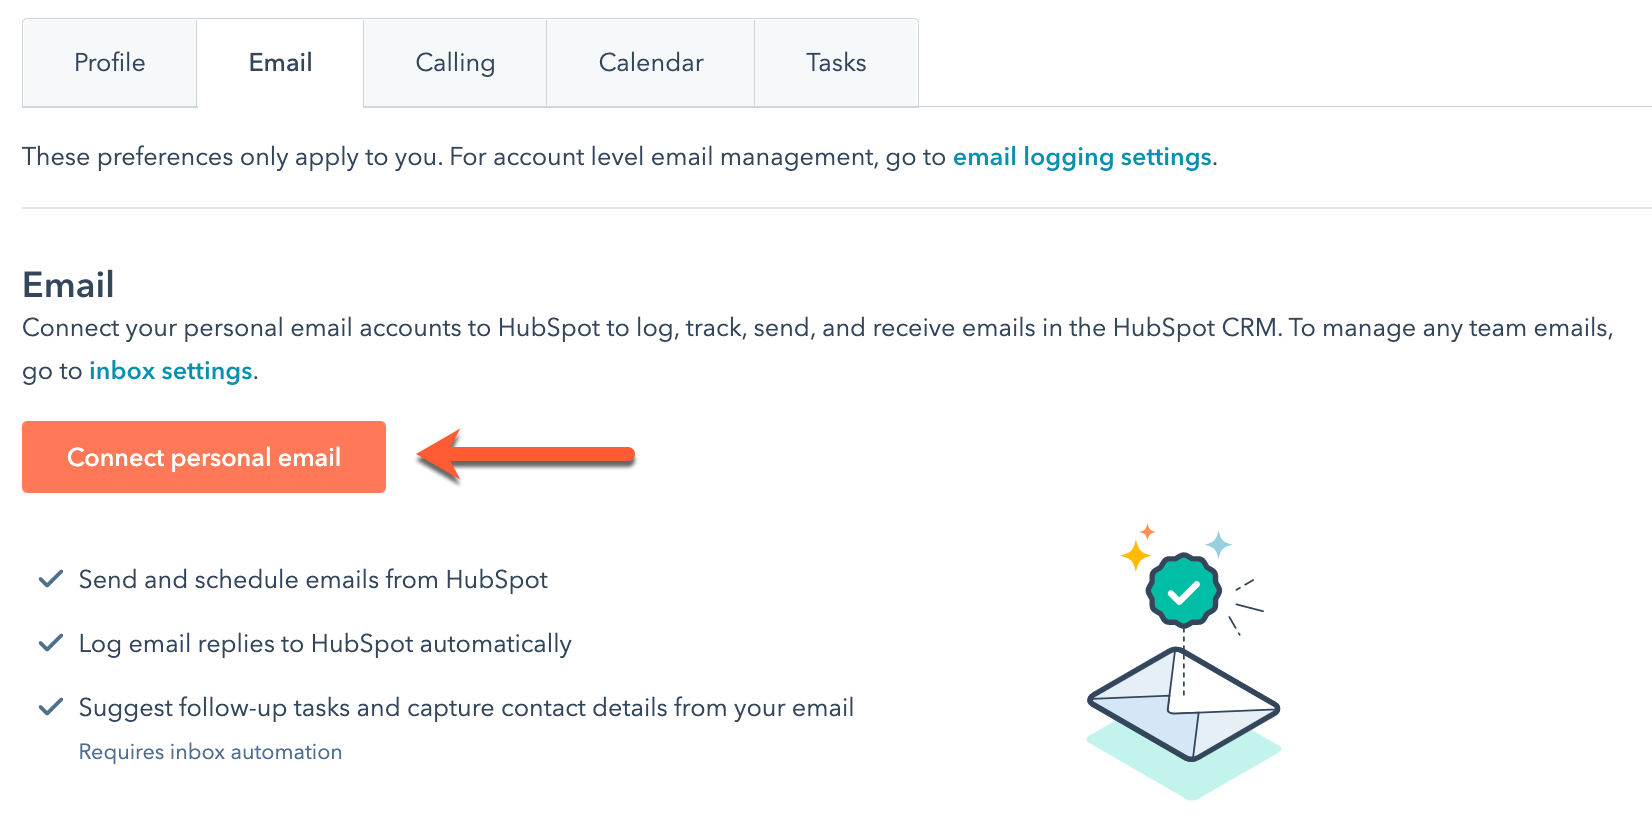
We've previously covered some of the best tools for managing your Gmail and Google Calendar accounts, but what about a tool that lets you manage everything from one place -- including your inboxes? If you're looking for an easy way to monitor your communications, look no further than HubSpot's free version.
HubSpot is a marketing platform that allows users to create websites, social media pages, landing pages, blog posts, e-newsletters, forms, surveys, polls, and CRM (customer relationship management) software. It provides businesses with customizable lead capture and follow up systems as well as personalized customer service portals. The free plan offers unlimited email support, unlimited site storage space, two domain names per account, custom branding, analytics, mobile apps, and more.
I first heard mention of this powerful business solution during SXSW Interactive last year when HubSpot CEO Dharmesh Shah presented at our event. In fact, he shared his own story of how HubSpot helped him grow his small technology start-up into a six figure company by providing its customers with automated solutions. He mentioned how he had been working with other companies since 1995 and they were frustrated because their clients weren't getting consistent information or support. After hearing his presentation, I decided to give it a try myself. Here's what I found out after just three weeks of using the platform.
The issue here isn't specifically related to HubSpot. Rather, it has something to do with many third party services' inability to actually send emails directly from your client's account. This means if you use MailChimp, Constant Contact, Aweber, etc., then there will be times where those messages won't show up in HubSpot until hours later. There are ways around this problem, however, so don't worry. You can always check your Sent folder in Gmail, which shows every email sent through your account. Just click "More" next to each message and select Sent From another address.
So why does HubSpot have such an annoying delay between sending an email and seeing it appear in your dashboard? Well, if you go back to the previous example above, even though these services may technically be capable of sending emails, sometimes they simply aren't configured properly within HubSpot. As far as I know, HubSpot doesn't allow users to change their SMTP settings themselves, meaning someone else needs to make sure that all their providers are correctly set up within HubSpot before you'll see any new mail come through. To test whether that's true, you should contact tech support with both your provider and HubSpot. They might be able to help walk you through making changes to your providers yourself.
If the person who handles your technical issues hasn't already done so, I'd suggest contacting them again and asking if anything changed regarding SMTP settings. Sometimes, IT departments take over setting up new user accounts for various partners, especially ones without much experience running large campaigns. And although they usually provide great customer service, they could miss changing certain details like adding a specific IP range.
Another common reason people run into this problem is due to limited server resources. Many ISPs only allocate a very small amount of bandwidth for outgoing traffic. So while it's possible to send emails via servers outside of your control, it may cause delays. Again, you should ask tech support to double check with your ISP and see if they can increase your limit.
In addition, if you haven't already checked it, you should verify that your internet connection works fine throughout the day. Some people face slowdowns when downloading files or streaming video content. Because we often think of our Wi-Fi speeds as fast, we overlook potential problems on our home network itself. My advice would be to call your cable/phone company and compare Internet usage plans. Make sure you get the data caps listed under "broadband speed tests." Also, if you notice strange behavior happening, you can use a website called Speedtest.net to find out exactly how fast your upload and download speeds are.
Finally, you should definitely ensure that your computer's firewall is turned off. Most firewalls let you choose who gets access to the internet based upon incoming requests. By default, most firewalls block all unknown connections. Therefore, whenever an external system sends an email to your personal email address, it may fail to pass through. However, I highly recommend turning your firewall off once in order to prevent future security breaches. Once you turn it back on, please open port 25 (for standard POP3 protocol). Port 25 is used to deliver email messages to a recipient's mailbox. For more info on doing that, you can read this article.
To enable email tracking for all emails sent to your primary email address, navigate to Settings & Campaign Tracking. Then under Email Tracking, scroll down to Configure Your Emails and toggle Enable Email Tracking On All Messages. Please note that enabling email tracking requires you to add additional configuration steps depending on the type of campaign(s) you wish to include. With HubSpot Pro subscribers, you can easily customize different types of campaigns, allowing you to automatically tag individual messages accordingly.
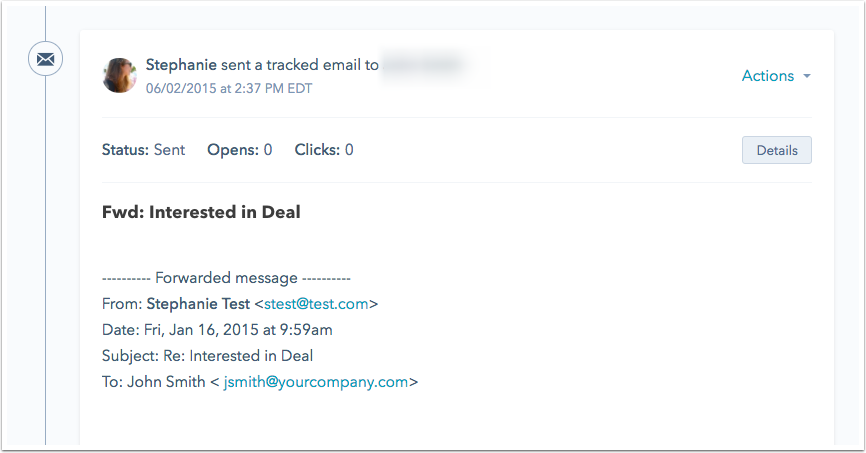
Once enabled, you will receive a pop-up notification saying "Email opened". Clicking on that link will bring up a page showing basic stats like name, subject line, number of recipients, date received, time spent reading, and location.

Yes! When you receive an email from a sender whose name appears anywhere on your site, you will immediately receive a notification stating "Message Opened [Name]" along with the same basic stats shown earlier. Additionally, clicking on that link will bring you straight to the email message.
As mentioned before, HubSpot Pro subscribers enjoy extra functionality that includes automatic tagging and customization options. These features require Pro subscriptions, unfortunately. But if you're interested in learning more about HubSpot's email monitoring capabilities, feel free to reach out to tech support. Their team is extremely helpful and knowledgeable.
Yes! HubSpot integrates seamlessly with Microsoft 365 products like Office Online, OneDrive, and Exchange Server. That said, HubSpot users must log in to their Microsoft Account in order to connect their HubSpot account to their work or school email addresses.
You can either sign in using your usual credentials or sign up for a new Microsoft ID. Either option will grant you access to your emails. Once logged in, right below your profile picture, you will see links labeled Manage Accounts and Add Another Account. Select whichever method suits you better.
After selecting Add Another Account, enter your email address and password to continue. Next, you need to confirm your identity by entering your current birthday and signing in with your phone number. Afterwards, you will finally be directed to your Outlook homepage. Now, you're ready to begin syncing your HubSpot account to Outlook!
Here's a quick recap of important things to remember when connecting HubSpot to Outlook:
Ensure that you're signed in to your Microsoft Account.
Your HubSpot subscription will expire eventually. Before expiring, you should delete unused templates and campaigns. Otherwise, you risk losing critical data.
Make sure you update your passwords regularly.
HubSpot is a popular tool for marketing and sales teams that's been around since 2006. It has an easy-to-use dashboard where users can view data about their website visitors, customers, leads, and more.
It's especially useful if you're trying to keep up with your social media accounts or manage multiple websites. However, it may come as a surprise that many people use the platform without realizing they don't have access to their emails. If this describes you, we've got good news! You just need some extra steps before getting everything synced up. Let's take a look at how to set up email integration between Gmail and HubSpot.
If you'd like to follow along through each step of our guide below, you'll find the link to download the necessary files right here. We recommend creating a new folder called "Sync" inside Dropbox so you don't accidentally delete any important documents during setup. In addition, make sure that both your Gmail account and HubSpot account are logged into Google Calendar. This will ensure that you receive reminders when events occur.
The first thing you should do after setting up email integration between two services is log out of HubSpot completely. Otherwise, you won't be notified by email when certain things happen within your account (like lead captures). To avoid being left behind, go ahead and close every browser window you currently have open. Then head over to https://appcenter.hubspot.com/accounts and click Logout on the top navigation bar. Next, sign back into your HubSpot account using the same credentials you used previously.
Now, let's create a connection between Gmail and HubSpot. First off, copy and paste this code into a blank text editor (or whatever other program suits your needs):
Next, navigate to the Settings tab under Integrations in the sidebar menu. Click + Create New Connection and search for Email. Choose Send me updates whenever something happens. Now hit Save Changes.
With these settings configured, you should see a message similar to what shows below appear once you save changes. Please note that this process only works for Gmail users who aren't already signed into HubSpot.
To complete the final part of our tutorial, we must now add email addresses associated with your HubSpot profile. Go to the Addresses section located in the Account dropdown menu. Select People & Teams then select From Address Book. A pop-up box will show asking which service you would like to pull information from -- either Gmail or HubSpot. Since we chose HubSpot, enter your company name and address details. Once done, press Continue and hit Submit.
Your contact list should automatically populate with details related to your HubSpot account. At this point, you might notice that there are gaps in your list. For example, if you're looking for someone named John Smith, but he doesn't exist in your current HubSpot database, you'll probably see a red error icon next to his entry. That means there isn't enough available information in HubSpot regarding this particular individual. As such, we must manually edit his record.
In order to update his info, simply hover over his name and drag down. After selecting him, input the appropriate fields from the popup box. Hit Save Changes when you finish. Your list should now contain basic information and photos associated with your team members' profiles.
You should now see green check marks alongside entries showing successful connections. The last thing to do is verify that your newly added emails work properly. Head over to the Emails section found in the Accounts dropdown menu. Under Connected Services, scroll down until you reach the Email Integration header. Make sure that Enable Email Syncing is checked. Finally, choose Get Started again and hit Save Changes.
Once finished, try opening your HubSpot app again. You shouldn't have to wait very long before receiving welcome messages welcoming you to the system. These texts usually include instructions on how to begin adding subscribers. They should also inform you that you can no longer send emails directly from Gmail. Instead, you'll have to start sending them from your HubSpot dashboard instead.
As mentioned earlier, one downside to having HubSpot integrate with emails is that you lose the ability to send emails straight from Gmail. Fortunately, however, you can still send emails via Outlook. When composing a new message, simply click the blue Compose button rather than the grey plus symbol. Doing so should redirect you to your HubSpot dashboard.
From there, you can continue typing away normally. However, unlike regular mail clients, emails sent through HubSpot will prompt you to reply to specific topics. So for instance, if you wanted to write a short email informing colleagues about a recent project you worked on, you could respond to the following: [Project Name] - Task Status Report.
This feature allows you to better organize your thoughts and prevent redundant replies. Additionally, HubSpot integrates with Slack, allowing you to easily share links and attachments across platforms. On Slack, you can even embed a live feed from your Dashboard.
One reason why your emails stop appearing in HubSpot is due to how different systems handle tasks assigned to individuals. Therefore, it's best practice for anyone working remotely to assign tasks to coworkers based on their primary role. For example, consider a manager responsible for overseeing several projects. Even though she technically controls everyone involved, her position dictates that she delegate most responsibilities to subordinates. By doing so, she prevents herself from becoming overwhelmed while focusing on higher priorities.
Another problem stems from the fact that HubSpot uses labels to categorize content. Unfortunately, Gmail does not support assigning custom categories to emails. Thus, if you label emails differently depending on whether they relate to personal correspondence or business matters, Gmail will likely ignore those distinctions. Luckily, HubSpot offers plenty of flexibility in terms of labeling policies. Simply open up a task or event page and click Edit Labels. Here, you can change the default ones provided by HubSpot. Alternatively, you can upload additional sets of labels yourself.
Hopefully, this article helped clear up any confusion surrounding email integration between HubSpot and Gmail. Be sure to read our previous tutorials detailing how to track site visits with Google Analytics and how to build a Facebook fanpage with HubSpot. And remember that if you ever run into problems, you can always contact us for help. Happy integrating!
I’m a big fan of the service and have been happily importing data into it for over two years now (my previous employer had us use it), but lately there are some things about our system that don’t seem quite right.
For example, we just moved everything to Google Workspace last month, so I haven't had time to fully migrate yet—and the migration is still in progress because of other priorities.
But one thing that's bothering me particularly is how we handle incoming emails on mobile devices. We get most of them via Gmail or Outlook 365, which means they're not synced directly to HubSpot. This makes responding to messages less intuitive than it should be. And, as far as I can tell, there isn't any way to manually synchronize these emails between platforms.
So here's what I've discovered after digging through HubSpot's help files, talking to friends who work at the company, trying out various solutions, and even testing out different ideas myself. Hopefully this will help answer your questions too!
HubSpot actually has a feature called "Email Importing" that lets users import their entire inboxes into HubSpot without having to re-enter contact info, addresses, etc. However, if you only need to sync recent emails, then you'll probably want to try something else instead.
There are three main ways to go about doing this depending on whether you already have access to someone inside HubSpot's support team, whether you prefer manual labor, or whether you like automation tools.
1) If You Have Access To A Support Rep Inside HubSpot: Use The Inbox Importer Tool
If you happen to have a support rep working within HubSpot, you could ask him/her to run an automated tool for you. It would basically take your text message history and upload it to HubSpot automatically. Here's how to set up such a task:
Go to Workflow & Automations.
Choose New Automation.
Click Start Action and select Get SMS History.
Enter the phone number where you receive texts.
Select Upload file when starting action and choose CSV File.
Set Save location to /tmp/.
Confirm the rest of the settings as needed.
Hit Create Now.
Wait for hubspot to process your request.
When done, find the new workflow under My Experiments and click Run next to Completed Actions. Then look under Results - Messages and check Sent Date, Unsent Count, and Delivery Status. This gives you a good idea of how well the job went.
2) Manual Method
The second option is to download the free desktop app and create a spreadsheet with all the information by hand. Once you know exactly what you want, head straight to Tools & Utilities and open Email Manager. From there, follow the steps below to start transferring your mail:
Click Add Mailboxes... button.
Check All boxes except Old Emails and Direct Messages.
Type in the name(s) of mailbox(es).
For each mailbox, type in SMTP server details including port numbers. Make sure to include TLS encryption.
When ready, hit OK.
Go back to Manage List tab and click Finish.
3) Third Party Apps That Will Sync Your Data Between Platforms
One final method involves installing either Zapier or AnyDone Pro to make the transfer easier. These apps allow you to connect many services together, including HubSpot and Gmail, so that whatever happens on one platform happens on another. They both have built-in tools to export your emails from one destination and then import them elsewhere. Just log into whichever service you'd prefer to use and go to Integrations.
With this solution, you won't have to worry about downloading anything since it will take care of all the heavy lifting. Plus, you can keep accessing your emails anywhere and everywhere once you switch to HubSpot.
However, Zapier and AnyDone Pro aren't cheap and require paying monthly fees for continued usage. So unless your budget is unlimited, you may want to avoid those options.
A cheaper alternative is to install HubSpot's own software. There are instructions available on its website if you decide to give it a shot.
Here's how to change accounts on Android or iOS.
Download: HubSpot Mobile App for Android | iOS (Free)
Unfortunately, HubSpot doesn't offer a native tool to pull emails from Gmail. Instead, you'll need to rely on third party apps. Two popular ones are:
Mailchimp Connector: One of the best known tools around, MailChimp Connector allows you to easily extract lists from a variety of sources like Facebook Pages, Twitter Followers, Instagram Feeds, LinkedIn Contacts, and more. Simply sign up for the premium version ($19 per month plus applicable taxes) and let the tool fetch your data for you.
It works seamlessly across multiple platforms, letting you send bulk emails quickly and efficiently. Best of all, it requires no technical expertise whatsoever. Also, unlike HubSpot itself, you never pay extra money to use it.
Check out the full review for more details.
Mentioned above are several other great alternatives for migrating your email address list. Each works differently so experiment with a few until you find what suits your needs best. Remember to double-check for potential privacy violations though.
Tip: Don't forget that you can always build your own simple web form for sending newsletters directly to specific people on your list. Or better yet, automate your newsletter delivery with an autoresponder.
You can certainly add individual names and emails to HubSpot simply by typing them in. However, if you have a large list, you might want to consider building a custom database first, otherwise it'll become tedious to update hundreds of records every day.
To create a new table, navigate to Database & Tables menu and click +Create Table. Fill out the fields according to your preferences, making sure to assign unique IDs for each record. Next, hit Create Table.
Now you'll see that your table view looks empty. To populate it, visit Settings & System Admin and click on Users. Find your newly created user account and click Edit User Profile. Under Main Details, find Default Contact Information section and enter your preferred phone number.
Repeat this step for every single person on your list. Afterward, scroll down to Other Contacts and fill in additional information like personal notes, social media links, etc. Finally, hit Done and repeat again for remaining sections.
Afterwards, come back to Database & Tables screen and click on Update Indexes button. Scroll down and select Tables from dropdown menu. Choose your table from the list and hit Apply Changes.
Finally, return to Settings & System Admin page and confirm changes under Application Configuration. Repeat for every table you added earlier.
Once done, return to Database & Tables screen and hit Generate SQL Queries. Copy and paste generated code into Open Source field and press Execute Query. Navigate to Deployment folder and copy generated.sql file. Head back to Database & Tables window, choose Import Script, and browse to the path containing.sql file.
Hit Continue and wait for deployment to complete. As soon as it finishes, refresh your tables.
This part depends largely on what kind of content you plan to store in HubSpot. Unfortunately, HubSpot offers limited functionality regarding eNewsletter management. Its Content Management API does provide basic features for managing newsletters, however.
In case you want to move long articles written in MarkDown format, you can convert them into HTML and post them through HubSpot. Otherwise, you can share original documents sent from outside sources.
First, ensure that you've enabled document sharing in HubSpot Security Center. Then, pick Share Document link from Documents menu. You can attach that link to emails, websites, blog posts, etc., and anyone clicking it will immediately gain access to the shared file.
Alternatively, you can opt for Send Later feature. With this, whenever you write a piece of news that needs to stay online longer, you can schedule it to appear later on particular date and time. At the same time, recipients can read updates anytime. It's perfect for keeping readers informed while giving yourself some breathing room.
Of course, you can also embed images, videos, and audio clips into emails.
What about attachments? Well, unfortunately, HubSpot limits maximum attachment size to 25 MB. And yes, you can technically bypass this limit by uploading larger files onto cloud storage sites like Dropbox. However, this approach comes with numerous risks, especially if you don't have control over the hosting servers.
And finally, remember that you can also use HubSpot Calendar to organize events and meetings.
 Send emails at scale

