 LIMITED SPOTS
All plans are 30% OFF for the first month! with the code WELCOME303
LIMITED SPOTS
All plans are 30% OFF for the first month! with the code WELCOME303

LIMITED SPOTS
All plans are 30% OFF for the first month! with the code WELCOME303

Salespeople are not always the best at planning their workflow, so it's important that they have something written down on paper when creating processes for new opportunities.
The first thing we recommend our clients do before starting any project is to write out all of the steps needed from beginning to end. In this way, your client can be more proactive about managing projects instead of waiting around for updates or requests. It also allows them to plan ahead of time and make sure everything goes smoothly once production begins.
We've found that writing things down by hand works better than using templates. Templates often leave room for interpretation and don't allow companies to personalize certain aspects like logos and colors. If there isn't enough space on one page, consider adding another sheet just for these details.
Once you're finished with drafting your initial document, you'll want to review it twice over again. Take some time after reviewing to think about what else might need to go into the final product. You may notice missing items that aren't part of standard practices but would help make sense for your company. Don't worry if you're unsure where to start—we will walk through each step below.
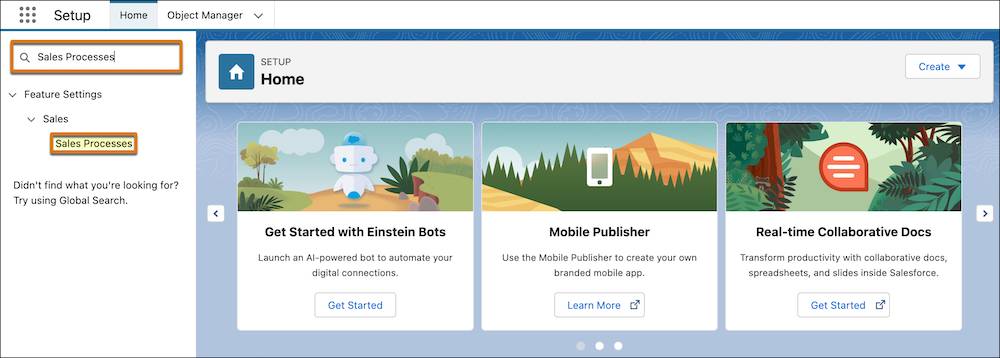
When setting up opportunity management within Salesforce, you'll see three main sections along the top of the screen: Opportunities, Accounts & Contacts, Leads & Pipeline.
Opportunity Management gives you several different ways to set up your pipeline based on your needs. For example, you could choose to use Opportunity Type (like New Business vs. Account Activation) or Stage Duration (for instance, Qualify stage lasting 1 month). The most common choice, however, is to select which phase you'd prefer to work on next.
If you already know which path an account will take, then selecting Next Action should give you a clear idea of how far past activities should progress. Otherwise, feel free to pick whichever option you find easiest to follow. We typically stick to picking either Next Action or Phase because both options provide similar information.
To change between those two stages, simply click on the field labeled "Next" and drag the slider to move. Once you've selected your desired location, hover over the box underneath the button and hit Save Changes. Now, whenever anyone views the same record, they'll automatically get redirected to the correct section.
Most of us have heard terms like SMART goals and PPPs, but did you ever wonder exactly what they mean in practice? When you come across these words while discussing business plans, the people who use them tend to focus heavily on numbers, specifically revenue targets. But when it comes to actually designing processes that lead to success, focusing too much on monetary value doesn't necessarily translate well into actionable tasks. At times, being able to show tangible results helps motivate employees even more.
For this reason, we encourage taking advantage of opportunity types, lifecycles, and stages rather than strictly speaking in terms of dollars. As long as everyone knows roughly how many leads it takes to reach a given dollar goal, it becomes easier to determine whether or not you reached your target.
You can also use this to your benefit when talking with potential customers. Instead of saying “our average deal size is $10k," say "it usually takes 3 qualified leads per week to close a sale." Customers will understand the math behind these statements without feeling lost. They'll be able to easily visualize how big deals grow depending on how quickly they progress through various stages.


It's easy to organize your opportunities in Salesforce by dragging-and-dropping them onto specific rows. However, if you happen to have multiple teams working on separate accounts, sorting them alphabetically makes it harder to identify which team handles which accounts. Plus, it's difficult to tell which records belong to whom. To solve this problem, we suggest ordering your opportunities according to lifecycle.
Within each row, you can sort them from oldest to newest. Then, you can assign a color label to each record based on its status. This way, you can distinguish between active listings, scheduled appointments, and completed orders. By doing this, you can avoid confusion regarding who has access to which data.
Here's a quick guideline:
New - These are leads that haven't been assigned to anyone yet. Typically, they require further qualification before someone decides to contact them directly. Therefore, these leads shouldn't be visible to every user.
Qualifying - After the prospect completes basic requirements, he/she moves into this stage. Here, the customer receives a quote request, inquires about pricing, etc., but hasn't made a firm decision yet. This category contains records ranging anywhere from 30 days ago to 2 months ago.
Scheduled - During this stage, a customer chooses a date and time to meet with you. Although they haven't signed off on anything yet, chances are good that they won't cancel unless it's absolutely necessary. Records here range from 4 weeks ago to 8 weeks ago.
Completed - When a prospective customer places an order, it marks the completion of this particular stage. Usually, they decide to buy right away if they like what they see. This means we're looking at records ranging from 10 weeks ago to 12+ weeks ago.
As mentioned earlier, you can switch back and forth between viewing your opportunities in chronological order or by lifecycle. Simply navigate to whatever view you'd like, click Edit Filters on the left side of your screen, and select Sort by Lifecycle. From now on, all of your opportunities will appear accordingly.
There are four general categories of opportunity types available in Salesforce: new business, renewal, acquisition, and retention. Each of these types represents the current state of the relationship between the customer and your organization. And since they vary wildly in nature, it's helpful to break them down into smaller segments.
Let's look at how opportunity types relate to regular CRM terminology. A lead refers to a person interested in learning more about a business, whereas a contact is an existing customer whose primary role involves purchasing goods or services. Meanwhile, quota is used to measure performance against sales targets. Lastly, repeat buyer indicates someone who's purchased products from you before.
In addition to offering plenty of flexibility, opportunity types offer additional benefits. Since each type has unique characteristics, you'll never run into problems trying to figure out which ones apply to individual situations. On top of that, having a list beforehand lets you structure conversations in advance.
For example, if a prospective customer calls asking about renewing his contract, you could inform him immediately that he belongs to the Renewal segment. With this knowledge, you can tailor your pitch differently than if you were only aware of his overall interest level.
Now that you know how to design custom pipelines inside Salesforce, let's talk about why using prebuilt opportunity types is beneficial. First, you can save yourself precious time by avoiding unnecessary research. Second, you can showcase your expertise by providing relevant information upfront. Finally, it's great for automating repetitive actions. That said, we wouldn't advise going overboard with customization. Doing so prevents users from accessing certain features, leading to slower productivity.
Also, keep in mind that you can still customize your own fields if you wish, as long as you remember to update the labels afterward. Just tap the Customize Label icon located beneath the label field itself. There are other optional settings you can adjust as well, including font style, background image, and spacing.
A few tips to remember: Make sure to include appropriate images, especially if you intend to display icons prominently. Additionally, try to refrain from putting spaces in front of columns containing large amounts of text. Last but not least, try to ensure that you're using consistent fonts throughout the application. Using inconsistent styles can confuse visitors.
Sales reps have been using spreadsheets for years to track their leads and manage opportunities. But what if there was one central repository that could help them prioritize work more efficiently? What if they had access to all relevant information about a prospect from lead qualification through close? That's where Sales Cloud comes into play. In this article, we'll show you how to set up a sales pipeline within your company with just a few clicks.
Let's start by defining "opportunity." An "opportunity" is any contact made between a business or individual interested in buying something (the buyer) and a seller who has it available but wants to sell it (seller). The two parties may be part of the same company, organization, industry, etc., or they can come from different companies. They also don't need to be aware of each other beforehand. So whether someone on your team knows a potential customer at another firm, or vice versa, both those contacts become an opportunity when brought together.
Now let's dive into setting up a sales pipeline in Salesforce. We'll cover everything from creating new accounts to assigning tasks based on which stage a deal should go to next.
The first step towards building a sales pipeline is to identify your target market. You want to focus on industries that will benefit most from having a solution like yours. For example, if you're selling insurance products, look into financial services firms. If you have expertise in cloud computing solutions, explore IT departments across major corporations instead. Your goal is to find businesses already looking for your product or service. When you've identified these prospects, you can then move onto the next phase.
Next, decide which type of account manager you'd like to handle each sale. A lot depends on the size and scope of your business. Smaller organizations usually only hire one person responsible for managing deals throughout the lifecycle. Larger ones often employ teams of people to take care of every aspect of a transaction. Whichever route you choose, make sure everyone involved understands their role and responsibilities.
After identifying the right sales rep, give him/her some basic training so he/she can learn the ropes. It's important not to overload the early stages of the funnel too much, lest you risk losing momentum before things really get going. As you grow, however, you may wish to add additional resources depending on your needs.
Finally, define the steps needed to convert a lead into a paying customer. Here's how our own process works. First, a lead qualifies itself via email or phone call. Next, a designated member of the team reviews its details. Then, depending on certain criteria, either the leader or several members independently assign a priority score to the lead. Finally, after reaching consensus, the decision-maker decides whether to proceed further.
To see how easy it is to use Salesforce to maintain a full sales cycle, check out this demo video created by Salesforce.com.
As mentioned earlier, once a lead meets specific requirements, it becomes eligible to enter the sales pipeline. Once it does, you can split that lead into separate categories to better organize them. Some common types include ReadyForClose, WaitOnSeller, LostCause, LowHangingFruit and WonByMail.
Once you reach agreement on priorities, the next thing to consider is workflow management. One way to achieve this is to segment leads according to their status, giving each category its own dedicated page. On top of being easier to navigate, this approach helps ensure accuracy and efficiency.
Another option is to create custom object records specifically related to each lead, even though they aren't necessarily part of the Salesforce CRM platform. Doing so allows you to keep tabs on multiple projects without cluttering up data entry fields unnecessarily.
So now you know what a "sales opportunity" is, how do you actually create a process around it? There are four main ways to do this.
First, you can manually record activity yourself. To do so, click Create > Record Type and select Opportunity. From here, fill out the necessary fields and hit Save.
Second, you can import existing transactions directly into Salesforce. This requires you to sign up for Partner Packages, which costs $16 per month and provides free integration with third-party applications. Click +Add Items & Choose Source followed by Import Activities. Select Opportunities and Continue.
Third, you can write automation code to execute repetitive activities automatically. While technically possible, this isn't recommended because it takes away control over processes. Instead, you can simply use prebuilt functions built into the system. Go to Setup > Workflow Management > Automation. After signing in, search for "OpportunityFlow," and follow the prompts to configure it.
Lastly, you can leverage features such as Visual Force Pages, Lightning Components, Apex Classes and Scheduled Jobs to automate various aspects of your pipeline. These components allow developers to create apps that interact with external systems seamlessly. For instance, you might integrate Lead Conversion functionality with Google Calendar. Or you could develop a dashboard displaying live updates on your progress.
Here's an overview of how Visual Studio Code can simplify development on the front end:
Visual Studio integrates nicely with many programming languages including Java, JavaScript, C++, HTML5, CSS3, Python, PHP, Ruby, Swift, Scala, CoffeeScript, ObjectiveC, Perl, Shell Script, Makefile, Git and SQL. Plus, VS Code handles versioning files, making it perfect for collaborative project development.
Before diving into specific methods, you should understand the general structure of an opportunity. Every opportunity consists of five distinct phases: Qualify, Discover, Narrow, Present and Close. Depending on the specifics of your situation, you may need to adjust these slightly or completely change their order.
In Qualify, you begin developing relationships with prospective buyers. At this point, you gather as much information as possible regarding their goals and objectives, current state, budget constraints and timeline. All of this info goes toward helping you craft the best pitch possible. Don't forget to ask open questions during this phase, since respondents won't feel comfortable sharing sensitive information otherwise.
During Discover, you determine whether a given opportunity is worth pursuing. During this time, you examine feasibility, viability and demand side factors. You may also conduct research pertaining to competitors' offerings and internal capabilities. Be wary of falling victim to unscrupulous tactics like phishing scams, especially while handling sensitive personal data.
Narrow refers to whittling down your list of qualified leads until you only have a handful left. Typically, this involves sorting candidates according to their perceived level of interest. However, this doesn't mean you shouldn't continue interacting with anyone. Rather, you mustn't delay interactions indefinitely due to poor filtering.
Present focuses on preparing individuals for meetings. By providing background materials, detailed explanations and supporting evidence, you increase chances of receiving favorable responses. Additionally, you can demonstrate value propositions, case studies and ROI figures to strengthen your argumentative skills. Just remember to avoid putting pressure on prospects by asking for quick decisions.
At last, you complete Close by finalizing agreements and securing funding. Keep in mind, however, that it's perfectly acceptable to defer closing discussions temporarily, particularly if you encounter delays in getting a response back.
With the above framework in place, you can implement a robust strategy for generating revenue faster than ever before. Before long, you'll wonder why you didn't think of doing this sooner!
Looking for more advice? Check out tips for winning proposals and avoiding bidding mistakes. And be sure to review these essential elements for crafting successful emails.
Sales reps have been using the Sales Cloud since it was first introduced back in 2011. Now, with Sales Cloud release 20000 (May 2021), there's an even more powerful tool that can help your team close deals faster than ever before. Here’s why they need Sales Cloud, what it offers them, and how to get started.
The new capabilities of Sales Cloud allow users to manage their pipeline better, gain insight into their customers' needs, and make smarter decisions about which leads should be prioritized next. It also provides marketers with insights on which prospects would benefit most from being part of one of their programs. And finally, by streamlining processes internally, this will save time so reps can focus on closing business while managing accounts more efficiently.
With all these benefits comes the challenge of creating a sales process, especially because each account has different requirements. There are three main types of sales methods used today—BANT, MEDDIC, and SCOTSMAN. These require slightly different approaches, but generally follow similar steps. In order to understand how to set up a basic stage within each methodology, we'll start off with an example of setting up a lead conversion process for our fictional client “Caroline Jones.”
Let’s say Caroline wants to buy a car online. She likes the Mercedes-Benz A-Class but doesn't want to pay full price right away. So she decides to enter her information and see if any other dealerships offer lower prices. If not, then she contacts the dealership closest to where she works. Then she waits until she receives a quote or call backs. Once she gets the quote, she compares that against another dealer. Let’s assume both quotes come in at $27,000. The dealer who offered her the lowest price wins. Afterward, she may decide to go back to them again. Or maybe she’ll try contacting the second best deal. Whatever happens after that depends on whether she finds a better deal elsewhere. We’re going to use the term "lead conversion" here because that's usually the goal of the entire sales cycle. Basically, you're trying to convert someone interested in buying something into actually making the purchase.
For purposes of this article, let’s say we want to automate the whole thing. That way, when a rep logs onto Sales Cloud during a specific period every day, he or she can immediately begin entering data. Below is the flow chart of the process we want to implement, starting with finding out if anyone else in the area sells cars like ours.
Since there aren't many people selling vehicles like hers locally, Caroline sends out a message via Facebook asking questions related to vehicle pricing. Her initial outreach strategy is based on the following question format: What type of vehicle could I possibly be looking for given my location? How much does it cost? When is the best time to contact them? For now, we just want to find out if anyone responds to her request. If no responses show up, then she moves down to the next step. Otherwise, Caroline continues to ask additional questions about available models, color options, etc., until she reaches the end of her list. At this point, she goes straight to calling the company directly instead of sending out a mass email. By doing this, she hopes to avoid getting spammed and stay focused on only relevant emails.
Once she calls the number, Caroline asks if they sell cars like hers. Then she tells them she found their website through Google search results and wanted to know if they had anything cheaper. Most likely, at least one person will respond back. But depending on how busy they are, this won’t always happen. Either way, once Caroline hears back from whoever answers, she enters details about herself and the vehicle into Sales Cloud.
Afterwards, she’ll receive a text message letting her know that someone called with interest in her desired model. Depending on her preference, she might choose to send a response back saying yes or no. As long as she did OK in terms of keeping things short and sweet, she shouldn’t hear from them again unless they inquire further. From there, she’ll probably continue to reach out periodically over several weeks. Eventually, she’ll either land a test drive or place an order.
While this isn’t exactly a complex process, it illustrates what reps typically face daily. Each situation will differ according to the goals of each user, which means that some companies may prefer to skip certain phases altogether. However, having a simple system in place helps everyone work together without too much confusion. You can adapt this same concept to fit whatever scenario you encounter, including those involving multiple product lines or services.
So how do you take this example and turn it into a fully functional workflow? To answer this question, it’s important to remember that there are two parts involved in building a sales funnel: defining stages and adding them to opportunities. While the actual mechanics behind each phase vary between platforms, below is how you'd proceed with implementing this idea in SFDC.
First, define your own stages. Since each customer follows a distinct path, you must establish a few base points along that journey. Start by identifying your top priorities and objectives for each potential customer interaction. Next, write down what actions they need to complete before moving forward. Finally, determine when they should move on to the next one.
Here are four examples of common stages: Discovery Stage, Decision Making Stage, Ordering Stage, and Follow Up Stage. With these in mind, you can now identify the appropriate fields to include in each stage.
Now that you've got a rough outline of what you want to accomplish, click Create New Flow on the bottom left side of the screen. Choose Account > Opportunity & Campaign Management. Select Lead Conversion Processes from the left menu bar, followed by Define Your Own Lead Conversion Stages. You’ll notice that there are already five preloaded stages that you can select from.
Next, click Add Step to expand the section and drag whichever field(s) you wish to assign to a particular stage. Click Save Changes when done. Repeat this action for each individual stage and hit Done.
In addition, you can manually customize each stage by clicking Edit Details underneath the title. This lets you change its name, description, and image.
That's pretty much everything you need to know about how to create a stage in Sales Cloud. Remember, you don’t necessarily have to stick with the default ones provided by Sales Cloud. Feel free to tweak them to suit your preferences. Also keep in mind that whenever you share a link inside a campaign, the recipient automatically starts on the last stage you created. Therefore, if you plan to use multiple stages throughout the life cycle of a single campaign, you’d have to repeat this entire process for each individual one. Luckily though, this is easily remedied by simply changing the status of your current campaigns to Draft.
To recap, here are a couple final tips to consider regarding implementation:
If you plan to run a multi-step campaign, ensure that you enable Auto Complete on recipients before beginning. Otherwise, you’ll have to wait until they finish the previous task before proceeding.
When editing stages, remember that these live within an opportunity record. Thus, you can edit their names and descriptions anywhere in the transaction history.
You cannot delete or modify existing stages. Instead, you have to create a new version of them from scratch.
When adding stages in bulk, be mindful of the fact that you can only insert them in sequential order. Therefore, think carefully about where each one belongs before assigning it to a specific user.
Creating a sales process requires planning and forethought. Before rolling out any changes, you should consult with your IT department to guarantee proper functionality.
 Send emails at scale

