 LIMITED SPOTS
All plans are 30% OFF for the first month! with the code WELCOME303
LIMITED SPOTS
All plans are 30% OFF for the first month! with the code WELCOME303

LIMITED SPOTS
All plans are 30% OFF for the first month! with the code WELCOME303

The messages in your Gmail account are piling up in a joyful mess? Or maybe, like me, you just want the chance to check all those incoming mails at once without having to scroll through them one-by-one. Either way, it is time for some organization!
In this article we will show how to organize your email using Gmail's automatic sorting options. We'll also give you tips on how to use these features more effectively.
Gmail allows users to classify their emails according to criteria such as sender or subject line. These filters can be used together with rules that control where particular types of mail should end up (e.g., into a specific folder). This feature is called Smart Filters and they allow us to create folders based on our needs and desires.
You could set up smart filtering so that every message from someone who has sent you money gets classified as "Payment", while any other type of message goes straight to trash. You might even decide to sort only certain kinds of messages, e.g., messages containing images or attachments.
To begin setting up your own filter, click the cog icon next to the search box. On the Settings tab, select Filter Messages.
If you would rather not deal with the settings menu, here's what each option does:
"Any message": If selected, all incoming messages will be stored in the Inbox.
"From:" selects which messages should get sorted when you apply the rule. For example, if you choose From: mommy@gmail.com then every new email coming from her will be placed into the labeled folder Mommy. Note that there may be cases where both messages arrive from different sources. When this happens, Gmail tries to find a common denominator between those two addresses, resulting in either getting categorized under the same name, or going into separate folders depending on whether they came from work or home.
"Has Attachments": Only applies if you've enabled the option below. It ensures that messages with attached files won't appear in the inbox unless you specifically mark them as important.
"Subject:" specifies the conditions under which a given message should be filtered. By default, all incoming messages are treated alike regardless of the subject heading (i.e., they're passed through Gmail's spam detection algorithm before being assigned to a folder). However, you can change this behavior and assign special meaning to individual subjects via the dropdown list above.
For instance, say you'd prefer to treat all messages about upcoming events differently -- perhaps because most of them require RSVPs -- but don't want to waste resources organizing event announcements that come with no urgency. Then simply pick Subject: Event Announcement and Gmail will place all future messages related to events under the appropriate category.
This works similarly for people whose names match the chosen tag. To enable it, tick Has Attachments. Otherwise, Gmail will try to categorize messages based on the first part of the address after @gmail.com, i.e., the person's actual username.
Now that you know how to set up filters, let's take a look at how to actually start making use of them.
Yes you can! With the help of another handy Gmail tool called Labels, you can automate the process. Once created, a Label will serve as a catchall bucket for similar messages throughout your life cycle. Just think of it as tags for clothes -- you wear many different outfits over time, and need several shirts like this.
So why not designate a Label as something akin to a clothing closet? Here's how you do it:
Go to Mail " Create New Folder. Give it whatever title suits best.
Pick your preferred color scheme. Click Done and Finish setup now.
Click Create Folder.
Then whenever you receive a message that fits within the parameters of your newly created Label, drag it onto the relevant folder in your main panel. Repeat this step until you reach your goal.
And yes, you can add multiple Labels per folder. So you could keep track of different types of correspondence separately. And for extra convenience, you can link Labels to existing Gmail Categories. That way you can quickly jump to any Category at a glance.
Here's how to do that:
Open the Google Labs page, and navigate to Menu " Preferences...
Next to Show Labels in Sidebar, turn off Linked Folders. Now you can access Labels from the left sidebar.
Scroll down to Categories and click Edit Links. Check the box next to your favorite Categories.
That's it. Whenever you see a Category matching your desired Label, it will automatically pop open.

When you're sending out mass emails, sometimes you don't pay attention to where your recipients' replies land. As a result, you often end up sifting through tons of responses instead of keeping tabs on who wants what kind of information.
Luckily, Gmail offers a neat solution that lets you direct emails straight to preselected destinations. All you need to do is tweak the recipient field slightly and watch as your emails magically morph themselves into neatly organized bundles.
First, let's assume you want to group all outgoing messages together. Start by adding a colon followed by the desired destination(s) separated by commas. Next, replace the previous text inside the quotation marks with %b. Don't forget to include the pound sign (#), otherwise Gmail will ignore everything else. Finally, append <br& to make sure your instructions aren't misinterpreted as HTML coding.
Here's the final code you need: %5cfrom=mike@example.com%7cmessageId=4354%40test#respond
What exactly does this mean? First, you tell Gmail to expect an email with the following format. Second, you specify the location of where the response should land. Third, you define the content that should accompany your message. Fourth, you ask Gmail to skip past anything that doesn't fit the description specified earlier. Fifth, you instruct the computer to display a horizontal rule separating the reply and the body of the message.
Once you've tweaked your code to suit your needs, copy it into a blank document and save it locally. Head back to your browser window. Replace the original string that appears next to Reply with your modified version. Make sure to hit Enter right after typing it in.
Finally, replace the #respond bit with the path you chose earlier. Save changes, refresh, and voila! Your emails will automatically transform themselves into tidy little packages.
Note that if you want to redirect emails to a single user, you must modify the code accordingly. Simply substitute the word "you" with whoever's account you wish to respond from.
Happy filing!
The messages in your Gmail account are piling up in a joyful mess? Maybe you have been using the same old way to sort through them -- deleting, archiving or moving it out of sight. But isn't there any other convenient method that can organize your inbox without much effort?
Yes, there is! It's called categorizing your incoming emails according to certain criteria. Using this technique will allow you to easily identify which emails need your attention more than others. In fact, it could be one of the best ways to manage your overflowing inbox. And all you'll need is some clever labeling skills. Here's how it works.
First things first... What does "labeling" mean? Labeling means giving each message in your inbox different characteristics so that they become easier for you to find later. You can use these characteristics as filters to decide what action to take with each new email. For example, if you want to archive every email from John Smith but keep those from his wife Mary, just create two separate labels in your Gmail account -- one for him and another for her. This kind of filtering allows you to quickly spot and deal with unwanted messages while keeping only the ones you actually care about.
Now let's see exactly how easy (and fast) it is to set up automatic actions in Gmail based upon specific conditions. We've divided this process into three parts: saving emails, sending emails and filing emails. First, we're going to show you how to automatically move emails to folders. Then we'll explain how to forward selected messages straight to a particular label. Finally, we'll cover how to add mailers to existing labels. Ready? Let's get started.
If you like to read your emails immediately after receiving them, then simply mark them as unread before opening them. If you'd rather wait until you open them, try marking them as starred instead. Either choice makes it very simple to find them again at a later time. However, if you really prefer to delay reading for now, consider creating a filter to save future emails to a special folder.
To start setting up such a rule, click on the drop-down menu next to New Mail Filter icon located above the Compose window. Next, select Create filter. A dialog box will appear where you can enter details about the filter you're trying to create. Fill in the required fields and hit OK.
Next, scroll down to Advanced Settings and check Show original message when applying rules. Now return to the previous screen and under When a Message Matches choose either Apply Label(s) or Save To Folder. Select Save to Folder. Choose a name for the folder and confirm. Click Continue, then Finish. That's it! Your newly created rule has taken effect. Every day, Gmail will look for incoming messages that match your condition and apply the appropriate label or move it to the specified folder.
Note: In case you ever delete a saved folder, however, you should also remove the associated rule. Otherwise, deleted items would continue to trigger the rule even though no longer present in your mailbox.
You can move emails directly to a designated Outlook folder by adding a forwarding address to their From field. Simply follow these steps:
Click the gear button inside the compose window and select Forward Lookup.
Enter the person's e-mail address.
Select Add Address(es).
In the resulting pop-up window, type in the desired recipient's address. Make sure not to include spaces between words.
Once finished, close the popup window and return to the main page. On the right side, you'll notice the Forwarded header added to the subject line. Just below it, you'll find instructions on how to change the default Subject line format. Once done, click Send/Send & Close.
Finally, enjoy watching your important emails fly away to the intended destination.
It's possible to attach a label to any email you write by typing [LABEL NAME] followed by @. So, for instance, if you wanted to tag the current email with the word "important," you might say, "[Important]" followed by @important@gmail.com.
For example, suppose that you have five pending emails related to taxes. Rather than sorting them alphabetically, why not assign them all to a single tax category? All you need to do is highlight the entire block of text and replace it with the assigned label term. Or maybe you want to group together several similar emails because you don't know who sent them. Whatever the reason, you can give each individual message a unique identifier. Say you received four emails from different people asking questions about a recent trip you took. Instead of responding to each individually, you can create a quick response template and fill in the blanks for each sender. Of course, you could accomplish something similar by tagging each email with a relevant keyword. Or you could use multiple labels to further streamline your workflow.
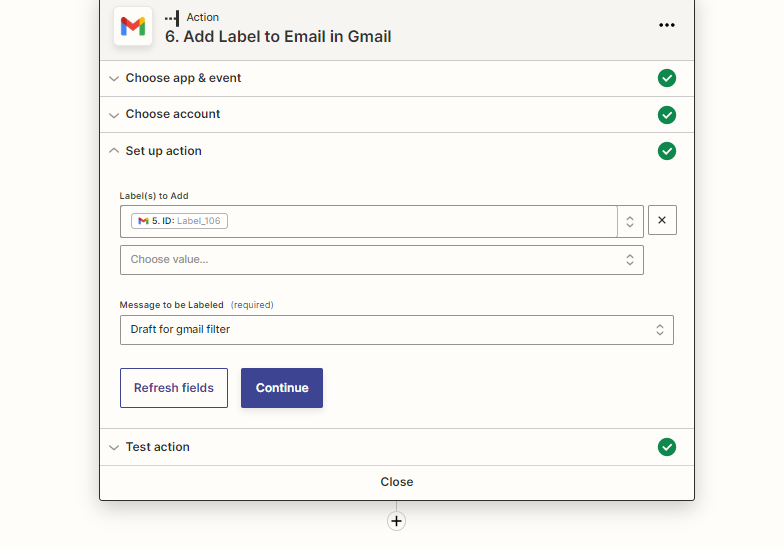
To create a new label, hover over the More Actions option and click Assign Current Email to Category.. Afterward, pick a suitable name for your new label. Then switch back to your inbox tab and view the list of your new categories. Notice that each item contains the title of the corresponding email along with the label itself.
This handy feature lets you jump right to the exact piece of correspondence you were looking for. Furthermore, you can drag and drop items within the labeled section to reorder them.
Also note that you can apply multiple labels simultaneously. Keep in mind, however, that doing so may cause confusion if your recipients aren't familiar with the convention.
When organizing your emails, it doesn't hurt to throw those older than six months into the recycling bin. By design, the Gmail search tool is quite effective at finding files stored elsewhere online. Therefore, you shouldn't run the risk of losing track of important documents by letting them slip past your radar.
To begin, pull up a fresh copy of Google Search Console, log in, and navigate to Cog Icon - Preferences - Search Engine Optimization Tools - Privacy Policies. Under Categories, expand Files and Documents. Scroll down to Find Internal Content, and enable Use Sitemap Filtering. Afterwards, adjust the maximum age range to whatever suits your needs. Hit Done.
Now whenever you come across an interesting link, article, video, etc., you can perform a desktop search and instantly see whether it exists somewhere else online. Additionally, you can narrow your results by date, location, language, document type, and so forth. Lastly, remember that you can always reverse engineer Google searches by selecting File - Print Preview - Download Page As PDF.
Have fun exploring and experimenting with Google Search Console and its various tools!
We hope you enjoyed our guide to automatically classify your emails. Please feel free to share your thoughts and experiences with us in the comments section below.
The messages in your Gmail account are piling up in a joyful mess? Or maybe the ones that aren't so funny have been moved into folders without you even knowing about it? Either way, there's no need for anxiety anymore — just follow these simple steps to organize all your incoming mail with ease!
You can use this guide as a general rule, but if you're using Google Apps or Google Workspace products, check out their instructions on how to set up filters.
To create a new filter, click "More" then select Filters & Blocked Addresses from the dropdown menu.
Then go down to More Options... and choose Create Filter.... Type in a name like "@spam," which will be what shows up next to each message sent to spammy addresses (like hotmail).com), and enter some additional information such as Subject line and include any other criteria you want to apply to those particular messages. You'll also see the box labeled Matching Messages underneath where you can add more details to make sure they really match everything you were looking for. Click Continue when done.
Now you should see a list of options pop up under Where to Look, including Inbox, Spam, Trash, Drafts, Sent Mail, Deleted Items, Junk, Promotions, Updates, and Forums. Select whichever one is most appropriate for whatever type of message you'd like to get rid of. For example, because my inbox tends to fill up with newsletters and promotional offers, I usually just stick them in the Promotion section. If you prefer to keep things separate, feel free to categorize however you wish. Now hit Apply.
It may take awhile before those messages start filtering in, depending upon how many exist already. Once they've appeared, scroll through the list until you find what you're looking for and delete it. When you're finished deleting emails, just head back over here and repeat the process above. It won't take long at all before you'll notice that your mailbox has become much tidier than it was previously. And best yet, you don't even have to open your email client!
This works exactly the same way as moving files around on Windows or macOS. Just right-click on the email and select Move To Folder. This doesn't require anything special, although we recommend enabling IMAP access for maximum speed. On Android, tap Menu " Settings " Accounts " Send mail " Configure Notifications " Enable notifications. Then, simply download our email app and sign in. Our favorite is Airmail, available on both iOS and Android, since it gives users tons of customization options while still being fast and easy to navigate.
If you're working on multiple computers, try setting up something similar across every device and leave yourself reminders to review important emails once per day. That way you won't forget to read your work emails unless you actually forget. We recommend turning off alerts when opening your email on another computer, though, otherwise you might miss something critical.
Note: While this option isn't ideal, there is technically a workaround to enable automatic sorting of emails based on certain keywords. However, doing so would involve editing the actual code behind gfeedfilter.html, which is not recommended due to security concerns. Instead, we suggest creating your own custom HTML page using CSS and JavaScript instead.
This feature might seem odd at first, but consider the usefulness. Maybe you receive hundreds of emails daily and sometimes you only care about specific types of content. With a few tweaks, you can easily save that content directly to a text document. All you have to do is highlight the entire email in question, press Ctrl + C on your keyboard, and paste it wherever you want. Simply put, this makes saving large chunks of texts very convenient.
For instance, let's say you wanted to write a short report for school. First, you could manually cut and paste bits of different emails together, but that gets tedious after awhile. Next time, you might remember to tag those emails with a quick note saying "report!" and then search for them later whenever you need to gather your thoughts. Alternatively, you could always turn this into a scheduled task. Let's say you had a lot of old drafts saved from past reports and you knew you were going to run into this situation again soon. You could just drag and drop those files onto a shortcut icon in your desktop launcher, which opens the relevant documents immediately. It saves you a huge amount of time.
To do this, first press Alt + Spacebar to bring up your Mac's contextual menus. After that, look for Edit " Find/Replace... Hit Enter, input the word "body," and change it to body_of_email. Save changes, and now you should see a new highlighted field called Body Of Email. Highlight the whole thing and hit Ctrl+C to copy it. Finally, go anywhere you want and hit Shift + Insert to paste it. Make sure you have enough space ahead of time to accommodate the copied text, especially if you plan on pasting it somewhere else.
While this method requires a bit of extra setup, it is worth mentioning as it allows anyone to quickly sort through a ton of emails without having to spend too much of their time sifting through everything themselves. Basically, you create rules for your inbox that tell it to place each individual email in a category. By default, Gmail does this automagically when you mark an email as Important, Unread, or Starred. But suppose you received 2,000 unimportant emails today and 1,000 important ones tomorrow. How do you decide which ones are important?
Well, thanks to Gmail's SmartLabels function, you can assign colors to your labels and dictate whether or not each colored label ends up in your Primary tab. So rather than spending hours organizing your tabs, just color-code your labels and watch Gmail handle everything itself. Here's how to do it:
Head to settings and click Labels. Scroll down to Advanced Tab. Under General Label Settings, pick either Color Code Labels or No Color Codes. Choose your preferred choice and hit Done.
Next, head to Categories and select Customise Category Tabs.
Select Only Show [Category Name] From My Own List and click OK.
Finally, head to Folders and select Manage Subscriptions. At the top, you'll see two columns titled Main and Other. Drag and drop your colored labels into the Other column and set them apart from your primary blue labels.
From there, your inbox should begin displaying your preselected categories according to your previous actions. Your emails will end up automatically sorted into groups accordingly, making it easier to browse and locate important items.
Hopefully, this helps everyone stay sane during quarantine. If you ever face issues, reach out to us via Twitter DM or submit a support ticket online. Happy organizing!
 Send emails at scale

