 LIMITED SPOTS
All plans are 30% OFF for the first month! with the code WELCOME303
LIMITED SPOTS
All plans are 30% OFF for the first month! with the code WELCOME303

LIMITED SPOTS
All plans are 30% OFF for the first month! with the code WELCOME303
Gmail is one of the most popular free web-based email services out there, but it's not always easy for people to manage their inboxes. That's why we're here with some helpful tips on how to organize your mails using filters. In this article, you'll learn about filtering emails by adding new labels or moving them into folders.
There are several ways that you can set up a filter within Gmail. Here are two different methods:
Method 1: Create a Filter from Your Email Address Book
If you don't use any third-party tools like Filtrific, Mailwasher, etc., then you may already know all the addresses associated with the accounts you use. If so, just click on Settings " Filters & Blocked Addresses (or go to the Gear icon next to the search field) and start building your own rules. To get started, first select the type of message—it could be either All Messages, Unsubscribe Links, Newsletters, Promotional Emails, etc.—and enter the address(s). Then simply choose whether they should pass through or fail based on certain criteria such as sender name, subject line, date range, etc. Once done, hit Save Changes at the bottom right corner and you will see those filtered messages appear under My Labels.
The downside of this method is that if you'd rather apply multiple conditions, there's no way to combine them together. For example, say you wanted to block promotional newsletters sent from Amazon while passing everything else through. With the previous method, you would need to open each newsletter and mark them individually. But what if you had hundreds of emails per day coming from various sources, making things even more difficult? Well, luckily, there's another option...
Method 2: Set Up Smart Rules Using Filtrific
Filtrific lets users customize smart filters which automatically apply specific actions to incoming mail depending upon preselected parameters. The app offers more than 300+ built-in presets, including options like unsubscribing junk mail, auto-labeling spam, blocking social network updates, managing subscriptions, setting up automatic replies, etc. It also comes with its own unique feature called Nudges which helps users stay focused on work without being distracted by unwanted stuff.
To begin, download Filtrific and install it locally on your computer. After installation, launch the application and sign in to your preferred account. Now drag down the top toolbar until you reach Filtrific's Search Bar. Type the keyword you wish to filter by, e.g., Newsletter List or Discount Codes. Next, scroll down and find the section labeled Manage Subscriptions where you can build your custom rules. Click + New Rule and fill in the required fields. Make sure to check off the Subscribe/Unsubscribe action box. Finally, save the rule and close the window.
This is how it works: every time you receive an email matching the keywords that you specified earlier, Filtrific will run the aforementioned rule and perform whatever steps were selected in the settings. So let's imagine you've subscribed to dozens of newsletters throughout 2016 and it's now 2017. Instead of manually marking those newsletters as read, you can easily automate the process using Filtrific. Simply visit the Filtrific website once again and select the Customize tab located near the upper left side of the screen. Under Actions, uncheck the box marked Only Apply This Action When These Conditions Are Met. Choose Delete Message From Sender and write in the textbox next to Subject Line. Hit Save Changes and you're good to go!
Now whenever you come across these types of emails, just press Shift + Tab to activate the hotkey combination that opens Filtrific's sidebar menu, followed by clicking Open Sidebar Menu. Select the corresponding list in the dropdown menu, i.e., Newsletter List, and proceed to mark those messages as Read. By doing so, you won't waste precious minutes going over each individual email looking for unsubscription links or promotional codes.
However, sometimes when you try to access Filtrific via Google Chrome, it might keep showing error code -10007. We encountered this issue ourselves only after installing Windows 10 update KB3068708. Fortunately, updating Chrome to version 53 fixes this problem, allowing us to continue working normally.
While having too many emails lying around in your inbox isn't necessarily bad, organizing them properly can help make things easier for you. One way to handle large volumes of emails is to separate them into groups according to categories. And labeling is one of the best ways to achieve that goal because it allows you to quickly identify particular types of emails. Luckily, Gmail has made this process pretty simple. Let's take a look at step-by-step instructions below...
In addition to receiving emails directly into your main inbox, you can also configure Gmail to send emails straight to other places, such as a catch-all mailbox, archive folder, or another label. To do so, head over to Settings " General " Undo Send. Check the boxes beside Forward [your primary email] to:, Reply to my default mailing client, and Mark as Spam.
Click Done and then follow our second tip on how to create a label and filter in Gmail.


By following the above instruction on how to create a label and filter in Gmail, you can now categorize your emails into certain lists. However, to further improve your workflow, we recommend automating the whole process by placing emails into predefined folders.
For instance, to place emails received between July 2015 and August 2015 in a certain category named Work Projects, you can put this command into a script:
" sort "@gmail.com" | grep --text "[0-9][A-Za-z]" | cut -d''-f2-" && echo "$DATE_KEYWork Project$NEWLINE""mv $INBOX/$DATE_KEYWork Project/"&&echo ""|sort -u"""
Note that the commands used in the above script will vary slightly depending on your operating system. Also, replace DATE_KEYWork Project with the actual words you prefer.
Once you finish entering the commands, click File " Script Editor " Run Selected Commands. A popup window will pop up asking you to Allow Untrusted Applications Access to Secure Storage. Accept the prompt and wait for the script to complete its job before closing it.
Afterwards, navigate to Tools " Automation " Folder Creation and select Moved Folders. Enter a Name for the moved folder and click OK twice. Lastly, change the value assigned to Move Primary Label to Yes and click Create.
Next, repeat the same procedure for all the necessary labels you created earlier by opening the respective tabs in Filtrific. Repeat this process for all future emails that meet the requirements defined in your preset rules.
What happens if you accidentally delete a filter? Or perhaps you added too many rules in a short period of time. Whatever the case may be, fear not! There's still hope for you...
Just stick with Method #1 mentioned previously since it was designed specifically for situations like these. What makes it stand apart from similar apps is that you can actually modify existing filters instead of starting afresh.
Here's how you can edit a filter in Gmail:
Open the Gmail page in question and locate the filter whose properties you wish to adjust. Alternatively, highlight the entire row containing the desired filter and press Ctrl + C to copy it to your clipboard. Head back to the original filter page, and paste the copied content into the appropriate field.
Hit Save Changes and restart your browser.
That's it! Now, whenever you come across emails matching the parameters of the modified filters, you can simply click on the Edit button and make changes accordingly. Note that you cannot rename filters nor remove them altogether unless you disable them completely.
Do you often find yourself struggling to deal with vast amounts of emails? Maybe it's time you tried out Gmail labs! They allow you to test experimental features and functionality provided by Google developers. More importantly, they offer you the ability to discover new functionalities that may otherwise remain hidden behind menus or icons.
Gmail's ability to filter emails is one of its best features, and it makes filtering out unwanted messages easier than ever before. But what if you don't know how to use filters or need more control over them? Luckily for you, there are several ways that allow you to better organize your inbox with labels.
In this article we'll show you exactly how to create a new filter, as well as some tips about using filters. We will also cover another method that allows you to group together similar emails into folders so they're easily accessible later. Finally, let us remind you that you may access all these options by clicking "More actions" at the bottom right corner of any message page in Gmail. Then choose "Filter messages like this." This way, you won't miss anything!
If you already created a filter but would now like to change it, simply click the three dots next to the filter name (or select More actions from the drop-down menu) and then follow the steps below. If not, just continue reading our guide.
1. Click Create Filter... The first step here is to give your filter a name. For example, you could call it "Personal", or something else along those lines if you wish. It doesn't matter too much since you'll be able to see this information when selecting other filters.
2. Now specify whether you'd like to apply this filter to All Messages, New Mail Only, Inbox, etc., depending on where you receive your mail. If you chose All Messages, the filter applies only to incoming mails, while choosing New Mail Only means that it will include both sent and received ones.
3. Choose whether you want to mark such messages as read/unread. This setting depends entirely upon your preferences.
4. Check the box beside Apply Label(s), if needed, and pick up to six labels you'd like to assign to this particular filter. To avoid confusion, make sure each label corresponds to either a person or a category, e.g., work related vs personal. Once done, hit Next.
5. Review everything again, checkmark the boxes next to your choices, and finally click Finish. Wait until you get a confirmation code via SMS, phone number, or email. After receiving said confirmation, open your account settings ("Account," top left). Go into Filters & Blocked Addresses. Here you should find your newly-created filter under "View blocked addresses."
6. That's pretty much it. Your filter has been successfully applied. Below, you can see what happens when someone sends me an email matching this criteria.
Filtering emails based on certain parameters, including sender names, keywords, content, attachments, dates, and even words, is easy once you've learned how to set up a filter. Simply follow these instructions:
Select Settings from the gear icon located in the upper right corner of the screen. From here go to Labs and scroll down till you reach Email Filters. A list of available filters appears. Selecting one will bring up further options.
Once inside the respective window, look for the field labelled Name. This is where you enter the name of the filter that you intend to activate. Make sure to keep it short yet descriptive. There's no point having a long, hard-to-remember string of characters. Instead, try to come up with a catchy phrase that describes the type of correspondence you're trying to catch.
Next comes the time period within which you want to receive emails. Keep it simple here. Enter your preferred search term, i.e., "work". Or you might opt for entering keywords pertaining to the subject line itself, such as "subject:" work ". This will help narrow down potential matches that fit your requirements.
Finally, you can decide whether you want to consider emails containing specific text, images, videos, audio files, links, etc. By checking Include file types, you'll ensure that non-text items, such as photos, are included in your results.
When satisfied with all fields, press Save Changes. You're good to go! However, if you feel unsure about which option to choose, take a peek at Gmail's official video tutorial. And remember to save changes often because you never know what unexpected tweaks Gmail offers after you save. Also, sometimes the options listed above aren't enough, so you might have to tweak things yourself.
To delete a filter, navigate back to the same place mentioned earlier and switch off Activate [name] instead of adding new filters. Alternatively, you can head over to Settings -& General Preferences -& Labels. From there, highlight the entry corresponding to the filter you wish to remove. Hit Delete selected lables. Be warned though, deleting old filters isn't always straightforward.
Sometimes you'd prefer to send emails to different groups, rather than letting them pile up in your mailbox. Thankfully, Gmail gives you the power to accomplish this task. Let us explain.
First, create separate filters for people who usually contact you regarding work-related matters and those who typically ask questions about personal topics. Secondly, sort their emails according to date range, starting with most recent. Lastly, arrange them alphabetically, making sure to put similar emails close to each other.
Now, whenever you receive an email that falls under the scope of a given filter, you can drag and drop it onto another tab. Doing so will automatically move it to the appropriate folder. Of course, if you wish to retain the original contents, simply copy and paste it. Otherwise, delete it.
This feature works great for keeping track of numerous contacts, especially if you deal with various organizations. Moreover, if you happen to run two Google accounts, you can split your tabs between them.
Yes, you absolutely can! With Gmail, you can send emails directly to preselected folders. To do this, first create a filter. Then proceed to edit it as described previously, except replace Activated[Name] with Send to Folder. When finished, hit Done.
From now on, every time you compose a new email, you can tell Gmail to deliver it straightaway to the specified folder. Remember to enable Move message to folder and Set as Primary Filer. Do note that this action does require verification via SMS, phone number, or email address.
In today's world, it is important for people to keep up with their emails and respond quickly to them. If they need to find something later or if someone else needs to refer back to that message, then having a good search function is essential. This is where filters come into play.
Gmail has always been one of Google’s best products. It includes all sorts of useful features such as multiple inboxes and smart sorting options. There are also numerous ways to sort through your emails faster using tools like filters.
Here we will discuss how to use these filters effectively so that you don't waste time looking at what doesn't matter. We'll also provide steps on how to create new labels in Gmail.
It may seem strange but there was once a time when Gmail wasn't available on smartphones. Fortunately, this isn't true anymore because now anyone has access to Gmail from wherever they go.
If you're looking to filter out specific types of emails via mobile apps (Android/iOS), here are some quick tips to help you get started:
Go to Settings " Filters & Blocked Addresses.
Click Create New Filter.
Select Inbox by default.
Add any criteria you'd like under Categories. For example, select All Mail containing words like bill, payment, etc., or Subject contains text such as Payment Received.
Once done click Next followed by Apply Changes.
That's all! Now whenever you receive an email matching those parameters, it will automatically be marked accordingly.
Note: The above instructions apply only to Android devices. iOS users must follow different guidelines depending upon whether they own an iPhone or iPad. On iPhones, tap More... located next to each option while iPads should look for Email app on the bottom left corner after tapping Edit.
After setting up a few filters, you might wonder how to locate them. Here's a simple way to check your recent filters:
Tap the cog icon situated on top right side of your screen.
From there, scroll down until you see Labels. Tap See All Labels.
Now, choose the ones you want to view. Alternatively, you could simply type in the name of the particular label you desire. Once chosen, tap View Label.
Then again, if you prefer not to bother about searching manually, try visiting https://myaccount.google.com/labels/.
Labels serve two major purposes: firstly, allowing us to differentiate between various kinds of mail based on certain characteristics. Secondly, it allows us to group together similar pieces of information without losing track of them.
For e-commerce platforms and services, this feature helps customers stay organized and makes things easier for them. However, even individuals benefit greatly from labeling their mails.
Let's take a closer look at both cases below.
Creating new labels in Gmail
There are several reasons why you would want to make new labels within Gmail. Some examples include:
To categorize your work tasks and projects.
To separate personal correspondence from professional ones.
To distinguish between spam and newsletters.
One thing worth noting is that you cannot delete existing labels. Therefore, before making more than one, ensure you've already created a handful of them. Then just start adding new labels whenever necessary.
Since you can give names to your labels, it becomes easy to identify them. So instead of writing “Project 1″ every time you refer to a project, change its name to “Eco-Homes Project.”
Similarly, if you want to set aside a section of emails for future reference, you can call it anything you wish. Feel free to assign it a title too. Just remember to stick to a standard naming convention so others know what to expect.
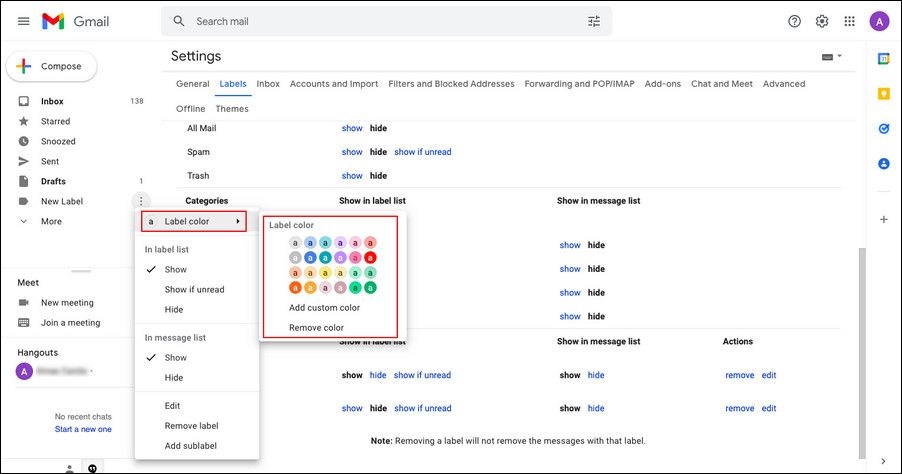
Adding a label takes less than 10 seconds. Simply head over to settings, then choose Manage Labels. From there, choose the label you plan to add. Afterward, hit Save changes.
Alternatively, you can also visit https://myaccount.google.com/labels/add/label_name to begin.
Using labels in searches
When you want to send an email to multiple recipients, it might become difficult to figure out who exactly needs to read it. That's why filtering emails according to categories is highly recommended. But since everyone uses Gmail differently, finding relevant results can sometimes prove challenging.
This is where labeling comes in handy. Let's say you want to ask a question regarding buying furniture online. Instead of sending a mass email to everyone in your address book, you can tag it with a category and let Gmail handle everything.
By doing so, you won't run into trouble during searches. Also, other members will be able to tell right away if they're interested in reading it or not.
Remember that you can easily edit a label anytime you wish. To do so, navigate to settings, pick Manage Labels, and click Edit in front of the desired label. Make sure to save changes afterwards.
As mentioned earlier, Gmail offers tons of sorting options. One of the most popular is Priority Inboxes. By enabling this feature, you can mark certain emails as high priority and thus avoid missing them.
However, another great method to employ is separating your incoming messages into three main categories: Important, Not urgent, and Archive.
The latter refers to emails that aren't related to current activities but still require attention. Such emails can either be sent directly to Trash or flagged as Read Later. Since these messages are no longer active, they're usually deleted eventually.
Important emails consist of emails that you need to attend to immediately. These are typically business-related inquiries and notifications. Meanwhile, emails that fall under Not Urgent carry minor updates from friends.
Lastly, Emails tagged as Archive contain newsletters, promotional materials, and advertisements. They should be kept safe so that you never miss out on anything vital.
On the last page, you'll notice a link called Move to. Clicking on it will allow you to move individual entries from one folder to another. For instance, you can move Messages to trash. Or perhaps Newsletters to archive.
Do bear in mind that moving messages to a different folder means archiving them permanently. Thus, it's advisable to decide beforehand which actions you intend to perform.
Having said that, this process works well regardless of whether you want to hide archived items completely or merely put them behind a paywall.
Unfortunately, Google does currently offer no built-in tool to manage labels. However, there are third-party alternatives that can solve this problem. Visit https://www.labelist.io/ to learn more.
We hope you enjoyed our guide on how to create labels in Gmail. Follow our step-by-step guide to getting familiarized with these functionalities. And feel free to share this article with family and friends!
 Send emails at scale

