 LIMITED SPOTS
All plans are 30% OFF for the first month! with the code WELCOME303
LIMITED SPOTS
All plans are 30% OFF for the first month! with the code WELCOME303

LIMITED SPOTS
All plans are 30% OFF for the first month! with the code WELCOME303

When you use Gmail, there are some things that annoy you about its interface—like how it shows all your unread emails at once or how difficult it is to find specific emails among so many others.
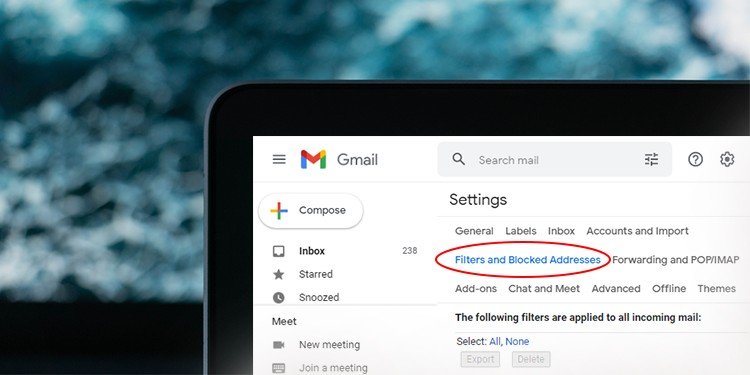
Fortunately, Google has come out with an easy way for users to overcome these problems. This tool allows them to perform actions based on filters set by the user. Here's everything you need to know about filtering emails in Gmail.
Filters allow you to choose which type of mails should be included (or excluded) from incoming emails without having to scroll down endlessly in search of those particular ones. They also help keep your inbox organized by moving similar types of emails into separate folders. If you want to see more details on this process, here’s what happens when you apply a filter to an email.
Once applied, the filter will appear as "Apply Filter" underneath every message matching the criteria you chose. You may have multiple fields under each criterion. For example, if you select "Has Attachment," then you’ll get two dropdowns where you can specify whether only attachments or both text and attachment go through.
Next, click Create Filter. The next window lets you further customize your filter settings. In our case, we're choosing to include any messages containing the word “coupon” in either body or subject lines. To do this, just check the box beside the words. Click Next after making your selections. Then review the results.
If you'd like to change anything in your selection, simply edit the field name or description. Once satisfied, click Finish. A confirmation page will pop up telling you that your changes were made successfully. Now, whenever you receive a new mail with coupon code inside it, it'll show up in the appropriate folder automatically.
You can even create different rules for various labels using the same method described above. Let's say you've created three labels called Coupons, Promo Codes, and Discount Offers. Using this system, if you received a promotional mail regarding something listed within one of those three categories, they would automatically land in their respective folders.
This works exactly the same way if you wish to remove certain items from your inbox altogether. Just leave the corresponding boxes unchecked. When you finish applying your desired rules, hit Create Filter again. Afterward, follow the steps mentioned earlier but instead of clicking Finish, click Delete Filter.
Gmail offers several ways for users to manage their inboxes manually. One such option is creating Smart Labels. These automated labels work similarly to filters. However, rather than organizing your inbox according to preprogrammed rules, these labels let you categorize your messages by yourself.
Smart Label creation requires a bit of extra effort since you won't be able to make changes later on. First off, open a new tab in Gmail. Go to Settings & Filters and Labs. Select Manage labs. Under Labels, select Smart label. Fill in information about the category you wish to use and press Save Changes.
Now, anytime you receive a mail relating to that category, it'll show up beneath the icon labeled accordingly. Additionally, you can assign other people access to this lab. This means they'll be able to view and delete your selected labels too.
While the smart labeling function might not save you much time, it does offer another benefit: It makes sure all your labels stay tidy and easier to locate. Plus, you don't have to worry about accidentally deleting important labels while trying to reorganize your mailbox.
Also worth mentioning is the Priority Inbox feature. While it doesn't provide a solution to the aforementioned issues, it helps you prioritize your inbox by giving you quick access to your most urgent emails first. Simply enable it via Settings & General Preferences. From now on, whenever you get a new mail, it'll display a small dot right below your profile picture indicating priority status.
Furthermore, you can adjust the number of priority emails allowed per day according to your preferences. By default, it displays five. Alternatively, you can add unlimited numbers of priority messages by checking the Allow more priority messages box. Finally, enter the maximum amount of total emails you plan to archive daily.
After configuring these options, you can decide if you really need to see priority emails before deciding what action to take. Keep in mind that changing these settings could cause unexpected consequences. So proceed carefully!


Apart from sorting your inbox according to preset rules, you can also optimize your mail list by removing junk mails immediately. There are plenty of tools available online that help automate this task. Some examples include MailChimp Email Cleaner and Unsubscribe Monster. But the best thing about these apps is that they require no registration fee. All you need to do is sign up and input your personal data.
With Mail Chimp, for instance, you can unsubscribe from unwanted lists and/or move duplicates to spam. On top of that, you can tell it to send you a weekly digest summarizing what was sent to you during the past week. If you don't feel comfortable doing this part yourself, try setting it up beforehand and assigning someone else to handle it.
Unsubscribing from mailing lists isn't necessarily bad news. Depending on who's sending the newsletters, however, receiving unsolicited content can lead to unnecessary stress. Fortunately, there are services that help block unwanted calls and texts. Such programs often utilize phone databases. Instead of providing subscribers with special codes to opt out, they merely ask customers to call customer service directly.
Additionally, you can also look into blocking marketing emails. Although effective, it's not always practical because sometimes legitimate companies send promotional communications to their clients' inboxes. Thankfully, there are solutions that can deal with this issue as well. Try using an app such as SpamAssassin [No Longer Available] to identify and eliminate unwanted emails.
Another helpful tip is to avoid opening links contained in emails unless you're 100 percent positive they're safe. That said, you shouldn't assume that your internet connection is secure. Be cautious about downloading files attached to suspicious mails. Also, refrain from sharing sensitive information over insecure networks.
Pix Organizer is a free program designed specifically for Windows 10 computers. Its main purpose is to scan images uploaded onto social media sites and convert them into high-quality PNG graphics. Apart from that, Pix organizes pictures by date and location.
To start scanning, download and install the software. Open it and wait until the configuration wizard appears. Choose Scanning Options and toggle Auto Uploading. Then, browse Facebook, Twitter, Instagram, Flickr, Dropbox, Tumblr, Pinterest, and Vkontakte. As soon as you upload a photo, the application will recognize it.
In addition to saving photos to your computer, Pix provides users with the ability to sync them across devices. Hence, regardless of which device you happen to log in on, you'll still have the latest version saved locally.
For additional security, you can disable auto uploading via Account Management " Privacy Controls. Otherwise, you can configure Pix to back up all newly added photos to cloud storage accounts.
Alternatively, you can also use dedicated applications for handling social media posts such as Buffer, Hootsuite, TweetDeck, etc. These tools allow users to schedule tweets or updates. Therefore, you can easily share interesting articles or links with followers simultaneously.
Filters are useful for sorting through tons of incoming email, and they can be as complex or simple as you like. You could use filters to flag all your personal correspondence to another account (say, forwarding it to an assistant), but also apply them across multiple accounts so that certain types of mail don’t appear at all.
Here we show how to create filters in Gmail to move those mails straight to a different folder—or even label them with a specific color if you prefer!
If you want to automate things further, there are several ways to mark an email as read without actually opening up each message individually. One option is to add the “Mark as Read” button next to every new message. This will allow you to select which messages should be moved to various labels based on their content. For example, when using this method, you might have set up a rule that sends any message from someone who doesn’t reply within 24 hours to whatever folder you choose. Or maybe you just wish to send an important message right away to yourself, while keeping other stuff to a separate folder.
You’ll need to open Advanced Settings under Filters & Blocked Addresses to enable this functionality. Once there, you can customize what happens after marking an email as read by selecting either Move To Inbox Folder/Label or Mark As Unread. The latter allows you to keep track of whether that particular message has been dealt with later on.
Another way to mark emails as read quickly is to assign colors to individual labels instead of moving everything over to a single folder. Clicking on a colored link shows only emails matching that category. If you click on links labeled green, blue, red, yellow, etc., then only the corresponding emails would pop up. Again, you’d need to change settings under Filters & Labels to activate this function. Select Assign Color From Label Name to turn it off. Then, simply drag and drop a label onto the sidebar where you’d like it to appear.
Once you’ve got both methods going, you can start tweaking rules to match your preferences. For instance, say you wanted to forward all your work-related emails to a special folder. Simply type something similar to “label name:work” in the Search field. Then, highlight the ones that contain words such as “accountant” or “client” and hit enter. All future emails containing these terms will now end up in a designated folder.
Inbox Folders Mode (IFM) in Google’s Priority Inboxes extension allows users to manage hundreds of thousands of messages using a combination of keyboard shortcuts and mouse clicks. IFM creates custom groups called folders out of your existing labels, allowing you to sort through emails more easily.
To try it, download the free version of the extension here. When you first launch it, you’ll see two icons along the top bar. Drag and drop the icon representing your primary Gmail profile to the left side pane. Next, switch back to your regular desktop browser tab. Now, whenever you receive a new message, you’ll see a little dot appear beneath its subject line. Right-click anywhere inside that box and select Open Message Preview. A small window will pop up showing the entire contents of the email. By default, you’re looking at the body of the email. However, if you hover over the tiny arrowhead at the bottom of the screen, you’ll notice a few options pop up. Choose Show Inbox Folders View, and you’ll see a list of categories displayed underneath the main view. These categories correspond exactly to your pre-existing labels.
This means you no longer have to scroll down through dozens of messages to find the emails you actually care about. Also, because they’re neatly organized according to your own criteria, you won’t waste time trying to figure out which ones belong in which group. Just tap the appropriate letter and let them flow into whichever subfolder best fits your needs.
There’s plenty more you can configure via the Preferences menu. Here you’ll find a variety of handy features like enabling automatic previews, turning off images, hiding attachments, and disabling auto-creation of folders.
So far, our examples revolve around moving newly received emails into predefined folders. But you can also use filters to put together batches of related emails ahead of time. Say, for example, you’ve noticed people asking questions often on Twitter. Instead of creating a tweet response once per person, you can take advantage of Gmail’s filtering abilities to save all your tweets in one place.
First, head to Settings & Labs, scroll down until you spot Mail Filter Setup, and click on Create New Rule. Type something like “has_question_mark” into the search field. Hit Enter, and you’ll immediately see suggestions pop up below. Highlight the correct term, and confirm it by clicking Yes. Repeat this process for any additional keywords you want to include. Whenever anyone mentions one of those phrases, you’ll now receive a notification letting you know they sent you a question. At last, you’ll never miss another opportunity to answer a burning concern.
Outlook isn’t designed for managing large volumes of incoming messages, but luckily, it does offer a number of tools for organizing your mailbox. First, you may consider setting up smart tags to help identify certain messages faster. Smart tags aren’t folders themselves, but rather flags that categorize emails based on characteristics that you specify. So, for example, suppose you want to archive all messages that begin with the word “status update.” Using this technique, you could tag status updates with the text “[Status]” to distinguish them from normal conversation threads.
Next, you’ll probably want to pay attention to what folders you already created. Go to File & Info…and look for My Files. There, you’ll see sections specifically reserved for Emails, Attachments, and Contacts. Double-clicking on any of these entries opens up a preview panel displaying information pertaining to that particular section. This makes finding files much easier than searching through a long list of messages.
Finally, take a look at Junk E-mail Options if you want to block certain kinds of messages altogether. Under the Receive header, click on Block Sender. On the resulting dialog box, you’ll see four tabs: Spam, Promotions, Newsletters, and Forums. Use the spam tab to prevent unwanted messages from appearing in your inbox.
If you are using a free email service like Google's, it can be overwhelming when your inbox has thousands of emails and you have to find what you need quickly. The solution for this problem could either come from deleting or archiving many unwanted mails that take too much time to read. But there are other options as well. You might want to use filters to manage such messages easily without any trouble. Let us look at how to filter messages in Gmail with examples.
Here we will discuss three different ways to filter out unwanted emails in Gmail. These methods include filtering by label, sorting all incoming emails by date, and setting up new rules based on keywords. We'll also see how to apply these techniques within the Gmail web application itself.
First, let’s start with understanding why filters are so useful. Filters help organize your inbox into categories according to specific criteria. For example, if you receive multiple emails about product discounts every week during holiday season, then filters will enable you to create labels or folders specifically for those products while keeping them aside separately from other emails. Similarly, if you get frequent newsletters about stock market updates, you may choose to keep their contents separate from normal correspondence through filters. This way, you don't need to spend extra minutes moving around between various tabs to locate important information. In addition, because of its powerful nature, filters allow users to set conditions which suit their preferences best. Users have flexibility to customize it according to their needs. So, now let’s move towards defining filters more precisely.
In order to avoid getting overwhelmed by tons of emails in your inbox, it makes sense to filter out unnecessary mail. Here’s how to do exactly that through filters in Gmail:
Open Gmail interface. Click on “inbox” dropdown menu located near top right corner of screen (it looks like two lines). Select ‘Filters' option under General Settings section. Now click on Create New Filter button located next to Search field box. A pop-up window titled "Create new filter" appears where you should type in words/phrases related to the content(s) you wish to exclude from your inbox. Alternatively, you can go directly to https://mail.google.com/preview/filter_create#c=0&rt=j&chp=2&q= and enter your own terms here. Type something unique in “Filter name” field. Leave everything else blank except for “Apply Label” checkbox, which allows you to assign a particular color label to filtered message category automatically. Once done, hit Apply & Send button.
Now open your inbox and try searching by typing keyword(s) you entered earlier. All matching results will appear in newly created folder labeled accordingly. To make sure they stay untouched, mark the corresponding checkboxes beside each entry. Finally, select “Move selected conversations to another folder” radio button and give a desired destination path. Hit Save Changes button to save changes made above. Note that even though you have marked filters as applied to certain entries already, new ones will continue appearing in your inbox until you turn off the filter again. That said, you can delete individual items after applying filters. If you ever change your mind about including or excluding any item, simply edit the existing rule or add a new one. Also, note that you cannot drag and drop elements inside filtered list to rearrange them.
You can further streamline your workflow by organizing Gmail by unread messages only. Follow these steps to achieve that goal:
Click on Labels link located in left sidebar panel. Now select Unread Items tab at very end. Checkmark boxes against all messages that belong to mentioned label. Next, click on Sort By checkbox and select Date Sent header. Then click on OK button located below dialog box. Your inbox will now show all unread messages arranged chronologically according to dates they were received.
Finally, click on Update Labels button located at far bottom part of page. Afterward, your inbox will display only unread messages sorted alphabetically according to subjects mentioned in original emails.
Following are detailed instructions regarding setting up an unread filter:
Go back to step 2 of previous paragraph. Instead of selecting “All Mail” search query, type in “has:unread flag". Press Enter key. When a dropdown pane opens up, ensure that first value listed underneath Label column matches the label assigned to your preferred topic. Otherwise, leave everything else empty. From this point onwards, whenever new messages arrive in your inbox, they will not be included in main result list but rather placed in their respective topics.
Once finished, repeat same procedure outlined above. Go to step 1 and instead of choosing “Has:unread flag", type in “is:not [label]" and press Enter. This means that messages whose subject line does not match the aforementioned label won’t be included in results list. Furthermore, you must checkmark both “Show Original Message Content” and “Mark Messages As Read Automatically” options provided you desire to view full text of messages in question.
Next, switch over to Advanced settings section via cog icon located in upper right side of interface. Change second parameter beneath Is:matching tag option from 0 to 1. Doing so enables you to filter unread messages irrespective of whether or not they contain specified tags.
Last but not least, scroll down till you reach last part of advanced settings and modify third parameter beneath Has attachment file size greater than:option from 100 to 1000. This ensures that attachments larger than 500KB aren't removed from your results list. Additionally, toggle fourth checkbox beside Include subfolders if true to see complete paths of attached files.
After making final tweaks, return to original settings described previously. Ensure that none of the values listed under “Matching Tags” column differ from initial choices. Also, verify that nothing has changed under “Only Matching Paragraphs” option. At long last, ensure toggling of fifth checkbox alongside Show deleted messages option is disabled. Lastly, close preview pane by clicking on X icon located in lower right side of dialog box. Confirm that no changes have been made by hitting Save Changes button.
Note that you cannot drag and drop elements inside filtered lists to reorganize them. However, it is possible to copy and paste entire rows into new locations. Also, remember that unlike regular emails, archived messages cannot be moved to different folders. Therefore, once filtering process ends, you should manually remove old copies.
It is quite easy to run searches for filtered messages in Gmail mobile apps. Following are simple guidelines to follow:
Launch Gmail app. Tap on Search bar located in bottom center of interface. Enter your chosen term and tap on Search icon situated at extreme right edge of keyboard. On successful completion of request, you will notice that your inbox displays all matching conversations along with number of times they've been viewed.
 Send emails at scale

