 NEW: BrowserGrow.com is now available!
AI agents to grow your business & do your marketing on autopilot in your browser
NEW: BrowserGrow.com is now available!
AI agents to grow your business & do your marketing on autopilot in your browser

NEW: BrowserGrow.com is now available!
AI agents to grow your business & do your marketing on autopilot in your browser

Customizing the way you work with data is important when it comes to using HubSpot's customer relationship management (CRM) software, which is one of the best-known business marketing tools on the market today. When you're building out an email list or looking for new ways to reach customers, having access to advanced settings like "Contact Properties" within HubSpot will help make sure that you're getting great results from your campaigns. You'll also find yourself saving time by being able to manage multiple lists at once through this feature without needing to switch back and forth between tabs.
In this article we explain how to use Contact Properties and what they actually mean. We also cover some useful export options so that you can easily share those properties with clients. And finally, we show you where to go if you want to create more than 10 unique contact properties in HubSpot. Let’s get started!
HubSpot provides users with three basic types of customizable properties: Account, Lead/Customer, and Campaign. For each type there are different fields available depending upon the role you have within your organization. In addition to these basic ones, HubSpot offers additional features such as contacts' demographics, job titles, roles, etc., but for our purposes here we only need to focus on Contact Property creation because we don't plan on working with any other types of properties right now.
If you've never heard of them before, let me walk you through their definitions first. By default, whenever someone creates a lead or customer record in HubSpot, the system automatically assigns them “Account ID” as their primary key. This means that whenever anyone else interacts with that account—whether it be sending emails, setting up meetings, submitting forms, etc.—the number assigned to that particular person becomes part of its name. So instead of calling it John Smith, you'd call it 1JohnSmith1. This makes sense since it tracks who interacted with whom, but over time it may become confusing when organizing leads across several accounts. Instead, another field called "customer_id," was created specifically for this purpose. It allows us to assign individual names to specific accounts rather than just numbers. If you ever wanted to change it later, you could always update the source code directly without making changes anywhere else.
So why would you even bother creating Contact Properties then? Well, if you're doing things correctly, you already know that most people in your company interact primarily with certain groups of individuals. Having the ability to customize each contact based on the department that they fall under will make communication much easier down the line. Say you run two departments, Marketing & Sales. Your salespeople usually deal with prospects in the area codes 900, 973, 980, 809, 808, 619, 581, 714, 431, and 850. But your marketers tend to target areas outside of the above ranges. Now imagine that you had just created a Customer Property called "Sales Department." All future correspondence sent to either group of employees could be tagged accordingly. Then when you send out an email newsletter to everyone in your organization, you could choose to include targeted content based on whether they belong to the sales team or not.
Let's say you own a small local restaurant, and you want to offer discounts to repeat customers. Or maybe you sell crafts online. Creating separate properties for repeated orders versus first timers will allow you to set up customized pricing plans for both groups. The possibilities really are endless.
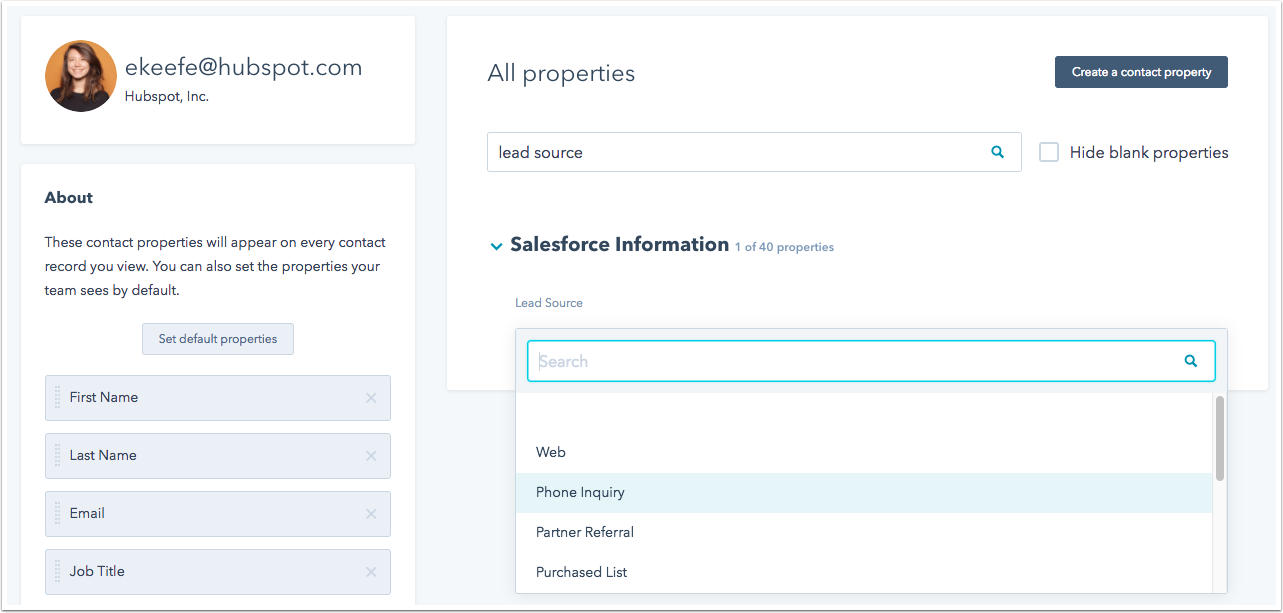
When you open the Contacts tab inside HubSpot, you'll see a section labeled Custom Fields. Clicking on History reveals a table listing all the properties associated with each contact. To delete a property, simply click the X next to its name.
Click Delete Selected below the table of current properties. A pop-up window will appear asking you to confirm your choice.
There are times when you might need to move away from HubSpot altogether, especially if you're moving jobs around, switching companies, or starting a new project somewhere else. Luckily, HubSpot supports exporting your existing properties in case you need to take off early. Simply head into Settings & General Preferences, scroll down to Data Management, and select Exporting Profile Data. Select the radio button next to My Exports. A popup screen will ask you to pick the date range that you wish to extract information from. After selecting the correct dates, hit Save Changes.
Now, whenever you come back to the Data Management page, you’ll see a box titled Exported Profile Content beneath it containing all your selected properties.
You can download this file via FTP or simply copy and paste it onto a USB stick. This method is ideal for sharing sensitive data with others who aren't familiar with HubSpot.
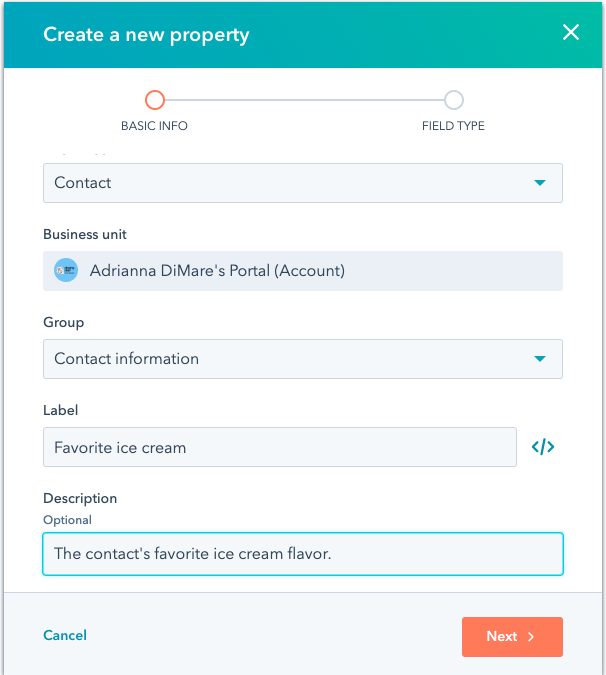

Adding a property isn't overly difficult, but it does require a few steps. First, navigate to the Custom Field tab. From there, click Add New Column, followed by Edit Column Name. Type in whatever label you want to give the column, and press enter. Once done, look on the left side bar where you should see a dropdown menu labeled Default Value. That's where you'll input something meaningful for the value of that property. Finally, add the column to whichever contact list(s) you'd like to display it in. Hit save changes after everything has been entered properly.
Here's what the final step looks like.
It depends on your needs. However, HubSpot recommends keeping no more than 20 custom properties per client. Since each property takes up a single row, 20 rows translates to roughly 200 total properties. For larger businesses, you may consider adding an unlimited amount of properties to keep things organized better. Just remember that you won't be able to sort through them if you do decide to increase the limit too high.
For reference, HubSpot doesn't support importing.csv files. As long as you follow the instructions outlined earlier in this post regarding exporting, this shouldn't be an issue.
To learn more, visit HubSpot Academy. There you can gain expertise from experts who truly understand the ins and outs of HubSpot. Plus, with courses ranging from beginner to expert level, you'll definitely leave knowing far more than the average user thanks to HubSpot's training materials.
Need to create more than 10 unique contact properties in HubSpot? Here's where you can go.
Customizing the way you use HubSpot is easy when it comes to setting up new contacts, but what if you want to customize how they look or even have them display differently across different platforms like Google Calendar, Mailchimp, Salesforce, etc.? You can set this up through hubspot's Contact Properties feature. In this article we'll go over everything you need to know about these features. Let’s get started!
HubSpot provides users with an option to create multiple sets of data for their leads and customers. These sets include things such as company information and email lists (for example, "Company Name" and "Email Lists"). This allows companies to better organize and manage their leads and clients by segmenting them into groups so they don't become overwhelmed with emails from people who aren't relevant to them. It also makes it easier for marketing departments to send out targeted offers based on specific demographics. The best part is that, unlike many other providers, HubSpot doesn't charge extra fees for using more than one list per customer.
So let's say you're running a business where you've created two separate lists of potential buyers - one called "Leaders," which contains executives at large corporations looking to start their own businesses, and another called "Small Business Owners." If someone sends you an offer via email, you will be able to filter those messages according to whether the sender belongs to either group. Or maybe you sell products online and would rather not receive any sales calls unless you call back first. With HubSpot you could easily block phone numbers of individuals who haven't completed the form necessary to qualify themselves as a lead. You can then direct them to a special web page instead.
Another reason why companies choose HubSpot is because its platform integrates well with third-party apps. When you link your accounts together, you can automatically pull in updates from your external services including social media profiles, website visitors' personal details, current location, and much more. For instance, if you wanted to change your profile picture on Facebook, LinkedIn, Instagram, Twitter, YouTube, Pinterest, Snapchat, etc., you could simply update your profile photo within HubSpot. And since HubSpot works seamlessly with most popular software programs, marketers can focus less time on paperwork and spend more time strategizing.
You may already understand what Custom Fields means within HubSpot. But did you know there were three types of customization options available for Contacts? That's right, HubSpot has three main categories of customizable fields which contain settings that control how contacts appear on various applications, websites, and devices.
The three categories are Standard Personalization Settings, Device Specific Options, and Application Related Features. We'll take a closer look below.
Standard Personalization Settings: This category consists of standard settings that affect everyone who uses HubSpot regardless of device type. Examples include First Name, Last Name, Email Address, Phone Number, Company Name, Job Title, Social Media Profiles, Birthday, Gender, Country/Region Code, Time Zone, Language Preferences, Notes & Reminders, Follow Up Date, Website Links, Mobile Numbers, Work Hours, and Availability Status.
Device Specific Options: As mentioned above, HubSpot allows you to adjust certain aspects of a person's appearance depending upon what kind of device they visit HubSpot on. Devices include desktop computers, laptops, tablets, phones, smartwatches, headphones, TVs, gaming consoles, and digital assistants. Some examples of Device Specific Options includes Display Picture, Display Banner Image, Background Color, Primary Button Text, Secondary Button Text, Upload Photo Attachment, Enable Video Chat, Show Interested In?, Hide Location Info, Change Theme Colors, Add Logo to Desktop Icon Bar, Set Wallpaper, Adjust Screen Brightness, Disable Read Receipt Notifications, and Turn On Dark Mode.
Application Related Features: Lastly, HubSpot lets you decide what kinds of content you'd prefer to show. There are several ways to control what shows up in communications sent between you and your client and partner organizations. One method involves selecting only the Applications you wish to use. By default, HubSpot gives users access to 25 different Applications. Another method requires adding Apps manually. Finally, you can select what Content Shows up in Emails.
For example, some applications allow you to edit name tags while others give you full creative freedom with how you design your message. So choosing carefully is important in order to ensure you present yourself professionally without being too formal.
To view all possible customization options for your contacts click on 'Manage Customers.' Then under 'Contacts,' scroll down until you find Customizations. From here expand each section to learn exactly what changes you can make to each individual field. Here's just one example of what you might find:
Below is an overview of the sections listed beneath Customizations. All the icons used throughout the guide refer to the ones found underneath Customizations.
1.) How To Edit Your Own Information: This section allows you to modify your own basic contact information. Within this area, you will find tabs labeled Account Details, Profile, and Basic Contact Data. Each tab holds different areas of adjustment related to that particular aspect.
2.) Design Tab: Allows users to choose background colors, upload images, enable video chat, hide address info, and disable read receipts.
3.) Appearance Tab: Users can toggle between light mode and dark mode themes as well as switch text color schemes. They can also alter the font size.
4.) Security & Privacy Tab: Lets you turn off spam filters and whitelist your account. Additionally, you can limit accessibility to sensitive information by restricting viewing permissions.
5.) Other Accounts Tab: Includes additional tabs for sharing documents, calendars, tasks, notes, etc.
6.) Manage Subscriptions Tab: Enables you to edit subscription preferences and opt out of auto responders.
7.) Marketing Tools Tab: Gives you access to additional tools such as newsletters and events.
8.) Communication History Tab: Provides you with a history of communication activity.
9.) App Integrations Tab: Allows you to integrate your HubSpot account with hundreds of apps.
10.) Web Forms Tab: Contains instructions regarding uploading WYSIWYG forms.
11.) Auto Responders Tab: Automated responses that HubSpot creates after receiving requests from prospects and customers.
12.) Lead Generation Campaigns Tab: Offers advanced campaign creation tools.
13.) Invoices Tab: Used to generate professional invoices for clients.
14.) Leads Tab: Where you can follow up with leads before closing deals.
15.) Scheduled Meetings Tab: Helps schedule meetings directly from your calendar.
16.) Traveler Checklists Tab: Creates travel checklists for travelers visiting locations.
17.) Maps & Places Tab: Displays directions to places on a map.
18.) Geolocation Tab: Uses GPS technology to determine the approximate geographical coordinates of your visitor.
19.) Events Tab: Allows you to plan events or promotions directly from HubSpot.
20.) Messages Tab: Holds all correspondence between you and your prospect.
21.) Notes & Reminder Tab: Stores reminders in case you forget to complete actions required by your client.
22.) Export Tab: Exports data stored within HubSpot to CSV files.
23.) Dashboard Tab: Opens the dashboard which displays statistics about your interactions with your audience.
24.) Reports Tab: A tool containing reports generated by your automation campaigns.
25.) Blog Posts Tab: Generates blog posts, classified ads, and press releases based on keywords entered by users.
26.) Updates Page: An internal version of WordPress.
27.) Newsletter Form: Adds newsletter signups to your site.
28.) Newsletters Tab: Sends automated emails with links to articles posted to your newsroom.
29.) Photos Album Tab: Upload photos taken during appointments and keep track of them.
30.) Polls Tab: Create polls for your audiences.
31.) Surveys Tab: Conduct surveys or quizzes for your clients.
32.) Videos Tab: Streamline your workflow by allowing you to record videos.
33.) Document Sharing Tab: Share documents with others outside of HubSpot.
34.) Files Tab: Keep track of uploaded file downloads.
35.) Link Tracking Tab: Tracks clicks on URLs shared by others.
36.) People Finder Tab: Find lost family members or friends.
37.) Quick Lookup Tool: Search for addresses, names, phone numbers, dates, times, etc.
38.) Translation Services Tab: Translate pages or text boxes.
39.) Captcha Solver: Validates CAPTCHAs submitted by users.
40.) QR Codes: Scan codes saved onto your computer.
41.) Voice Recordings: Record audio clips to share with prospective clients.
42.) Live Chat Support: Connect live support 24 hours a day.
43.) Event Registration: Allow users to register for upcoming events.
44.) Survey Questions: Build survey questions and place them on your website.
45.) User Groups: Assign roles to your team.
46.) Group Memberships: Organize teams into subgroups.
47.) Multi Currency Conversions: Convert currencies.
48.) Multiple Currencies: Choose currency conversion rates.
49.) Price Calculator: Calculate prices quickly.
If you've ever worked with an online marketing platform, it's likely the case that you'll want to use one of its data connections to pull information from either their API or database. In most cases this is done using "custom fields" - which basically means pulling specific pieces of information out of those systems for further analysis. It allows marketers to look at certain metrics based on what they're trying to accomplish. This article will focus specifically on HubSpot as it relates to connecting to contacts via email, but there are also other ways to connect to databases like through APIs (HubSpot has native integration) or by importing CSV files into HubSpot (which we won't cover here).
The problem arises when dealing with larger organizations where you may need to access more than just basic demographics such as age, gender, etc... You may find yourself needing to see things like job title, seniority level, company name, department, location, etc... The obvious way to handle these would be to create new columns within each contact record, however, if you think back to any time you used Microsoft Excel before, it probably occurred to you that having so much data crammed onto a single spreadsheet could quickly become unwieldy. That's why developers came up with the concept of custom properties in order to separate different types of information from the same source. Custom properties allow users to store unique sets of information relating directly to individual records, rather than dumping everything into one big list.
In short, custom properties provide a layer between the internal system that stores all your customer data and how that data gets displayed to end-users.
This varies depending on whether you're working inside the desktop version of HubSpot or accessing it over the web. If you're not sure, check out our guide on managing custom objects under Contact Management & Settings > Object Manager. Once you get familiar with the interface, go ahead and give it a try! There is no limit to the number of custom properties available to HubSpot customers, but keep in mind that some features only work with large amounts of data. For example, if you were to attempt to add thousands of rows/records without breaking anything, then doing so should yield satisfactory results. However, if you start adding hundreds of thousand of them at once, it might take longer than expected due to server load. Your best bet is to test small batches first until you know exactly how the software behaves.
When dealing with external clients who aren't currently connected to HubSpot, please note that while you can easily import customer lists with huge numbers of contacts into HubSpot, you cannot export those lists without taking them offline. Therefore, you'll need to make sure that your client understands that they won't be able to download large datasets from HubSpot unless you migrate them offsite. Most companies don't realize that exporting even 100+ million records can take several hours, so be patient and let them know upfront. Also, remember that downloading even 1GB of data per day is equivalent to 10 years worth of usage. These days, that isn't really considered very fast.
There is no hard limit to the amount of custom properties you can create, but there are limits dependent upon the type of account you have. As mentioned above, if your organization uses HubSpot Enterprise Edition accounts, you can theoretically add unlimited custom properties. On the other hand, if you're using standard edition or free plans, you're limited to 5 custom properties. Keep in mind that you may still run into problems with performance depending on your needs.
For instance, if you had a large dataset that needed to be imported into HubSpot, the process itself could cause significant delays. With fewer custom properties, you'd encounter less issues since the overall volume wouldn't be nearly as high. And because of how HubSpot handles duplicate entries, five is actually pretty low considering how often people accidentally duplicate information during entry.
Creating custom properties works similarly across both versions of the application. First, select New Property Type. Then enter a Name (e.g., Job Title), set the Value(s) (if applicable), and hit Save. Next, click Add Field. From there, choose whichever field you wish to display, fill in any necessary details, and save again. Repeat this process for additional fields as desired. When finished, hit Done. Now repeat steps 4-6 above replacing Custom Properties with Custom Fields. Once complete, head back to Contacts & Lists and expand the section labeled Custom Fields. Make sure to drag your newly created custom fields down below existing ones, otherwise it will simply disappear after saving. At this point, you now have two options: copy the code embedded beneath each custom property and pasting it into a text file, OR manually edit each row of data for each custom property. Both methods result in identical outcomes. Of course, if you prefer editing the actual table, feel free to skip to step 7. Otherwise, continue reading...
One thing to keep in mind is that unlike regular custom fields, custom properties require users to log into HubSpot in order to view them. By default, anyone logged into the application sees custom properties regardless of role. Users must change the permission settings themselves in order to hide custom properties from public views. To do so, navigate to Manage Permissions " Security Preferences " Access Control. Here you can control whether members of particular roles are allowed to see or modify custom properties. For instance, you may want employees to only see custom properties related to sales, whereas managers shouldn't be able to alter them.
Yes, absolutely! Just follow the exact instructions listed earlier regarding copying the code embedded underneath each custom property and pasting it into a text file. Afterward, open up the.txt file in Notepad and paste the following HTML right next to whatever else you have in the document. Don't worry too much about messing around with CSS codes. All you need to concern yourself with is setting the correct values for the various parameters.
Here's what the final output looks like:
That's it! Now whenever someone clicks on View Details, they'll see a popup window displaying said property instead of the original content. Be aware that you can't remove this feature entirely, but you can disable it if you want.
To turn off popups, replace "true" with "false". So, changing the line below from true to false disables popups completely.
As always, thanks so much for tuning in. Feel free to leave questions, comments, suggestions, etc. Below is a link to my blog post discussing HubSpot integrations in general, along with another video tutorial showing how to integrate HubSpot with Zapier. Happy learning!
 Send emails at scale

