 NEW: BrowserGrow.com is now available!
AI agents to grow your business & do your marketing on autopilot in your browser
NEW: BrowserGrow.com is now available!
AI agents to grow your business & do your marketing on autopilot in your browser

NEW: BrowserGrow.com is now available!
AI agents to grow your business & do your marketing on autopilot in your browser

HubSpot is an all-in-one marketing platform for businesses. It has many features that help you manage your business better. One of its most useful functionalities is the ability to create customizable dashboards with various reports and statistics. This article will show you how to use this feature.
You can add multiple tabs from different modules within HubSpot's dashboard. These tabs allow you to display data from different sources like Contacts, Leads, Companies, Deals, Tickets, Custom Objects, Payments, and Calls. You can even have several versions of one tab depending upon the information displayed there. For example, if you want to see more detailed data about leads than those available at first glance, you need to click "Show More" under "Leads". Similarly, you can also choose which fields contain additional details when viewing other tabs such as Company Information, Customer Service Tools, etc. Let us now discuss each module individually.
This section allows you to create new contacts by searching their email addresses or phone numbers using search bars. The contact list contains basic demographic info, social profiles, email address, birthday, gender, title, company name, website URL, notes, follow up emails, etc., thus making it easy for you to find any particular person. Also, you can sort the results according to the date range and select certain columns for filtering purposes. So, here you get two options - either to narrow down your choice based on some specific criteria selected through checkboxes or type in the text field provided next to them. You may apply both methods together to further refine your results. Once you're done selecting everything you wish to see, hit the "Create Contact List" button and then proceed to the next step.
Here in this section, you'll be able to access information related to customers and prospects who've opted into your mailing lists. As mentioned earlier, this is where you can change the number of rows shown per page so that you can easily navigate through lots of customer/prospect names without going back and forth between tabs. To do this, simply hover over the column headers till you reach the desired row count, and press Enter. Now go ahead and repeat the same process until you reach the maximum limit allowed. Once again, click on Create Dashboard once you're satisfied with the result.
In this section, you'll come across a set of tools and resources designed specifically for small enterprises. Here, you'll be able to connect with clients and prospective buyers via live chat, call center services, video conferencing, etc. In addition, you can send out newsletters and promotional campaigns from this screen itself. With this, you don't require logging in separately for sending bulk messages. On top of this, the toolbox makes it easier for salespeople to take advantage of the latest technologies. If you'd rather not include these things in your dashboard, just tick off the corresponding boxes. And finally, hit Save Changes.
The above screenshot shows what happens whenever someone sends you an e-mail message, voicemail, faxes, etc. Within seconds they receive an automatic reply acknowledging receipt of the said communication along with relevant links to download attachments (if any). Henceforth, you won't necessarily have to manually look into every incoming mail. Instead, open the app and click on the dropdown menu located near the bottom right corner. Select "Open Applet", and the relevant message would appear right inside the applet window. Clicking on this link would lead you straightaway to the attached file. From here onwards, you're free to work on the document directly within the applet window. When you're finished working on it, simply close the window and return to your main dashboard screen.
If you plan to make changes to your calendar, schedule meetings, invite people to events, etc., you must log in to Calendar. While creating a new event, you can assign tasks to others as well as record due dates and reminders. Alternatively, you could also copy existing events instead of wasting time formatting new ones. For instance, let's say you already scheduled a meeting with Mr. Smith but he hasn't confirmed his presence yet. Just copy the event and paste it onto another day while replacing his name with something else. After doing so, edit the newly created item to suit your requirements. Finally, hit Save Changes and you're good to go!
Once added, you should be able to see the contents of the Ticket Board immediately after clicking on it. But before that, we suggest you perform a few tests. Open your browser console and refresh the Ticket Board. Then try adding items from the Email Messages tab as well. Upon saving changes, you might notice that only some items are updated automatically whereas others still stay the way they were initially. That's because the latter haven't been refreshed properly. Thus, you need to ensure that you always keep the application running smoothly. To resolve this issue, head over to Settings > System Preferences > General. Under Default Browser Version, select Internet Explorer 9.0. Find the Tab Options box below it, and uncheck the option labeled Use Legacy Tabs. Hit OK. Try refreshing the Ticket Board again. If it doesn't happen this time around, please enable legacy mode temporarily. Otherwise, you'll need to update IE9 yourself.
Let's move on to discussing this section wherein you can find important details regarding your customers' orders placed online. Here, you can track shipments, returns, refunds, inquiries, tracking numbers, etc. Using this tool, you can instantly respond to client queries. Moreover, you can also notify them whether or not their order was processed correctly.
To start managing your bookings from Bookings, sign in and drag and drop the appropriate icons from the left pane. Dragging icon(s) to the right side would remove them from the left panel altogether. However, you can bring them back anytime during editing by dragging them towards the middle. Next, fill in the required details including price ranges, cancellation policies, location, etc. By default, the system suggests booking slots for guests arriving closest to the current hour. You can adjust this setting by choosing any alternative suitable for your needs. Lastly, hit Save Changes and launch the application.
Sidebars are usually used to segregate content sections of webpages. They provide users with quick access to frequently visited areas. Usually, you'll spot these menus at the very topmost portion of the webpage. Adding a sidebar to HubSpot is pretty simple. All you need to do is to click on the "+Add Sidebar" bar present beneath Content Block 1. This action would redirect you to an entirely new layout containing a sidebar alongside the rest of the blocks. Thereafter, replace all the placeholder images with actual photos and graphics. Do remember to give each block a unique ID so that no confusion arises later on.
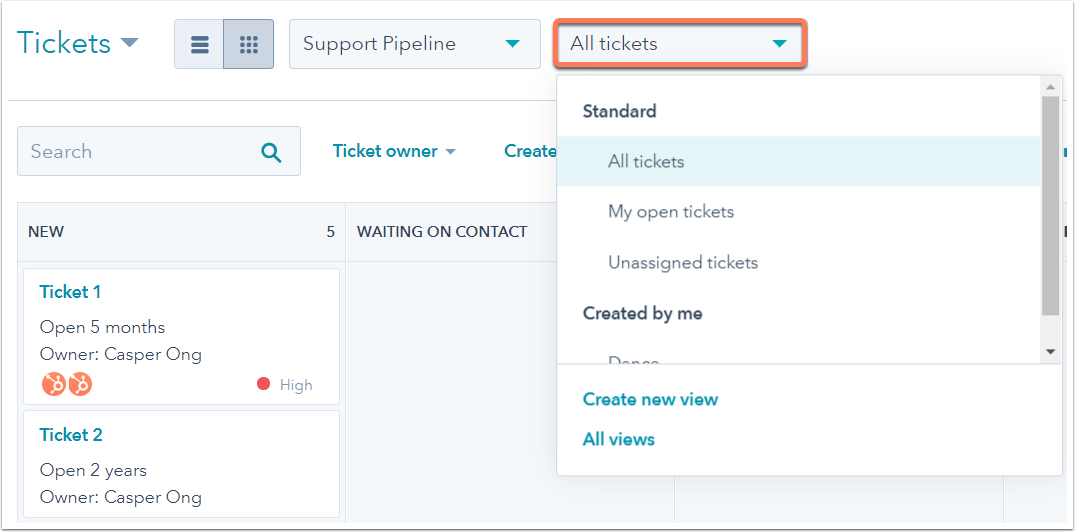
After opening HubSpot, you'll find the Views tab situated on the upper part of the screen followed by Other. These 2 panels house all the previously made customization settings. To activate a saved view, open the View Manager and double click on the respective view you wish to turn on. To delete a view, expand the Manage Views area, and click Remove Selected Items.

Customizing HubSpot involves fine-tuning your chosen theme as per personal preferences. There are several ways to achieve this goal. First, go to Theme Configuration and select Edit Theme. A pop-up window would appear prompting you to upload a background image. Simply browse to your preferred folder and select your favorite picture. Upon hitting Upload Image, you'll be asked to enter the dimensions of the uploaded photo. You can leave that blank by pressing Continue Anyway. The following steps involve changing font styles and sizes, modifying colors, adjusting border widths, etc. Once you're done tweaking everything, scroll down and click Submit Changes.
Now that you know how to use views within HubSpot, why don't you share your own tips and tricks with fellow readers? Feel free to comment below. We hope our guide proves helpful for newcomers.
HubSpot is an all-in-one marketing platform that allows you to manage your entire customer lifecycle from lead generation through sales and service. To make sure you're getting the most out of it, we'll show you how to set up different views so that you can easily switch between them without going into each screen's settings menu.
We've put together five simple ways for you to create new filtered lists within HubSpot, including filtering by contact name, company size, deal type, status, and more. You can then use this list to build customized dashboards and reports to suit your needs. Let's get started!
To start adding a filter, open any HubSpot page where there's data such as Contacts, Leads, Companies, Deals, Tickets, Payments, Calls, etc., and click "Filter." This will bring up the Filter Panel. Here, you'll see several options for which fields you want to include criteria for in your search results. For example, if you have many people in one department at your work, you may wish to only display those who are over 20 years old. Or maybe you want to find everyone with green cards. Whatever your need, feel free to tweak any field here until you discover what fits best.
You can choose whether you'd like to perform a global search or apply a specific date range. Next, select whether you would like to search text, numbers, or both (if applicable). Then decide whether you'd like to search multiple values, single value, exact match, or none. Now, hit the blue button beside the dropdown menu next to "Search" to run your query.
When running your first query, remember to check off the box beside "Sort Results By," otherwise they won't be sorted according to your choice. If you prefer, you can also sort the results manually using Sort Field and Order. Underneath the column headers, you should now see a small arrow icon indicating sorting has been applied. Clicking this will allow you to reorder columns.
Once you've finished tweaking your searches, don't forget to press Save Changes once everything looks good. Your changes will automatically reflect when you refresh your dashboard!
If you ever need to delete a saved filter, simply go back to the Filter panel and uncheck the relevant boxes under Search Options. Hit Save Changes again, and your changes will stay intact.
Similar to finding yourself needing to look up information about a particular person, sometimes you might come across a situation where you just need to know what kind of business someone works at. In order to quickly jump right to their profile, you can either add them directly to your Deal List, or alternatively, you can link to their LinkedIn profile. Once you do that, you can access their profiles through the same Filters section described above.
Here's another way to do it. Open up any Company record and scroll down to the bottom of its details page. There, you can expand the More Actions section by clicking View Details. From there, you can select Link to [Company] Profile. This takes you straight to their LinkedIn profile and gives you quick access to their basic info, skillset, education history, portfolio, social media accounts, and more.
Now, whenever you refer clients to HubSpot via email or other means, you could even ask them to fill out some form on our website asking for additional info to send along with their request. When they submit it, their profile will pop right up and give you a fast summary of what they do. It's really easy!
Sometimes you may not care too much about where your client currently stands, but rather, you may want to take note of what stages they've gone through before reaching yours. As mentioned previously, you can always try linking your users' LinkedIn profiles, or you can also browse their profiles on a separate tab. Either way, you will receive quick updates regarding their progress and can monitor their journey throughout the process.
Another great feature HubSpot offers is allowing you to customize the emails sent to your customers after every step of the purchase cycle. With this feature enabled, you can modify the message based on what part of the sale you're in. So let's say you were working with a prospect who was interested in buying two products. After entering their credit card information, you'd immediately shoot them an email letting them know their payment went through successfully. But if you had reached the final confirmation phase, you'd instead inform them that their invoice has been issued.
This makes it easier for your team to keep track of your workflow while keeping your clients informed. And because you can control the messages sent by HubSpot itself, you never have to worry about sending confusing communications, especially considering the fact that non-techy folks tend to panic when faced with unfamiliar technological processes.
The Sidebar is pretty handy for showing related content, trending topics, recent activity, and more. However, you can also use it to hide certain items that aren't necessary for viewing. Simply head to Settings & Sidebars and drag whichever item(s) you'd like to remove onto the Trash Can. They will disappear instantly!
Alternatively, you can also toggle Sidebar visibility during runtime. Just click on Show/Hide Sidebar Items inside the top toolbar.
For even quicker access to hidden features, you can enable Quick Access Menu which shows shortcuts and buttons for various actions. The icons displayed will depend on the current action being performed, so you can adjust accordingly depending on your preferences. Below is a screenshot demonstrating how it looks:
By default, Quick Access Menu is turned off. If you'd like to turn it on, navigate to Settings & Interface Designers and check the box beside Enable QuickAccessMenu. Now, when you hover over the hamburger icon located in the upper left corner, you'll see a popup menu appear. Within this menu, you can tap Hide All Functions to temporarily disable all functions except Dashboard.
Happy browsing!
HubSpot's Contact Management feature allows users to create an unlimited number of Contacts, Companies, Deals, Tickets, Custom Objects (such as Products), Payments, and Calls that they can easily access from a single page. This article will walk you through creating different types of views within this tool.
The first thing we'll show you is what Views look like on the left side of our screen. To add one, hover over "Views" at the top of any contact management page, then click on Add New View. You'll see three tabs along the top with a variety of options under each tab such as Data Sources, Filters, and Columns.
Let's take a closer look at some useful ways to use Views to help manage leads.
You may have already added multiple Deal Types, but if not, just select Create new deal type and give it a name like "Sales." Then go into the Settings section and set up whatever fields you'd need for those particular deals. For example, I've created two columns called Sales Rep and Total Amount so my customers could enter their information there. In addition, I've also included another field where they can check off whether or not they want me to call them back about the item. It lets them quickly decide which ones they want to follow-up on right away.
Now let’s say you wanted to make changes to all your existing deals. Just double-click the dropdown arrow next to “Deal Type.” From here, choose Edit Existing Deal Type. Once inside this window, you can change the color scheme, update the logo, or even delete the entire deal type altogether.
This same process works for other items besides Deals too—let's try changing a Company instead. Double-click on the company dropdown arrow and pick Update Existing Company. Here, you can rename it, move it around, or delete it entirely. If you're working with many different companies, this makes keeping track of everything much easier.

Properties allow us to categorize data by specific criteria. Let's start out by adding more than one property to a Contact record. First, find your desired category in the Categories section, then drag it onto the appropriate row below. Next, scroll down and open Properties again. We recommend using colors for properties because they stand out better when filtering results later. Select the plus sign (+) button and add additional categories until you finish organizing your Contacts. Click Save once you’re done.
For Customers who come across several different product lines, Proprietary Items might be handy. Under Custom Fields, hit +Add Field and search for proprietary_item. Now, simply assign this field a value whenever someone purchases a certain product line. When searching for Customers, you can limit your list only to those who own products from that specific brand.
If you ever need to remove a Property, hold Ctrl+Click on the relevant row and select Delete Row. You can now close the Properties window without worrying about accidentally deleting something important.
Another way to utilize Properties is to group Contacts together based upon similar interests. After selecting Group By, you’ll notice a small box pop up underneath. Enter the conditions you wish to apply and voila! Your filtered lists will automatically populate according to your choices.
There are five main sections on every view: Index Page, Search Bar, Filter Panel, Sidebar Menu, and Advanced Options. The Index Page shows you exactly what kind of data you selected to display, while the sidebar menu gives you quick links to navigate anywhere else in the app. On the Filter panel, you can adjust various settings related to how your data appears and behaves. And lastly, the Search bar helps you narrow down search parameters and limits your scope of results accordingly.
On the following examples, we'll show you how to create a basic view for Customers. However, feel free to play around with others to get familiar with their functions.
Customers Overview - This is probably the simplest view. All you need to do is fill in the Customer ID field with the customer’s unique identifier. Then, tap the blue toggle button located near the center of the upper toolbar. Check the boxes beside Show Active Projects & Accounts and Show Subscribers. These two features will pull in active projects and accounts associated with that individual. Finally, press OK.
Once you run a report like this, it should appear on the Index Page. But for extra convenience, you may also want to customize its appearance further. Go ahead and tweak things like sorting, grouping, pagination, etc., to fit your needs. Also, don't forget to enable the Auto Paging option located towards the bottom of the filter panel.
Basic Details - Another very simple, yet effective, method of finding potential prospects involves setting up a few Basic Details filters. Let's assume that you sell cars online. Instead of pulling up everyone who has purchased a vehicle online, you can select the Vehicle Brand Name filter and restrict results only to vehicles made by Ford Motor Co.. Then, beneath that filter, include the car year range and mileage, along with the price. Press OK to generate the resulting reports.
Advanced Criteria - Perhaps you would prefer to pull up leads whose owner has been inactive for quite awhile. Rather than manually entering a date period yourself, consider utilizing the Find Dates function to locate people who haven't logged into HubSpot in over 12 months. Simply input a starting date and ending date in the corresponding textboxes. Remember to include the word AND between both dates to ensure accuracy.
Afterwards, you must specify a minimum amount of time elapsed since the person’s last login. Lastly, select Is Deleted before clicking OK. As long as the result meets all four requirements, it should populate on the Index Page.
Customer Emails - Sometimes, you'll end up having to send emails directly to individuals via Outlook. Unfortunately, unlike web forms, HubSpot doesn't offer an easy way to attach files. So, rather than sending attachments individually via email, consider building a view containing only the Email Address column.
To do so, head over to the Filter Panel and click on the Plus icon (+). Choose Include/Exclude Based Upon Field Value. Then, type in the Email address and select Yes. Don't worry about including additional values like Subject and Attachments because they won’t matter unless you plan on attaching documents. Hit OK after saving your changes.
As mentioned earlier, the above methods aren't necessarily limited to Customers. They really depend on what kinds of information you typically require. Some items like Phone Numbers, Mailing Locations, Birthdays, Anniversaries, Social Media Profiles, Languages, Interested In, Favorite Color, and Other Values work almost identically. Others, however, vary slightly. Feel free to experiment with these to discover what suits your preferences.
In summary, Views are great tools for helping organize large amounts of data. Whether you're looking for prospective clients, current customers, or vendors, you can filter records by anything imaginable and sort them by whichever criteria you deem necessary.
 Send emails at scale

