 LIMITED SPOTS
All plans are 30% OFF for the first month! with the code WELCOME303
LIMITED SPOTS
All plans are 30% OFF for the first month! with the code WELCOME303

LIMITED SPOTS
All plans are 30% OFF for the first month! with the code WELCOME303

Image formats are a hot topic of discussion on internet forums and social media. There's no shortage of opinions about what's best or most compatible with different devices and operating systems.
In terms of email signatures, there are two main types: one that displays your contact information at the top of each message, followed by a line break, then your name, title and company displayed below it (the "top-aligned" signature). The other type has all your details listed underlined underneath your email address (the "bottom aligned" signature). Which should be used depends entirely on who you're sending emails to. If someone prefers the bottom alignment style, they might prefer that you use the latter option — images can't really be added as attachments when using Gmail so if you want to send them a photo, GIF or JPEG file, stick to the first style. For those who would rather have their profile picture appear above anything else, stick to the second method of adding your signature.
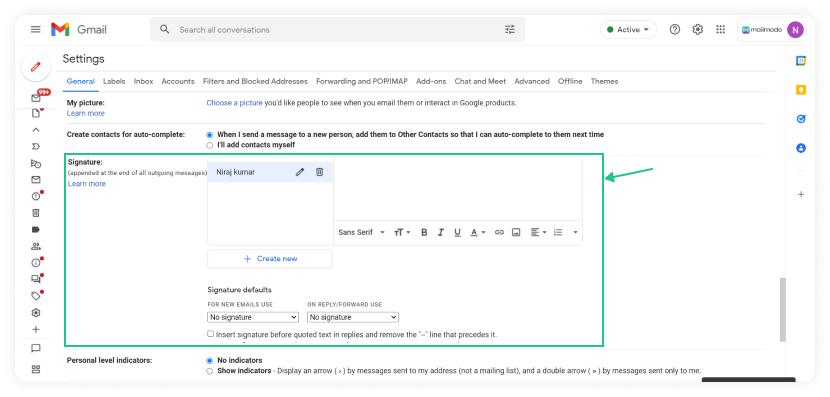
If you've been reading our newsletter lately, we know that some people may still struggle with how to add an image to their email signature in Google Chrome. But don't worry! We'll cover everything you need to get started creating professional looking email signatures today.
There are many reasons why you may experience problems while trying to create an email signature in Gmail. Here are just a few common causes:
Gmail doesn't support multiple fonts within email signatures. In order to make sure your font looks consistent across platforms, only one font is supported per account. So if you'd like to include both Arial Narrow and Georgia Condensed Bold in your email signature, unfortunately, you won't be able to unless you switch accounts.
Your browser blocks certain extensions from running. As mentioned previously, because of security concerns, Gmail prevents third party apps from accessing its API. To ensure your signature works properly, disable any browser plugins such as PDF readers or image editors before opening your inbox. You can also try turning off ad blockers such as uBlock Origin or Ghostery.
You're viewing your email incorrectly. When composing new messages in Gmail, you can choose between previewing them online through Gmail itself or downloading a copy to your computer. Unfortunately, downloading copies means converting images into JPGs which often results in distorted pictures. Instead, avoid saving drafts until after clicking Send & Mail instead of Download attachment. This way, you can view your messages without losing quality.
While writing up this guide, I decided to test out how to create email signatures myself. After several attempts, I realized that the process was quite difficult. Thankfully, there are plenty of tools available to help. My favorite tool is Signature Maker [No Longer Available], but more recently, I've tried out Email Signature Creator. Both were effective in helping me craft professional signatures quickly and easily. Below is a step-by-step breakdown of how these programs work:
Signature Maker allows users to upload existing photos to personalize their own custom signatures. It offers over 1 million templates to select from including ones specifically designed for business purposes. Users can customize their images by changing colors and removing backgrounds. They can even remove parts of images to fit perfectly inside the margins provided. Lastly, it provides guides detailing where to position things like a logo, phone number, website link and social media icons. However, if you decide to purchase Signature Maker yourself, keep in mind that it costs $15/month.
Email Signature Builder is another great choice for making email signatures. While it's free to download, users must subscribe to the platform ($10/month) if they want access to premium features such as background removal. Once signed up, users can simply drag and drop elements onto the canvas, rotate objects and resize them accordingly. Like Signature Maker, they provide guidelines showing exactly where to place your logos, links and social media profiles. All in all, I found that both options offered similar functionality and user experiences.

When uploading images to websites, browsers typically display them as thumbnails. On desktops, this isn't usually a problem since screens tend to be larger than mobile screens. Online viewers can scroll down to see additional details once the full page loads. Meanwhile, smartphones allow users to take advantage of their smaller screen real estate. Because of this, when browsing web pages on mobiles, images contained within email signatures may look slightly stretched horizontally due to limited space constraints.
This issue becomes especially apparent when using the bottom aligned signature design, as users' eyes will naturally travel left to right upon opening the mail. With images appearing too small at times, this could cause confusion for the recipient. Luckily, you can fix this problem by choosing to embed images directly into your document. By doing this, you essentially turn the images into hyperlinks which automatically adjust themselves depending on resolution. Now, whenever anyone opens the message containing your image, they will see the entire thing.
Unfortunately, unlike desktop computers, phones aren't equipped to handle high definition video content. Since YouTube videos can reach resolutions higher than 1080p, they often stretch beyond smartphone borders. Thus, if you plan to include a video in your signature, consider hosting it elsewhere.
Sometimes, images uploaded to sites may become pixelated or blurry despite being saved correctly and resized appropriately. If this happens to you, here's how to prevent it:
First, check whether your selected template contains errors. Most likely, you'll notice a red outline around images which haven't loaded successfully. Simply click anywhere outside of said boxes to close them. Then, go back to your original settings and try again.
Next, try adjusting dimensions manually. Some graphics packages allow users to scale images based on specific parameters. Adjust widths and heights individually until you obtain desired results.
Lastly, attempt uploading the same image to various services. Sometimes, issues arise when attempting to load an image twice. Try replacing old files with newer versions. Or, perhaps try loading the image via a different webpage altogether.
Hopefully, one of these solutions fixed whatever caused your image to malfunction. Otherwise, feel free to ask us questions regarding this tutorial in the comments section below. Also, let us know which program you end up choosing and if the steps outlined helped solve your issue!
If you are a freelancer or self-employed person who uses Microsoft Office on a regular basis, then chances are that you're using Word. And if you use Google Docs as your primary word processor and have multiple documents open at once, then you'll be familiar with how it handles images.
Unfortunately, when creating signatures in Mail & Calendar (the default software used by Gmail users), the program doesn't handle images very well. It won't let me insert any picture into my signature without having them completely squished together or overlapping each other. When I try adding more than one photo from different sources, they all end up being inserted under one another instead of side-by-side like I want them to appear. This makes it difficult to see what my photos look like since there isn't enough space between them.
As far as formatting goes, it's not so much about which type of document you choose but rather how you can adjust its properties to make everything fit perfectly within the confines of your screen size—and not just because it looks neat. Here’s how to properly create a professional looking email signature in Gmail while maintaining good organization principles.
When I first opened up my Word doc for this project, I was able to get away with inserting two full-sized photos next to each other without worrying about where their edges would meet. But after opening up my new Gmail message window, things got messy pretty quickly. The problem wasn’t necessarily with the layout itself, but rather with the fact that the images were no longer aligned correctly.
I don’t know why the program decided to center these images instead of letting them stick to the left edge like normal, but it resulted in some major headaches later down the line. To resolve this issue, all I had to do was go into the Properties section and change the “Align Text” option from “Center” to either "Left" or "Right." Then, I went over to the Picture tab and changed the alignment options there too. Once I did that, everything looked much better. You could still tell that the picture was centered, but it didn't take up half of the page anymore.
The only downside to doing things this way is that now every single one of my photos has been moved slightly further towards the right hand side of the page. So to keep them organized, I usually need to put something else beside them to separate them from whatever content comes afterwards. In my case, I typically use a large bold heading so that people aren't confused on whether or not they should click on those links.
But even though I may have to resort to extra measures to organize my photos, at least it's possible! If you ever run into problems with trying to figure out how to add your own custom images alongside your emails, check out the following video tutorial below.
http://www.youtube.com/watch?v=wKkYhZ2Q7W4&feature=youtu.be
After watching the above video and realizing how easy it actually was, I thought it might help others struggling with similar issues if I created a step-by-step guide outlining exactly what changes needed to be made. However, before we proceed onto making our final adjustments, here are three important tips to remember whenever working with images in MS Word:
First off, always ensure that your margins and paper sizes are set to zero when importing your documents. Otherwise, the computer might think that you intend to print out your work. Or worse yet, it might decide that you want to move stuff closer together simply because that’s easier for it to process. The same thing applies to images. Anytime someone sends you.jpg files, consider yourself lucky — otherwise, they'd probably be sent in.gif or.png extensions, both of which allow images to remain unaffected by margins and such.
Secondly, never resize your original images unless absolutely necessary. By resizing, you risk messing up the proportions and quality of your photos. Instead, download copies of your images directly from Flickr, Facebook, etc., and paste them straight into your Word document. Don't worry—this shouldn't cause any trouble whatsoever. Lastly, avoid converting colors. Always leave your images untouched, especially when dealing with high-resolution digital photographs. That means avoiding anything greater than 72 dpi.
Now that we've taken care of those pesky technicalities, let's talk about adjusting the overall appearance of your signature. As mentioned earlier, I'm going to show you how to turn my old Word doc into a clean, clutter free version of myself. All I'm really interested in changing are the background color and font style. Before getting started, here are four quick steps to follow:
Select "˜File' and select 'Print.' Make sure "˜Send Printout to Printer' is selected underneath the General menu item. Click OK.
Once your document prints out, cut out the individual sheets containing your various signatures. Keep the front sheet intact, along with the bottom margin. On top of that, place the rest of the pages upside down so the topsides face upwards.
To remove the background, highlight it and press Ctrl + C. With your mouse, drag across the entire width of the signature until you reach the very edge. Now release the mouse button. Go back through each step again until you arrive at the last one. At this point, you should have highlighted the entirety of the signature except for the background. Press F8 to delete the selection. You also can try this background removing tool.
Finally, head back up to the Home Screen and select Font. Change the Size field from 12 to 16. Increase the Color field from #fefefe to #000000010000FF. Under Background, pick White Solid Fill.
That's basically it. Your signature should now be ready to roll. Check out the finished product below.
[NO LONGER WORKS] Signatures.me [No Longer Available]
This is the part where things start to get tricky. Since Google Docs doesn't offer many tools for modifying the shapes of objects, the easiest way to accomplish this task was by taking screenshots of the desired results and pasting them onto canvas programs such as Photoshop or Paint.NET. From there, I could manually position the items until the perfect placement appeared. Unfortunately, this approach can also lead to a lot of wasted time. Not only does it require quite a bit of effort, but it takes forever to complete one simple signature.
Luckily, there are plenty of online services available today that specialize entirely in providing templates specifically designed for Gmail. One service worth mentioning is called Email Signature Maker. After signing up for an account, you’ll instantly receive access to hundreds upon hundreds of professionally formatted email signatures. Some of the most popular ones include business, gamer, executive, fashion, and wedding designs. Each design includes several customizable elements including header styles, file attachments, contact information, social media icons, and logos.
Here’s how the website works. First, browse through the categories until you come across a template you like. Next, fill in the fields as instructed and hit submit. Within seconds, you’ll receive a link to view your newly completed signature. There’s nothing more frustrating than seeing your carefully crafted masterpiece ruined by errors somewhere around halfway through. Luckily, despite the occasional glitch, the system generally worked flawlessly.
On average, it took me less than five minutes to finish the job. Even if you don’t feel confident editing images, you can easily bypass this headache altogether. Simply copy and paste the code provided by the site into your own HTML editor. Although it might seem daunting at first glance, it's surprisingly straightforward once you understand the basic syntax involved. Just search for "background" and replace it with "img src="URL."" This method allows your readers to enjoy your signature without needing to install any additional plugins.
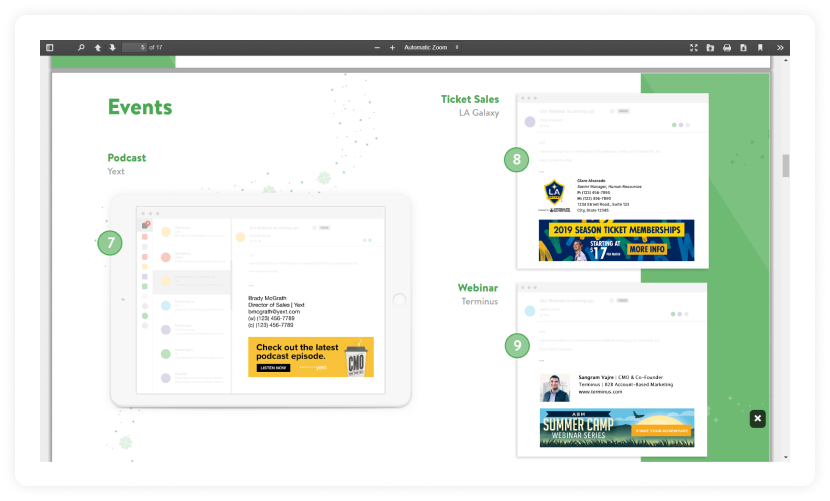
Below is a screenshot showing a portion of the customization options offered by the aforementioned website.
Signature Generator
If there's one thing that can ruin a perfectly crafted email it would be an unsightly attachment. Emails are supposed to look professional but if your attachments have the wrong dimensions or aren't aligned properly then they're going to make people want to delete them as soon as possible.
Email signatures also need to be attractive enough so that when someone opens their inbox, they don't immediately close out because of boredom. People often use these emails to gauge how well-dressed the recipient might be. So what does all of this mean? It means that your images must adhere to certain specifications which determine whether they should be uploaded or not. You'll also want to know how to align things like pictures with text on your profile. Here are some tips for creating a great email signature using Microsoft Word.
Image Credit: Amit Agarwal/Shutterstock
This post was first published in 2016. We've updated it now due to changes in technology.
PNG stands for Portable Network Graphics and has been around since 1997. But why is it better than JPEG or GIF for an email? The short answer is that PNGs take up less space while still retaining high quality images. This is especially helpful when sending large files via email. However, many users prefer JPEG over PNG simply because it allows easier editing. As a result, we recommend that you stick with PNG unless otherwise specified by your client (like Google Chrome).
But even though it takes up more space, many argue that the lossless compression makes PNG ideal for emailing sensitive information like credit card numbers. If you absolutely require the smaller file size, go ahead and convert your image into another format like JPEG before saving it onto your computer.
However, note that most modern browsers support automatic conversion between different types of images. For example, Internet Explorer automatically converts from.JPG to.GIF and Firefox detects JPEG versus.JPEG. Therefore, converting your PNG to JPG isn't necessary unless you plan on using older versions of either browser. Alternatively, you could just upload a higher resolution version directly to your server.
As far as Photoshop goes, our guide to optimizing images for email suggests keeping your final product at least 2000 x 1700 pixels wide. However, many clients allow much wider sizes such as 2048 x 1536 pixels. To get the full benefits of uploading larger images rather than cropping them down in Photoshop, consider upgrading your web hosting service. In addition, keep any background colors white instead of black—this helps prevent red eye effect.
Finally, remember that your email provider may block PNM, TIFF, XBM, RLE, and other raw formats. They only accept specific extensions like.jpg,.gif,.png, etc.. Be sure to check out our list of the top free online tools for resizing and compressing RAW photos.
The general rule of thumb when choosing an image format is to choose something simple and easy to work with. Most people aren't graphic designers and shouldn't have to worry about making complex decisions regarding color profiles, gamma values, or dithering effects. Furthermore, if someone else needs to edit the document, you won't want them having to spend time figuring out how to change an entire font style based on a single pixel value.
So, here are a few general guidelines to follow when selecting an appropriate image format:
Go for 8 bit per channel. When working with jpeg, gif, png, tiff, bmp, or anything below 24 bits per channel, always save your original file in 16 bit mode. Saving in 32bit mode creates too big of a file and doesn't give you extra storage space. Also, try to avoid adding transparency effects like drop shadows or emboss. These tend to stretch the edges of small images which results in unwanted artifacts within the borders. Save your documents as transparent backgrounds when possible.
For maximum compatibility, opt for lossy compressions such as jpg, gif, or png. Lossy compressions reduce the amount of data required without losing sharpness or detail. Although lossless compressions such as pdf usually create smaller file sizes, they aren't practical for everyday usage. Plus, if you ever decide to print your document, you risk getting errors when opening the PDF.
Use multiple layers whenever possible. Layers let you stack elements on top of each other. Because of this, it's important to name each layer appropriately and select a unique fill type. Without proper naming conventions, layers become difficult to manage and sort through later on. Additionally, never add alpha channels to your images. Instead, use blending modes to achieve similar effects.
Consider using grayscale palettes. Grayscale palettes contain shades of gray instead of individual colored ones. This works particularly well for photographs where you typically see the same object in a variety of lighting conditions. On the contrary, using truecolor palettes gives you access to millions upon millions of colors in order to recreate natural looking skin tones.
Keep your fonts scalable. When designing websites, it's very common to include custom designed fonts in your CSS stylesheets. Unfortunately, non-scalable fonts cause problems when viewed on screens that range anywhere from 7 inches to 20+ feet away. That's why it's essential to ensure that both your website design software and email signature program scale your fonts correctly. Otherwise, customers who receive messages sent from your company may experience horizontal lines along the sides or bottom of letters.
Try to limit yourself to three fonts. Using too many fonts slows down download times as well as adds unnecessary clutter to your message. Remember that no two eyes interpret items identically. Even slight differences in weight, spacing, or alignment can throw off the overall appearance of your document. Stick with a limited number of fonts until you really understand what works best for your audience.
To help viewers quickly scan your signature, place your logo near the center of the page. Then, surround it with text blocks that describe your job title. Aligning your logo vertically with the middle of the page ensures that everything remains readable. Next, arrange your contact details horizontally under your logo. Finally, add a line beneath your address section describing your services.
When combining pictures with text, it's crucial to keep the proportions equal. Images should ideally be twice as tall as they are across. Text should likewise be double its width compared to height. Keep objects centered on the screen and make sure that none of the boxes overlap each other. Lastly, if your office uses Outlook 2007 or 2010, place your hyperlinks above the fold. By doing so, viewers are able to navigate through your site without scrolling.
When composing new emails, Gmail offers several options for formatting the body of your email. First, you can click the little arrow next to New Message " Plain Text to open up a plaintext editor window. From there, you can write whatever you'd like. Once finished, hit Send and nothing fancy will happen.
Alternatively, you can press Ctrl + Shift + S to open up Gmail's compose box. Press Enter after entering your subject, pick your recipients, and begin typing your message. After hitting enter again, scroll down and you'll notice that your message appears right alongside every item in your Sent folder.
Lastly, if you'd like to insert additional HTML code into your email, you can turn on rich text. Go to Settings & Labs " Composer " Show Options and enable Use Rich Text Formatting. Now, whenever you compose a new e-mail, you'll see a menu bar appear beside your message. Click View Source and you'll see all sorts of cool stuff like tables, links, lists, and embedded videos.
Have questions about email etiquette? Check out our ultimate guide to writing effective emails. And if you're interested in learning more about building email newsletters, read our piece on how to craft killer email copy.
 Send emails at scale

