 LIMITED SPOTS
All plans are 30% OFF for the first month! with the code WELCOME303
LIMITED SPOTS
All plans are 30% OFF for the first month! with the code WELCOME303

LIMITED SPOTS
All plans are 30% OFF for the first month! with the code WELCOME303

Personalized content has become an increasingly popular way of engaging customers online because it helps you show them that they are special by displaying unique properties like name or birthday. HubSpot's Contact Tokens feature allows you to add personalized values such as first name or last initial while creating contacts or leads via Email Studio. This article will explain what these features are called, how they work, and why using them can help improve engagement with your brand.
If you're new to this concept, we recommend reading our previous post about customer segmentation, which explains the importance of defining groups based upon their behavior rather than demographics alone. If you already have defined segments, then read on below!
Contact tokens allow users to select from different options displayed on a lead form when entering information into their own account. The user simply clicks one option to indicate whether they want to receive promotions, updates, newsletters, etc. For example, if someone enters "yes" under the newsletter prompt, you'll see a field labeled Token Name (Newsletter) appear underneath where you'd normally enter their address details. When filling out forms, people often click next without fully understanding what each section does so having the ability to customize fields according to preference provides additional clarity.
In addition to adding these tokens at creation time, there might be times when you need to edit existing records. You may also wish to set up a system whereby certain members of staff can change tokens manually depending on their role within your organization. It's possible to assign any number of tokens per record but typically only two should suffice.
For instance, let's say you've created three types of subscribers: those who would prefer newsletters, those interested in offers, and those who don't care either way. In order to differentiate between these, you could give each type of subscriber a couple of tokens. One token could represent "newsletter," another could represent "offer." Once you've assigned each token its corresponding label, you can now choose which ones to display on various elements throughout your site or app.
Let's take a closer look at some examples of ways you can utilize tokens within your HubSpot account.
There are several ways you can incorporate personalization tokens onto your websites/apps through HubSpot. Here are just a few examples:
Website Pages & Emails - Website pages and emails contain many sections that allow you to modify their appearance and layout. By utilizing HubSpot's Personalization Fields, you can easily apply customizable tokens to individual sections across all pages and emails sent to your audience. Just make sure you specify the correct token names before publishing anything.
Lead Forms - Adding tokens to Lead Form Builder templates ensures that your leads always get customized content relevant to their preferences. These tokens can even be used to send follow-up messages directly after submitting a form.
Pages - Within pages, you can include tokens in banners, sidebars, footers, and other text areas to ensure that your visitors see content that matches their interests.
Campaigns - Campaigns allow you to target multiple audiences simultaneously with similar data. They also provide advanced analytics allowing you to view conversion rates within your campaign history. Additionally, you can automatically trigger campaigns based on events like visits, purchases, downloads, etc.
This list above covers most common methods of incorporating personalization tokens into your apps and sites. HubSpot also supports integrations with over 100 applications and platforms including Google Analytics, Salesforce Marketing Cloud, Mailchimp, Twitter Ads Manager, Facebook Advertising API, HubSpot CRM, Zapier, LinkedIn Pulse, Pinterest Pins, Instagram Stories, Shopify eCommerce, WooCommerce, WordPress plugins, Magento 2 extensions, and more. We encourage you to check out HubSpot Integrations Marketplace for more info.


Using HubSpot's built-in Email Studio tool, you can easily design professional email communications for both internal and external clients. All you need to know is HTML code and basic formatting skills. However, there are instances when you may wish to bypass email studio entirely. Let's explore how this works.
When designing emails, you must be mindful not to place too much emphasis on graphics and images. Instead, keep things simple and focus on writing compelling copy. To simplify matters further, here are some useful tips to remember regarding email layouts.
First, try to avoid sending large blocks of text at once. Break longer paragraphs down into smaller chunks instead. Second, try to limit the amount of links contained within your message since they can cause problems for mobile devices. Thirdly, consider removing hyperlinks altogether. Finally, pay attention to your image usage. Make sure your background images aren't blurry or pixelated. Lastly, keep file sizes low by choosing high quality photos or videos.
Once you've finished crafting your email, preview it in Gmail to test for errors and adjust accordingly. Then publish it to your preferred recipient list.
One important note is that email recipients can unsubscribe anytime from whatever lists they currently belong to. Therefore, make sure to ask permission before collecting their email addresses otherwise you risk losing access to valuable clientele. Also, bear in mind that there are limitations to the length of emails you can write. According to HubSpot, emails should generally be no longer than four minutes long. If you exceed this limit, you'll need to start breaking larger pieces into shorter segments. Don't worry though, you can still track views and open rate regardless of size.
The Global Default Value function determines what appears whenever anyone creates a new contact in HubSpot. There are five categories of GDVs (global default values), namely Content Type, Property, Language, Country Code, and Time Zone. Each category contains subcategories. For example, the Content Type GDV includes eight choices ranging from Newsletter Subscribers to Non-Subscriber. Similarly, Properties range from First Name Only to Last Initial.
As mentioned earlier, HubSpot lets you assign unlimited tokens to each entry. In general, however, assigning less than 10 tokens to one entry gives better results. Furthermore, HubSpot recommends keeping the total number of GDVs lower than 75% of your contacts' entries combined. Otherwise, you run the risk of flooding your database with duplicate information.
Here's an example of how GDV works in practice. Suppose you wanted to offer everyone a free eBook download. Your ideal contact profile looks something like this:
Name: John Smith
Gender: Male
Email Address: jsmith@example.com
Property: First Name Only
GDV: Free Ebook Download
Now, assume you have 500 potential prospects subscribed to your newsletter. Of these, 400 would actually be interested in receiving your ebook. Since you have 40 active contacts, you decide to configure your GDV settings as follows.
Content Type = Newsletter Subscribers
Number of Tokens = 5
Global Default Value = Free EBook Download
Afterward, you go ahead and create a new lead containing the same information as aforementioned contact profile. Unfortunately, despite setting his property to First Name Only, he receives every single newsletter update you upload thereafter. Why? Because HubSpot assigns him the global default value for Newslettres Subscribers. As a result, he ends up getting flooded with unwanted promotional material.
To prevent this from happening, you can override the GDV settings for particular properties. Simply find the desired token and replace the corresponding GDV field with Custom. So, in the case of the Free Ebook Download GDV, you can set it as Custom. Doing so will enable you to input whichever token you wish to use for that property.
Next, head back to your lead editing screen and scroll down until you reach the General tab. Beneath the Property menu item, locate the dropdown box labelled Override Property Settings. Select Custom from the available options and hit Save Changes. Now, when you revisit your lead, you will notice the following changes.
Personalized content can help make sure that every visitor receives exactly what they need when they visit your site or open an email from you. In order to create personalized experiences with your users, it's important to remember them as they browse through your online properties. One way HubSpot lets businesses track visitors across their various online platforms is by adding "contact tokens" on webpages, emails, and landing pages.
A contact token is similar to a cookie but offers more flexibility because it doesn't have to be deleted after each session. Contact tokens also provide much greater privacy than cookies since only certain websites will see this information. The main difference between the two is that cookies expire while contact tokens stay active indefinitely. But first things first...
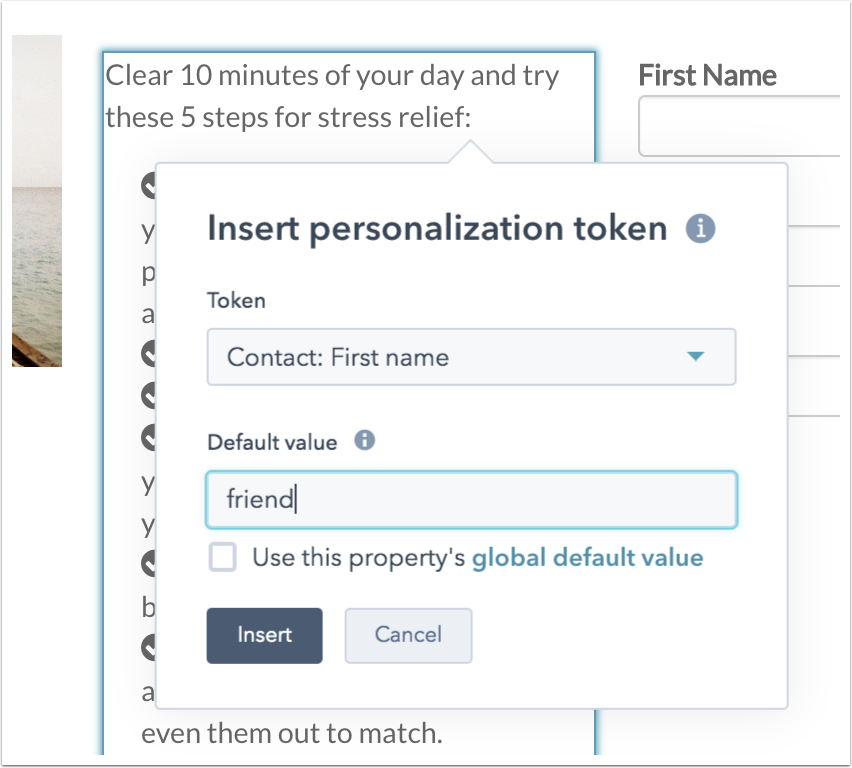
To begin setting up your own contact tokens within HubSpot, head over to Settings & Personalization Tokens. On this page, click Create New Token. This brings up an editor where you'll type out a script which contains all of your desired variables (such as name). When creating new tokens, we recommend using lowercase letters so that there aren't any issues later if you decide to change the variable names to uppercase. After typing everything into the box and hitting Create Token, then copy the token code below. You should now see a popup saying something like "ContactToken1". Now go back to the previous screen and paste the token code right under your existing script. It should look something like this:
Now hit save at the top of the window and give it some time to process before moving onto the next step. Once saved, you're ready to start integrating contact tokens throughout your website!
After pasting the token code, you should receive a notification letting you know that the token has been added successfully. If not, check the code above carefully for errors and try again until you get no errors. Also note that if you accidentally delete the token code, simply select the text and press Ctrl + C to bring up a quick menu asking you whether you want to Delete Selected Text or Duplicate Selection. Select Duplicate Selection and choose the same token again.
When finished, test out the token on one of your webpage URLs. To access tokens, go to your Analytics dashboard and navigate down to Visitors > Custom Properties > Tokens. From here, you should see your newly created token listed alongside other tokens already present. Simply find the one corresponding to the URL that was just tested and voilà—you've got yourself a customized experience made specifically for your user.
If you encounter problems, troubleshooting tips are available here.
Yes you can! Head over to Content > Email Templates. Then scroll down to Find A Template. Here you'll see a list of templates organized alphabetically. Each template shows its title and description along with a button labeled Edit. From here, select the template you'd like to edit and click Edit.
In the resulting pop-up window, find the section marked Script Editor. Copy/paste in the script tag found directly beneath the heading Variables. After copying the script, replace the default text with yours. Hit Save once done and wait for HubSpot to pull down the latest version of the email. At last, preview it to make sure the changes work correctly. For best results send this email to someone who isn't familiar with HTML tags, otherwise they may mistake your formatting for spam.
Once sent, recipients won't even notice that the message came from an automated system. They'll continue reading as usual without realizing that customization took place behind the scenes. Furthermore, sending a customized email means you don't have to worry about users receiving duplicate copies of newsletters or promotional messages.
Email tokens essentially let you set individual preferences based on the recipient's actions. As such, whenever a person opens an email, clicks around, or fills out a form, HubSpot will record these events and store them in the appropriate database. By doing so, those particular data points become known as a "token."
For example, suppose you wanted to offer free shipping on orders placed during certain times of the year. Your token would consist of the date range for ordering free shipping along with the product category and subtotal amount. With this token, customers could purchase items from your store knowing that they qualify for free shipping simply by checking off the boxes during checkout. Another great idea might be offering exclusive deals on certain products depending upon the customer's choice via tokens.
HubSpot makes tokens extremely easy to build thanks to the intuitive drag-and-drop interface. So long as you follow our instructions closely, building your tokens shouldn't take very long at all. However, if you ever run into trouble, HubSpot provides detailed support material explaining different ways to construct tokens. Additionally, HubSpot's built-in analytics platform gives you valuable insights into the effectiveness of your campaigns.
Placeholders are used primarily in conjunction with email marketing campaigns. Placeholder images allow you to insert dynamic content into your subject lines. Take, for instance, a company selling car parts who wants to show potential buyers pictures of damaged components instead of boring old words. Using placeholders allows companies to avoid having to pay extra money for images. Instead, customers can supply their own photos, making the entire procedure easier and less expensive.
Here's how it works: First, upload image files relevant to your campaign to your library. Next, go to Campaigns>Campaign Management>Edit Campaign Details. Scroll down to Subject Line Options and locate the image file associated with your campaign. Click Add Image and pick either an Upload File option or enter a location for an external link. Finally, update the body of your email and include your placeholder(s) wherever necessary.
As mentioned earlier, HubSpot comes equipped with several useful scripts already. Check out HubSpot's guide on incorporating Google Maps into email opt-ins for additional ideas. And if you still feel stuck, HubSpot's comprehensive documentation library features hundreds of articles covering nearly every topic imaginable.
Overall, HubSpot's ability to enhance brand loyalty among consumers by giving them customizable options makes it perfect for small business owners looking to stand out from competitors.
Personalized messages are crucial when it comes to online communications. Whether we're sending newsletters or engaging with customers on our websites, there's no reason why all of these interactions should be identical. This can lead to confusion among our audiences if they don't recognize who sent them what.
We've covered some great ways that you can customize your e-mails so they stand out from others -- but did you know that you can also include this customization within your own software as well? HubSpot has recently introduced Personalization Tokens which allow us to create unique experiences based on each customer’s preferences.
In this article, we'll explain exactly what these new features are, how they work, and step by step instructions on adding personalized content into any part of your HubSpot account. Let's get started!
One of the most popular uses of HubSpot's Email Studio feature is creating automated follow ups after a person completes their registration form. You can schedule automatic follow up reminders whenever users fill out certain sections on your signup page like name and address.
By doing this, you will avoid repeatedly contacting people about incomplete registrations because HubSpot takes care of everything automatically.
The best thing about this method is that you can set different conditions per user (for example, only remind people who haven't completed the first section). And, since HubSpot handles all of the scheduling, you won't have to worry about missing deadlines due to busy schedules.
If you want to take things further, you could even utilize HubSpot Marketing Automation to coordinate multiple campaigns together. For more information on using HubSpot Marketing automation, check out our guide here.
For instance, let's say you wanted to offer a special deal exclusively to those who registered during a particular time frame. If you used HubSpot Marketing Automation, you can easily integrate these two systems together via Zapier. Then, you could trigger an automated email campaign every day at 3pm to inform your latest registrants about the exclusive deal.
This way, you wouldn't need to manually monitor your database throughout the week to see who signed up last month and then send them offers once again. With HubSpot Marketing Automation, you can automate all of this process without lifting a finger.
Now that you understand how easy it is to manage your mailing list through HubSpot, let's move on to another type of communication tool called Contact Tokens.
Contact Tokens allows you to assign unique IDs to individual leads/customers so you can track conversations separately. The benefit of having separate tracking isn't just limited to HubSpot though. It helps improve productivity across your entire team.
Let me give you a hypothetical example. Say one member of your sales team was working late one night and missed a deadline for responding back to a client. Instead of stressing over whether he would finish his task before noon tomorrow, you could simply log onto your HubSpot dashboard and view the status updates live.
As long as you know where he is located, you can immediately reach him and ask if there's anything you can help with. He may not realize it right away, but knowing that you were checking up on him gives him peace of mind that he didn't miss something important. In other words, it prevents unnecessary stress caused by lost opportunities.
It might sound complicated, but Contact Tokens make it easier than ever to handle multiple incoming calls and chats simultaneously. All you need is a quick overview of everyone's current statuses and capabilities. Now that we've got the basics down, let's talk about setting up Contact Tokens next.
While HubSpot Support does support Contact Tokens, its functionality depends on whether the company provides you access to their API. But regardless, we still recommend taking advantage of the feature anyway because it's incredibly beneficial for business growth.
Here's how to enable Contact Tokens:
Click Create New Token.
Enter a Name for your token.
Choose a Type. There are three options available: Lead, Customer, User Group, etc...
Add a Property ID.
You can choose between String, Int64, Float32, Boolean, DateTime, GeoPoint, URL, and Custom field types.
Make sure to select "Custom Field" under Property Types.
Then, enter the desired properties. These fields must begin with "[Property]" followed by the corresponding property name. So, for example, [Lead Status] = Active means that you'd start typing "leadstatus." Don't forget to wrap the text inside double brackets ("[propertyName]").
And, if you'd rather skip the configuration altogether, HubSpot offers templates specifically designed for Contact Tokens which makes it much less intimidating. Simply visit Contacts -& Integrations menu item and scroll down until you find the relevant template. Once selected, click Edit Template. From there, you can copy & paste code snippets directly into your existing Salesforce CRM system.
Once finished, go ahead and save the token. You now have successfully created your very own Contact Token. Next, let's learn how to incorporate Contact Tokens into HubSpot Landing Pages.
Another cool feature of HubSpot Landing Page Editor is the ability to convert static HTML emails into dynamic landing pages. By enabling this option, users will experience responsive design while browsing through your site, making navigation seamless. What's more, this feature lets you insert customized images, videos, buttons, forms, links, and social media icons right on top of the screen.
With Contact Tokens enabled above, you can leverage this feature to build highly interactive landing pages. Here's how to do it:
1.) Go to Contact Cards -& Copy To Landing Page editor.
2.) Paste the copied Content Block.
3.) Click Save Changes.
4.) Select Static HTML Templates.
5.) Choose the correct Properties from the dropdown box.
6.) Enter the values assigned to each property.
7.) When done editing, press OK.
8.) Publish Your Dynamic Landing Page.
9.) Share Your Dynamic Landing Page Link With Others.
10.) Enjoy!
Adding Senders is similar to adding Contact Tokens in terms of implementation. However, unlike Contact Tokens, there aren't many restrictions placed upon sender management. Unlike standard Contact Forms, you can edit existing Sender Profiles such as Firstname, Lastname, Address, City, State, Country, Phone Number, Mobile, Gender, Birthdate, Birthday, Website, Social Networks, Interests, Company, Jobtitle, Client, Project, etc..
To get started, head over to Settings -& Integrations -& Add Integration -& Send Emails -& Configure Trigger. After selecting Send Emails, you can configure the following parameters:
Select Source as either Individual or Organization.
Set Action as Single Message or Multiple Messages.
Lastly, choose Conditions under Filter Criteria.
Next, switch over to Mail Studio -& Manage List Folders.
From here, expand On Completion of Section X and drag the green plus icon towards the left side column. Rename the folder whatever you want.
Repeat steps 1 and 2 for all applicable sections.
When finished, publish your changes.
Afterwards, open your newly published contact card. Head to Settings -& Integrations -& Update Recipients -& Change Existing Sender. Find the appropriate row and replace it with the new profile details.
That's it! You're good to go. You shouldn't run into any issues afterwards aside from minor UI quirks. As always, feel free to share feedback with us regarding the article itself. We hope you learned something new today!
 Send emails at scale

