 LIMITED SPOTS
All plans are 30% OFF for the first month! with the code WELCOME303
LIMITED SPOTS
All plans are 30% OFF for the first month! with the code WELCOME303

LIMITED SPOTS
All plans are 30% OFF for the first month! with the code WELCOME303

Businesses today have many different tools that they use for tasks such as order entry, billing or customer support. While these tools can be very useful, it is often difficult to integrate them together because each system uses a slightly different format and language. In addition, there may not always be an immediate need to send information from one application to another. If you find yourself needing to do so frequently, then consider creating your own custom objects with fields that match those used by other systems. This way, you can easily transfer data between applications without having to create multiple spreadsheets.
In this article we will discuss what Business Process Automation (BPA) means within the context of Salesforce. We'll also provide some examples of existing BPs and walk through the seven-step process of designing new ones. Finally, we'll show you where you can access these features via lightning path.
A "business process" refers to any task performed on behalf of a client or company. For example, if you work at a bank, your daily activities would likely include handling deposits, withdrawals, transfers, loans, etc. Your overall job responsibilities could involve interacting with customers, employees, colleagues, vendors, etc. These interactions all fall under the heading of business processes.
Salesforce makes it easy to identify which business functions correspond to various stages of the sales cycle, including lead generation, qualification, opportunity development, proposal writing, contract negotiation, post sale follow up, and invoicing & collections. You can even set triggers based on certain events occurring during the sales cycle. The same holds true when identifying any other type of business function.
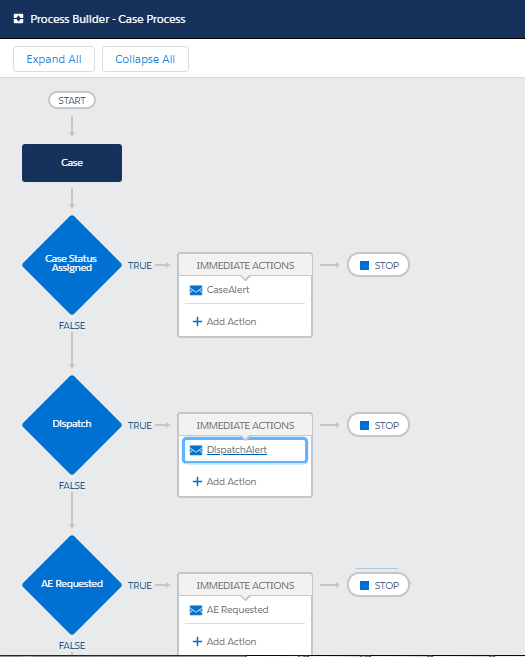
The following figure shows two sample business processes built into the platform. Note that while these look like standard CRM pages, their contents were created specifically for the purpose of illustrating BPAs.
There are three primary ways to structure a workflow automation solution. One approach involves defining individual flows. Another consists of building blocks that form a flowchart. A third utilizes both approaches. Each has its advantages and disadvantages. To help you better understand why each approach works, let's go over the pros and cons of each method using our previous example.
Method 1 - Defining Individual Flows
This option allows users to build out specific actions that fit their needs. It gives them flexibility since they don't have to adhere to a pre-determined schedule. However, if something changes in the future, they must modify these actions themselves rather than just changing a setting somewhere else. Also, once a user starts working in this manner, he/she cannot see whether other people are performing similar tasks simultaneously. Lastly, if someone leaves the organization, his/her personal knowledge base becomes obsolete.
Method 2 - Building Blocks That Form Flowcharts
This alternative provides more control over how things are done but requires that the designer put more thought into the design phase. As long as everyone understands how everything fits together, they're able to perform the desired actions at the appropriate time. Afterward, anyone who comes along later does not necessarily have to know about every step involved. Plus, this method lends itself well to larger projects due to its modular nature. Thus, individuals can focus on smaller sections of the whole instead of being distracted by trying to oversee too much activity at once.
Lastly, this option offers greater flexibility in terms of allowing users to customize their own experience without having to rely solely on pre-set rules. Users can tweak individual elements of the flow until they reach optimal results. Unfortunately, if anything ever happens to change the plan, the entire process is affected. So, while this model might allow for maximum customization, it doesn't offer enough oversight to ensure that things run smoothly.
Method 3 - Combination Approach
While neither method above is inherently superior, combining the best parts of both creates a hybrid approach that combines the benefits of both worlds. With this technique, you get the ease of implementation provided by the block approach plus the adaptability offered by the flow approach. Since users only have to worry about putting pieces together, they don't have to spend time learning how to operate all the moving parts and details. On top of that, if someone leaves, nothing goes away unless the person deleted the records himself/herself.

Now that you've learned about the basics behind BPA, let's talk briefly about the steps required to actually implement a BPA project. There are several key phases that occur before, during, and after a project gets started. Here are the first few steps that should be completed throughout the life span of a BPA initiative.
1. Identify Problems: Before starting any kind of project, you must determine exactly what problems exist. What kinds of issues keep coming back time and again? Are there recurring errors? Is there a bottleneck preventing productivity levels from increasing? Do certain departments or teams struggle with certain areas of responsibility? Once you've determined the root cause(s), you'll be ready to develop solutions.
2. Design Solutions: Now that you've identified potential causes, it's time to start brainstorming ideas. Brainstorming sessions typically last anywhere from 15 minutes to several hours depending upon the scope of the problem. Make sure to invite relevant stakeholders so that they feel included and give their input. Then, select the most viable solution(s). At this point, you should already have a general idea of what direction to head toward. But now you need to fine tune things further. Use wireframes and mockups to make sure that the final product will solve problems effectively. Don't forget that testing early and often is critical to ensuring quality!
3. Implement Solution(s): Once you come up with a good solution, you want to move forward quickly and efficiently. To accomplish this feat, try implementing small chunks at a time. This strategy ensures that you won't waste precious resources trying to tackle an overly large project in one fell swoop. Remember to test your solution thoroughly beforehand (as mentioned earlier) to avoid making costly mistakes.
4. Evaluate Results: Just as important as proper planning is effective monitoring. Find out if your solution was successful right away. Compare actual performance against expected outcomes to spot patterns and anomalies. Adjust accordingly whenever necessary. When evaluating results, remember to ask lots of questions. Does the solution improve efficiency? Has it eliminated errors? Have costs been reduced? How satisfied are clients? And finally, did it meet expectations? If not, what went wrong? Take note of the answers so that you can adjust next time around.
5. Repeat Steps 4&5 Until Successful: By repeating this process until success, you'll eventually end up solving bigger challenges faster. Keep in mind that the goal here isn't necessarily to turn a profit. Instead, aim to eliminate wasted effort and enhance productivity.
6. Maintain Continually: Regular maintenance is essential to keeping businesses running smoothly. Perform periodic checks to ensure that everything continues going according to plan. Ask questions regarding possible bottlenecks, missing deadlines, and poor employee morale. Be proactive about maintaining high standards.
7. Celebrate Accomplishments!: No matter what kind of project you undertake, celebrating milestones is vital to motivating others and boosting morale. Create incentives, rewards, or recognition awards for outstanding achievements. Hold special parties or celebrations for big wins. Letting everyone know that you appreciate hard work helps foster teamwork and collaboration.
Lightning Path is part of the Enterprise Package available exclusively to Professional Edition and Partner accounts. Accessible from Setup > App Launcher, Lightning Path gives administrators the ability to automate repetitive tasks and streamline document management across SharePoint documents, PDF files, Word Documents, Excel sheets, PowerPoint presentations, and Visio diagrams. More importantly, organizations can leverage BPA functionality to drive efficiencies and increase revenue.
To learn more about leveraging Lightning Path, check out the below links:
https://help.live.com/kkc5225/00027679828.html#00133575
https://help.live.com/kkc5225/000078127214.html
https://help.live.com/kkc5225/000193418861.html
In my previous article, I talked about how important it is for a company's IT department to be able to create custom objects like accounts or contacts from scratch. This allows them to have more control over their data than they would if someone else created these records on behalf of the user. The same can be said for any other type of object that needs to be customized specifically for your organization. One way to customize an existing "standard" object is by adding additional fields (or removing some) so that it becomes exactly what your team wants. In order to accomplish this task, however, you need access to VisualForce tags which allow developers to add functionality to standard objects such as Account, Contact, etc.. One very useful feature provided by VisualForce is called Process Builder. It provides users with the ability to design workflows based upon specific criteria. These workflows then become part of a process template where they can be shared across multiple organizations.
For example, let’s say one of your clients has an opportunity pipeline management system that tracks leads coming into their sales force. They may want to send out monthly reports showing lead activity per region. However, their current reporting only shows account level information. To solve this problem, they could use Process builder to automatically generate reports based upon certain parameters. For instance, they might choose to exclude all inactive accounts when generating lead report results while including active accounts. So instead of manually creating two different reports, one for inactive accounts and another for active accounts, they would simply run one report and get both sets of results at once!
The following tutorial will show you how to set up processes within Business Objects via Apex code. You'll also see how easy it is to share those processes with others who are not coding themselves.
When setting up new processes, there are many things you should keep in mind. First off, you don't necessarily want to start with something complicated because you won't have enough time to properly debug it later. Therefore, try to make sure your process does several simple tasks first before moving onto bigger projects. Also, make sure each step of your process has a clearly defined beginning and end point. If possible, try to break down larger steps into smaller ones. Each action within your process must have its own unique identifier so that it can be easily tracked. Finally, always ensure that you test everything thoroughly before putting it into production mode.
Now that we've covered general guidelines, here are four sample processes you can follow to help you understand how to organize your own complex workflow scenarios.
While writing our own process builder, we're going to be building upon the default starter package found under Setup - Create - Workflow Activities menu option. Once the Activity Set page opens after clicking on that link, select New - Workflow Record Type button. A screen similar to the one below appears. At the top portion of the window, click on +Add Field button followed by Add Column. Here you can name the column whatever you'd prefer but make sure to give it some sort of logical naming convention since it will be used throughout your process definition.
Next, go ahead and drag-and-drop the field you just named into the blank columns area. Now go back to the main form of the wizard and click on Edit Fields button. From this window, you can change the field properties for ease of editing. Make sure to check Include validation rules box so that any values entered into the text boxes meet the conditions specified by the rule. By doing this, you avoid having to worry about accidentally entering invalid values. After you finish making changes to the field settings, return to the Activity Form page. Next, click on the Insert Data icon located next to the empty row and drop-down options listed above the grid of columns. Select Execute method and fill out the appropriate function. Then, enter the details of the logic behind the particular process being designed.
Let's look at a real world scenario. Say you had a client who was looking to automate their entire lead conversion process. Your job would be to come up with various ways to qualify potential leads. Based on the outcome of your analysis, you would assign either green, yellow or red status to indicate whether or not the prospect deserves further contact. When you were finished developing your initial draft, you would save it locally inside a folder labeled “Lead Conversion Template”. Whenever future lead conversions needed to occur, you would deploy the saved file directly through SFDC IDE. This allowed everyone involved to quickly jump right into their assigned duties without wasting valuable time waiting around for approval.
As previously mentioned, a lot of companies utilize business automation tools such as Microsoft SharePoint 365 to streamline operations. While most people know SharePoint as a collaboration platform, did you know that it actually includes numerous features that can improve overall efficiency? One great example is known as Power Automate. With this application, you can build highly advanced workflows that perform hundreds of actions simultaneously. Just think, if you had a bank that wanted to manage thousands of customer requests at once, you wouldn't have to waste precious time opening up emails individually for every single request -- your automated assistant would handle it all for you. Another interesting fact is that Power Automate integrates tightly with the rest of the Office 365 suite thus allowing you to leverage the power of cloud computing whenever necessary. Best of all, unlike traditional software applications, it doesn't require a high degree of technical expertise to operate.
Another popular program aimed towards helping businesses manage large volumes of incoming email messages is ActiveCampaign. As long as you have an outgoing message setup beforehand, you can easily begin directing prospects straight to the relevant person responsible for handling their inquiry. Of course, if you ever decide to upgrade to the paid version, you gain even greater flexibility in terms of customization options available. Lastly, if you aren't already familiar with HubSpot CRM, consider giving it a shot. Its primary purpose is to simplify marketing efforts by converting website visitors into paying customers. Basically, it helps businesses increase online visibility and brand awareness among prospective buyers. Aside from that, it offers robust analytics capabilities which makes it ideal for tracking campaigns' success rates.
Once you've developed a few basic ideas for your new processes, you may now feel overwhelmed by the sheer number of choices presented. Fortunately, Salesforce gives you the freedom to pick whichever direction feels best suited for your situation. Although you can certainly develop dozens of processes that cover almost every conceivable topic imaginable, sometimes less really is better. In these cases, stick with three to five core categories and focus exclusively on improving upon your weakest areas. Remember, the goal isn't to write the perfect document, rather it's to provide guidance for others working on similar problems.
Salesforce has become an integral part of the modern-day workplace, with many organizations relying on it for collaboration between employees as well as customer service. Although there's no denying that other enterprise software like Microsoft Office 365 can be complex and difficult to navigate, people who use both systems say they find themselves having more trouble navigating Salesforce than most. And if your company uses multiple apps or services from different vendors, keeping everything straight becomes even harder.
One reason why users have difficulty finding their way around Salesforce is because the app doesn't display all its features within one window. Instead, it displays them across various tabs and sections. This makes it much harder to get familiar with the app without taking some time to learn where each feature lives. Additionally, when someone clicks into another tab, it could throw off their current workflow.
For example, let’s say you want to create a new account record type called "Consultant" in Accounts but instead of clicking Account > Record Types > + New button, you end up going to Opportunity > Lead > Consultant. The only indication you see that something changed is when you close out of the screen and go back to Accounts. Not knowing what else to do next, you might accidentally delete the wrong record type. Or worse yet, you may not know about the existence of certain tools until you stumble upon them by accident.
However, while switching screens around can cause confusion, you shouldn’t feel overwhelmed at first glance—there is a clear map available to help guide you through the maze. It’s just hidden behind some menus. You'll need to open a few menus yourself to access it—and we're here to show you exactly which ones.
Let's break down where the major components of Salesforce live so you can better understand the layout of the user interface (UI). We've also included tips on how to customize these locations to fit your needs best. Here's how to find Business Processes, Case Management, Custom Objects, Community Cloud, Data Loader, Developer Console, Enterprise Grid View, Journey Builder, Marketing Automation, Reports & Insights, Service Cloud, Visual Force pages, Workflow Rules, and more.
The quickest place to start customizing your UI experience is under Home " My Layout. When you click on Edit Header, you will notice two areas of customization pop up side by side. On the left hand column, you can choose a background image for your header bar. Underneath the menu items, you can adjust font size and color, add buttons, move icons, and remove any icons already present.
Next, let's head over to the right portion of the page. In this area, you can rearrange menu items, resize them, and drag them wherever you wish. For instance, you can make sure that the Cases section is always above Contacts whenever possible. If you prefer to keep Contact Us below Customers, simply drag Customer Support beneath Orders. To save space, you can hide unnecessary items from view by selecting Hide icon in the top right corner.
If you'd rather focus on building your own customized layouts, check out our article outlining several ways to build custom workflows.
When you think of “business process,” chances are you picture something very specific — namely, a set of instructions that workers follow every day. However, unlike traditional office jobs, those workers don’t necessarily interact directly with customers. That means a lot of Salesforce’s core functions are actually geared toward internal operations. Still, if you want to integrate external data sources such as social media posts, email messages, text messages, etc., then you'll probably want to look elsewhere. Luckily, you can still rely on Salesforce's built-in functionality to streamline communication throughout your organization.
In addition to the standard navigation options mentioned earlier, there are three main places to begin looking for business processes: Dashboards, Reports & Queries, and Communities. Let’s explore them further.
Dashboard 1
Your dashboard serves as a hub for viewing all relevant information from anywhere inside the platform. To open yours, select Create from the upper right corner of your home screen. Once you do, you should see a row of boxes appear along the bottom. Clicking Show All expands it to reveal additional rows. From here, you can search for dashboards based on category or name. Simply scroll down to locate the option you desire.
Reports & Query 2
Similar to dashboards, reports allow you to pull together data from numerous sources on the platform. Unlike dashboards though, reports contain charts, graphs, maps, and tables that visualize data in real-time. They can either be created manually via Report Builder or automatically via Chatter Feeds or Lookup fields.
To launch report builder, select Create from the upper right corner of your home screen again. Then, hover over Reports & Queries in the dropdown menu and select Report Builder. Alternatively, you can launch report builder easily by typing in Report Builder into the Search field located at the top of the screen.
Once done creating your report, you can share it externally by sending it to others via email. Select File " Share " Email " Send Report and enter the recipient(s)' contact info.
Community 3
Communities serve similar purposes to personal groups found on platforms like Facebook or LinkedIn. As long as everyone involved shares common interests, communities provide a secure environment for sharing ideas and opinions freely. Just like Groups, communities aren't accessible to anyone outside of your organization unless given permission.
To create a community, select Start A Community from the upper right corner of your home screen. Next, fill out the necessary details including title, description, members, privacy settings, and visibility status. Finally, hit Save and give the group a meaningful name.
Although fixing broken business processes takes effort, there are plenty of resources to help you figure out whether problems exist. For starters, you can visit Help " Troubleshooting Guides. There, you will find a list of frequently asked questions categorized by application. Within each question, you'll often find short videos showing step-by-step solutions. Another great resource is the Knowledge Base. Type in keywords related to the problem you're facing and receive results containing detailed explanations, references, and links. Lastly, you can ask for assistance directly from your desktop browser by visiting https://help.salesforce.com/questions/.
Additionally, Salesforce offers free support plans consisting of phone calls, chats, and video conferences. For $1 per month, however, you gain access to 24x7 chat support, priority response times, and unlimited troubleshooting sessions.
Lastly, if you would like to collaborate with fellow developers, consider subscribing to SFDC Partner Exchange. With this program, partners can discuss potential integrations with third parties, request technical documentation, or submit bug fixes.
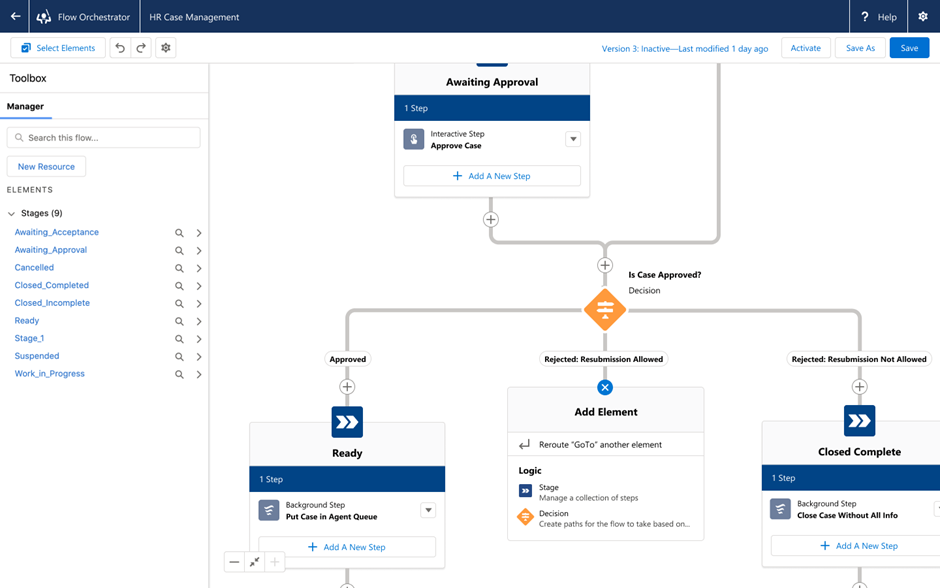
There are many methods for deploying a business process in Salesforce. One method involves copying existing objects onto blank records. By doing so, you essentially turn your original object into a template. However, depending on what type of object you're trying to do, this approach could prove inefficient since duplicating a large number of records can slow things down significantly. An alternative solution is to utilize flowcharts designed specifically to aid in designing business processes. These diagrams consist of nodes and arrows connected to form paths. After choosing a path, users simply input the appropriate parameters and watch as the process unfolds.
Alternatively, you can use the Deployment Toolbar to send flows to designated recipients. Before distributing the design, ensure that the intended person knows his login credentials. Once he does, he can complete flows directly from Salescloud.
 Send emails at scale

