 LIMITED SPOTS
All plans are 30% OFF for the first month! with the code WELCOME303
LIMITED SPOTS
All plans are 30% OFF for the first month! with the code WELCOME303

LIMITED SPOTS
All plans are 30% OFF for the first month! with the code WELCOME303

It’s that time again—you are sitting in class or standing in line at the cafeteria wondering why no one has sent an email to your Carleton email account yet.
If this sounds familiar it may be because we have the same dilemma when we want to send someone else our password for their Google login or Facebook log-in. We know how frustrating this can get so here are some easy tips on how to find your emails if they're not already stored under "Sent" but also keep them organized and accessible.
First things first let me explain what exactly CMail is. It stands for Carleton Online Mailing System and was launched back in 2007 as part of a larger project called “eConnect” which aims to provide students with better online services such as student information systems, academic calendars/calendars, course management system software as well as electronic mailing lists (emails). As its name suggests, CMail offers students free web based email service from Microsoft 365. Currently there are only two versions available, Classic & Pro. The classic version is offered to all undergraduate students while the pro version is reserved for graduate students. Both plans come complete with 100 GB cloud space, priority delivery options, spam filters and more!
When signing up for both plans you will need to choose whether you plan to use Outlook (classic) or Office 365 (pro), however once logged into either option you will notice similar layouts and designs. You can check out the difference between these two programs over at http://www.carleton.ca/econnect/plans/.
Now let’s jump right into how to actually view your emails using CMail. First off, open up any browser window and type https://cmail.carleton.ca/ into the URL bar. This should take you straight to CMail where you'll find links to signup, settings, billing info etc. If you don't receive a prompt asking you to accept terms then click on Accept Terms… Now select My Account. From here you can create new accounts or change your current profile picture. To manage your subscriptions simply go down to Subscription Management section and look through your list of active subscriptions. Once you've done this, scroll down until you reach the end where you will find a link labelled Inbox. Click on inbox and voila...your mailbox awaits!
To help us navigate around our inboxes easier, we created a handy guide below featuring common questions people often ask about finding their emails within CMail.
Cmail is a Canadian university owned web service designed specifically for students who attend Canada's largest post secondary institution - Carleton University. There are many reasons why students would want to subscribe to Cmail including receiving important messages during registration processes or when applying for financial aid. Additionally, subscribing allows users to stay connected and informed via timely notifications delivered directly to their inboxes. Lastly, Cmail provides fast access to personal data files like photos, documents, spreadsheets, presentations and even audio recordings.
While most universities offer free internet usage, different providers charge differently depending on the packages they offer. Most schools give away unlimited bandwidth for little cost however, after paying for your plan, you might discover that you exceed your allotted limit. Thankfully, Cmail gives you plenty of extra room to spare! They currently feature three tiers of pricing, starting at $4 per month, $8.50 per month and finally $24 per month. For those looking to save money, Cmail does allow customers to pay annually instead of monthly. However, if you decide you'd rather continue to pay every month and are willing to commit to a year, there is an annual payment rate of just $5.75 CAD per month. With a yearly price, you will enjoy benefits such as 2TB worth of file storage, 25GB of high speed upload storage, 10GB of low speed download storage, premium spam protection, automatic archiving of conversations, 1 TB of OneDrive storage, and much more.


One thing you may notice right away upon logging into Cmail is that everything looks very simple and minimalistic. While it appears simple, this design choice helps make navigating through your emails quick and efficient. Another cool feature of Cmail is that you can sort your emails according to various categories making it super convenient to locate specific letters. These categories include Messages, Sent Items, Drafts, Archives, Junk, Promotions, Updates and Notes. When searching for specific items, you can easily narrow down results by typing keywords within the subject field.
Once you find something you wish to read, clicking on the message automatically opens it up within a pop-out box. Within the pop-out box, you can adjust screen brightness, mute sound, close tabs, copy text or images, delete content and more. By default, whenever opening a message, the user will be taken to the next unread message. Alternatively, you can switch this setting to On if you prefer to skip ahead to the next item immediately. Also, you can enable auto-mark as Read, Unread or Starred so that each piece of correspondence lands neatly in the appropriate place. Finally, another neat feature is that you can set certain messages to repeat themselves daily, weekly, monthly or never.
A final note, please remember that Cmail uses cookies to improve your browsing experience and enhance functionality. Although this technology is used exclusively to gather statistical data, you must agree to third party tracking to gain full access to Cmail. Should you ever wish to disable cookies, be sure to visit your browser’s security settings before doing so. This way you can ensure privacy while still enjoying the convenience that comes along with having a modern web browser.
In order to track incoming emails, Cmail utilizes the Microsoft Exchange Server 2013 platform. Upon signing up for Cmail, you will automatically become subscribed to Microsoft 365. Therefore, if you were expecting to have your emails downloaded onto your computer, unfortunately this isn't possible as Cmail doesn't host your emails locally. Instead, Cmail stores your files directly within the Microsoft Azure Cloud. So, although you won't necessarily have your own hard drive anymore, Cmail will always be there to serve as backup and archive.
Another nifty feature of Cmail is that you can attach media files to your emails. Meaning, if you receive a mass email with multiple attachments, you can conveniently organize and store them separately without worrying about losing anything. Furthermore, since your files are stored in the cloud, you can share sensitive material securely with others. Lastly, if you're interested in keeping your contacts updated, you can notify them via SMS whenever a new message arrives.
You've probably heard about Carleton University's new student-focused service called Cmail. If you're confused about how to get started with it or what exactly the service does, we'll explain everything for you below!
We also have some tips on getting your inbox back if Cmail messes up your account in any way. And finally, we will tell you where to find all of these services' official online tutorials so that you can check out their functions yourself.
Cmail allows students at Carleton (and those studying elsewhere) to manage their emails from one location. You don't need to be an admin on every single computer your users log into -- instead, they only have one login per user. This means that the person who manages their accounts won't have to worry about whether someone else has logged into their account while they were away, as long as they make sure no other people are using them.
All of this comes together under the "Student" tab within your My Accounts menu. When you first sign up, you'll see a few different options available to you here. The most important option is obviously Cmail itself, which is located right underneath the rest. To set up a new mail client, click on Add Mail Client. Here, you will choose between Outlook 365, Gmail, Yahoo!, or Entourage.
Once you pick a client, you will then enter your password information and agree to terms & conditions. After clicking Next Step, you should receive instructions on setting up your mail client, depending on which platform you chose. Once you finish installing the app, you can begin logging into Cmail.
If you already have an existing email provider like Google Inbox, Hotmail, iCloud, etc., you may not want to go through the trouble of switching clients just yet. Instead, you could try signing in to Cmail normally until your providers switch over to the new system.
From now on, whenever anyone sends you an email via either method, you can reply directly from your inbox. It works similarly to Facebook Messenger conversations, but it doesn't show up anywhere else except on your mailbox.
It's worth noting that Cmail uses IMAP technology, meaning that messages sent via its servers are accessible wherever you are. This includes both desktop programs and smartphones. However, since it connects to your various providers' servers, you might experience slower speeds when sending large files. For example, uploading photos on Snapchat would take longer than usual because Snap Maps isn't compatible with Cmail.
To change settings related to file size limits, head to Settings & Preferences. From here, select File Upload Limits and adjust accordingly.
In addition to text messaging, Cmail lets users send each other voice notes and audio clips. These sound recordings aren't limited by length, but by storage space. They can last forever without running out of room.
When you create a voicemail message, all participants must verify themselves before recording. Otherwise, whoever calls will hear a robotic voice saying "This call cannot be completed as dialed."
Yes! There is actually a special number that you can call if you ever want to reach Carleton staff members. Not many people know about it, however. According to the website, calling 1-613-766-5200 will connect you immediately to its customer service team.
The best part is that calls made to this number are free. Unfortunately, there's currently no way to pay for the privilege of being able to contact Ccom, nor is there a way to add funds to your account once you've reached them. As such, we recommend making free outgoing international calls to Canada rather than paying extra fees.
However, if you live in North America and wish to call this number anyway, you can always try asking a friend to do it for you.
No! Although it looks similar to a regular email address, @carleton.ca isn't associated with the university whatsoever. We suspect that this was created by hackers trying to obtain personal data from unsuspecting victims. Don't fall victim to scams like this!
Instead, type carleton.ca into your browser to visit the actual site. Alternatively, you can type in cmail.carleton.ca to open the Cmail homepage. Both lead to the same results. A link titled "Find my Account" appears at the top of the page after entering either URL. Clicking on this link takes you to another fake page that instructs you to register for an account.
After doing so, you'll notice that the next time you visit the main page, you'll see a box labeled "@mail" appear above your profile picture. This is clearly a scam designed to trick people into divulging sensitive information. Should you continue past this point, you risk falling victim to further phishing attacks.
Don't give anything away unless you absolutely trust the source! Also, never enter private details into forms found online. Never share passwords or provide banking info to others.
Writeme is basically like having two email addresses: one for public correspondence and another for more covert communication. While it seems convenient to have multiple ways for people to contact you, it poses several security risks.
For instance, if you receive a suspicious package addressed to a wrong recipient, you could end up throwing away something valuable. Or if you forget to delete an embarrassing photo, it could wind up somewhere embarrassing. Plus, it makes things difficult for emergency responders. How would you even respond to an urgent situation if you didn't know where to look?
Therefore, you should avoid creating additional accounts. Doing so puts unnecessary stress onto your current email providers. Keep track of your correspondence using Cmail and save everything on cloud backups, so you won't lose anything accidentally.
Remember that nothing happens automatically due to technical issues. Even though Cmail offers 24/7 tech support, you still must notify them of problems manually. Luckily, you can easily escalate matters to human beings by reporting issues through their ticket portal. By doing so, you can ensure that your concerns are taken seriously.
And remember, if you think Cmail's services are causing you trouble, our guide detailing how to fix common Cmail errors will help you resolve any issue.
If you are a student at Carleton University, or have an @carleton.ca email address, your email will be forwarded to the campus-wide system known as Carleton Mail (Cmail).
This article describes how to use this system to send/receive emails from any web browser on any device. It also explains how to change your password if needed.
To learn more about using Cmail, visit its Help page here. You can find answers to common questions there too. If you still need help, please contact IT Support.
Note that the screenshots below were taken with Chrome Browser version 64-bit running Windows 10 Version 1803. They may look slightly different when viewed through other browsers.
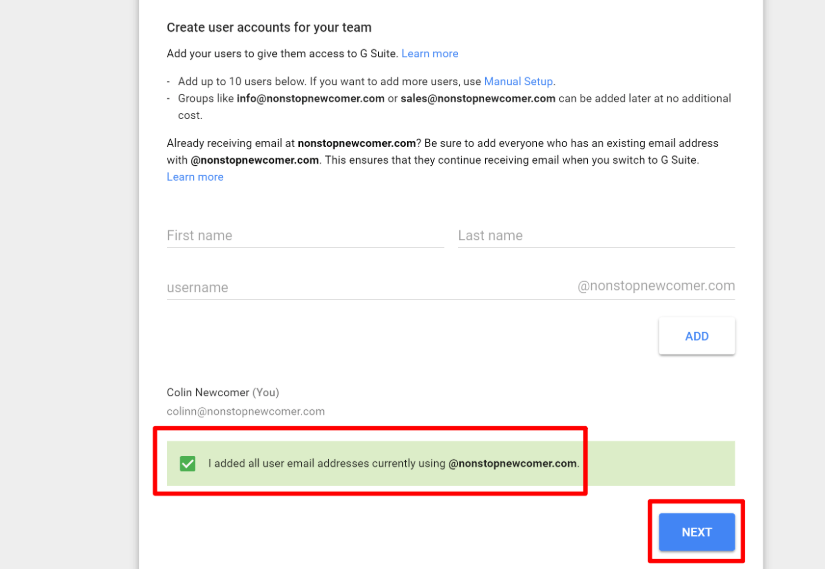
You'll receive an invitation via your primary inbox after registering for it. This invitation contains instructions for activating your new mail service. Click "Activate Now" to continue your activation process.
Your next step is to provide your personal information. Enter your name, preferred username, current mailing addresses and phone numbers, date of birth, gender, language preference, country code, passport number, driver’s license number, social insurance number, mother tongue, student ID card number and expiry dates. When these fields are completed, click Submit. Then select Activate Account. The final steps require entering your personal details again so make sure you don't skip them! Next, enter your login credentials (if you haven't already created one) and check mark whether you would like to sign up for automatic payment options. Finally, choose which services you'd like to subscribe to. Note that we only offer two services — Gmail & Calendar — but you're free to add additional accounts later.
After completing all these steps, you should see your Carleton Mail profile pop up under My Accounts. From here, you can edit your user preferences and privacy settings just as you would with your own regular email client. For example, you can customize what happens automatically every time you open an email message. Select Preferences then Auto-reply to pick between Yes and No. Or, go into Settings and enable Smart Reply Suggestions to respond to incoming messages faster than ever before.
In addition to editing various general settings such as spam control, auto-downloading images attached to emails, and downloading attachments without opening them first, you can also create filters within your mailbox. These allow you to organize your incoming emails based on who they come from or where they originated. To get started, select Filters. In there, you can filter out certain people, topics, files and folders. And while filters aren't necessary for sorting your mails, you can always sort them manually as well. That said, if you want to avoid missing important emails, feel free to turn on Mark Important Messages Always Automatically Filter Them. After doing so, whenever you get an email matching a preselected keyword, it will show up in your filtered folder.
Once you've activated your account, you can start setting up your personalised email experience. Go back to the homepage of your mailbox and scroll down until you reach Personalisation. Here, you can adjust some basic settings such as your signature (you can either type it yourself or upload a photo), and decide whether you'd like to keep track of read receipts. Also, you can switch between displaying file sizes in kilobytes or megabytes. Lastly, you can modify your default reply option.
When you're ready, hit Save Changes. At last, you can log into Cmail to complete the setup process. Once logged in, you can customise many aspects of the app to suit your needs. For instance, you can adjust the appearance of your mailbox by choosing themes. There are several available to download, each featuring beautiful backgrounds and colourful icons. Alternatively, you could opt to replace the standard interface entirely with something else. By selecting Customize Theme, you can replace the existing theme with another provided by the developer or even build your very own. While changing the background might not appeal to everyone, you certainly won't regret trying out themes in Cmail.
Additionally, you can tweak the way things work on the website itself. Under Appearance, you can easily remove ads, toggle full screen mode, change font size, etc. On Mobile Apps, you can disable push notifications, hide menu items, change icon colours and much more.
Finally, you can connect Cmail with third party apps including Google Drive, Slack, Asana and Zoom. So far, our team has built integrations with most popular tools used by students today. We hope to expand upon this list soon. But in case none of those suits your fancy, you can try connecting any application supported by IMAP protocol.
Under the Connected Services heading, you can view a map showing where your messages originate from. Moreover, if you wish to block specific IP ranges or users, simply head over to Blocked Addresses.
There, you can input blocked IP range(s) and their corresponding hostname(s). Hit OK once done, and you're good to go.
While logging into Cmail, you probably noticed the little gear button right above your avatar. Clicking it reveals a dropdown panel called Your Profile. Here, you can manage a few different areas including your security settings and online safety guidelines. First off, you should take a moment to review Safety Guidelines. It provides handy tips and advice for staying safe on the internet. After reading the document, proceed onto Security Settings. Here, you can alter your PIN, recovery codes, 2FA methods, location sharing permissions, contacts and more.
Lastly, go to Privacy Controls. Here, you can limit what data gets collected, delete sensitive information, and prevent cookies from being sent across websites. Additionally, you can toggle on Secure Browsing Mode and Block Third Party Trackers. Both functions aim to protect your identity by making browsing safer and less prone to malware infections.
Since you likely signed up specifically for Cmail because of your Carleton email address, chances are high that you received an invite to link your Cmail account to your main email provider. However, if you didn't notice anything related to linking your accounts, you can do so now. Simply follow the prompts.
First, navigate to gmail.com. Sign in to your account and head to the hamburger menu located in the top left corner. Scroll down until you spot More " Linked Accounts, followed by Manage linked accounts. Within there, you can merge multiple email IDs together to ensure everything works seamlessly.
Once merged, you can continue configuring your Cmail account exactly as you did before. For instance, you can disable image previews, adjust spam controls and change your notification frequency.
The developers behind Cmail are working hard to improve the platform. Recently, the company introduced a bunch of exciting new updates such as integration with Facebook Messenger, improved AI capabilities, better accessibility options, and more. All these changes aim to enhance your overall experience when communicating with others both inside and outside of class.
For example, if you happen to miss a lecture, you no longer have to worry about forgetting vital school material. Thanks to the latest update, Cmail allows you to sync notes directly from your browser. With this feature enabled, you can store relevant study materials offline and revisit them whenever you need to. Likewise, you can save photos or documents uploaded from external sources straight to your cloud drive.
On the subject of syncing, remember that Carleton recently launched a tool allowing you to view all your classes' lectures simultaneously. Called Lecture Sync, it makes learning easier by combining videos, quizzes and assignments into one single feed. Furthermore, you can share your screens with classmates during lessons. What's more, Lecture Sync supports Apple Pencil, VoiceOver and Braille functionality.
Recently, Carleton announced plans to introduce a brand new Learning Management System early 2021. Designed primarily for remote teaching, LMS will streamline content delivery and reduce administrative workloads. Since it integrates directly with the university's learning portal, you'll be able to move around courses freely.
 Send emails at scale

