 NEW: BrowserGrow.com is now available!
AI agents to grow your business & do your marketing on autopilot in your browser
NEW: BrowserGrow.com is now available!
AI agents to grow your business & do your marketing on autopilot in your browser

NEW: BrowserGrow.com is now available!
AI agents to grow your business & do your marketing on autopilot in your browser

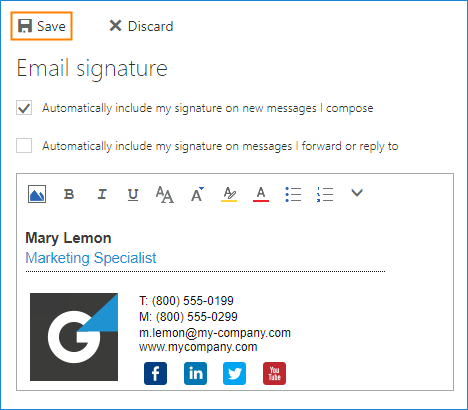
Email signatures are an important part of modern online life.
They're the first thing you see when someone opens an email from you and they provide vital details about who's sending it along with any relevant links to what you want them to check out. They also give people a little taste of your personality by including something personal like a joke or saying. If you use Microsoft Office programs on Windows, Mac, Android, iPhone, iPad, and even Linux, here's how you can easily customize your own email signature.
While there may be some differences between different versions of Word, Excel, and PowerPoint — which we'll get into later — for this article, we're going to focus primarily on changing signatures within the most popular version of Microsoft Office: Office 2016 (or simply "Office"), which includes both desktop software as well as its web apps. We used testing files provided by Microsoft to create our emails below, so keep that in mind if you run into issues using these instructions.
If you send messages via Microsoft Outlook Web App, there aren't many ways to make changes to your email signature beyond adding one at the bottom of each message. But don't fret! You can still have fun customizing your signature while keeping things simple without having to learn HTML coding. Here's how you can set up and style your email signature in Outlook 2019.
To change your signature in Outlook 365 webmail, click Mail followed by Options. This will open a new window where you should select Signatures & Blurbs. Now, under Signature dropdown menu, choose Edit Signature. A pop-up box displaying all available fields will appear on your screen. Scroll down until you find Email Address field and double-click it. In the pop-up box, enter your desired name. Then, hit Save.
Now, go back to the previous step but instead of selecting Signature dropdown menu, scroll down until you see Name Field and double-click it. Enter your preferred email address again, then hit Save. Repeat those steps for every other field listed under Name Field and save whatever changes you've made. Once done, hit Done and close the settings tab.
You now know how to change your signature in Outlook 365 webmail. For more detailed instructions, take a look at this guide detailing how to change your email signature in Gmail.
It's pretty easy to set up and remove signatures in most free email services. First off, head over to the Settings icon located right next to your profile picture in Yahoo Mail. From there, click Emails, and under Personalization, locate and expand the Manage Your Customizations area. Select either Remove/Add Signature or Change Signature.
Yahoo Mail allows users to remove existing signatures or replace them with their own customized ones. To delete your current signature, just double-click it and hit Delete Signature. Alternatively, you can add a totally fresh signature by clicking Add New Signature. The process is similar across all major mail clients.
On Google Chrome, click More tools " Settings " Privacy and security " Content Settings " Cookies and site permissions. Click Block third-party cookies and untrusted sign-ins to prevent sites from tracking you through personalized ads. Hit Allow local storage to enable saving user preferences locally. Finally, turn on Always show my inbox button. That way, whenever you visit Gmail, you won't need to manually type in your username and password because it will already be saved thanks to browser autofill features.
For Apple Mail, open Preferences pane and navigate to Accounts section. Under Account options, click Set Up Autosignature. Next, tick Automatically insert standard signature. Lastly, ensure that the box beside Show me signing certificate has been checked. This will allow you to view a digital copy of your signature, rather than relying solely on a prewritten template.


Outlook 365 doesn't offer much customization abilities to account profiles. However, it does allow users to adjust certain elements such as whether to display photo attachments or not. Also, you can only access two accounts at once unless you upgrade to Premium plans.
But if you'd prefer to tweak the layout of your email signature, you may want to consider upgrading to the premium plan. With it, you can create multiple signatures that work independently based on specific conditions. It will also let you control signature appearance, font size, colors, image uploads, etc., for individual contacts. And best of all, you can swap between accounts seamlessly.
Here's how you can switch between default and alternative signatures in Outlook 365:
Click Home " All My Files " Contacts. Double-click the contact whose signature you wish to modify. On the resulting page, click Signature Options. Choose Default Signature or Alternative Signature (depending on which one you prefer) and enter your preferred name and email address before hitting OK.
Afterward, return to the home screen. Go to Home " Contact Info " Signature Options and repeat the same procedure to switch back to original setup.
In addition to being able to manage multiple accounts, you can also enjoy full control over your signature format. If you upgraded to the latest release of Office 365, here's how you can update your signature:
Head over to Start " Settings " Mail " Signature.
Double-click the signature you want to change.
Select Create Signature...
Under Additional Information, locate and highlight Font Size.
Next, browse around until you spot Image Attachment Format. Below it, you can input the file path of images you would want to attach to outgoing emails.
Finally, scroll down until you reach Text Header. There, you can write anything you want under Headers. After entering your chosen text, press OK.
Once finished, go back to the previous screen and follow the same procedures outlined above to revert everything back to defaults.
Signing documents digitally isn't always ideal. Sometimes, it might be better to physically print documents and share physical copies. Luckily, Microsoft makes printing and sharing documents easier than ever. Plus, since you can store scans anywhere, you never have to worry about misplacing physical documents.
Your iPhone is a great device, but its default Mail app doesn't have many features for formatting signatures and adding them to outgoing messages. Fortunately, you can customize that app and add more functionality with third-party apps like MySignature (free) or SmartMail ($2). We'll show you how to use those tools to set up cool new signatures.
Before we get started, here are some important tips about changing your signature on your iPhone. First, if you don’t already have one, create a free Gmail account to save as "My Signatures" in iOS Settings " Accounts & Passwords " Email. Then try out each of these steps below.
Next time you're composing emails from your iPhone, tap the More icon at the bottom right corner of the screen. Choose Create New Message then select Attachment Viewer followed by the document you want to attach. When the attachment opens, choose Edit Details next to Photos. This will allow you to edit the photo before sending it off via Messages. Now go ahead and type something into the text box so you know what your message looks like when sent. Hit Done once everything looks good.
In this example, I'm using Dropbox to host my photos instead of iCloud because Apple has removed support for external image hosting services recently. You may need to download files directly onto your iPhone before editing. In other words, make sure that whatever file(s) you plan to upload work properly on your iPhone! If they won't open, you could also convert images to PDF format first.
Now head back over to the Compose window where you just added the attachment. From there, hit the More icon again and scroll down until you see Signature. Tap this option. Next, tap Add Signature which should be near the top of the list of options. Your existing signature will appear underneath this field -- tap it to bring up the keyboard. Type in your preferred name, e.g., John Smith. Enter any relevant information such as address and date under the Additional Fields section including city, state, zip code, etc. Finally, tap Save Changes after entering all desired details.
Once you've finished creating a brand-new signature, you might want to keep it handy everywhere else, not just within the Mail app. To do this, take note of the unique ID shown beneath Saved Signature Name. It appears as a series of numbers starting with 001. Copy this number and paste it somewhere safe so you always remember it. Once you start signing off messages with your own customized signature, copy it from the Signature menu and send it along whenever needed.
If you'd rather begin setting up another signature without having to worry about remembering the aforementioned string of digits, you can simply install one of our favorite mobile signature solutions, MySignature [No Longer Available]. The app allows you to quickly grab prewritten texts, sign them yourself, and even add pictures or videos. Plus, it works seamlessly across multiple platforms. Here's a quick walkthrough to give you an idea of what MySignature offers.
After installing the app, launch it and log into your Google Account. Select either Personal Profile or Business Profile depending on whether you're trying to use it for personal or business purposes. Either way, you'll still access most of the core features. For instance, you can view recent signatures stored in your profile or search through the database of available templates.
To find a template, tap +Add Signature, enter keywords related to the kind of content you typically include in your emails, and pick a style. After selecting a design, you can modify anything inside the popup window while leaving the rest intact. Don't forget to check out the preview pane above the editor area.
When you're satisfied with your creation, tap the blue arrow located at the upper left corner of the page to return to the main interface. At last, decide whether you want to store the signature locally or share it online. Unfortunately, MySignature only saves signatures created on your local machine. So, if you ever need to update your current signature, you'll have to repeat the process outlined earlier.
For anyone who uses both Android and iOS devices, SmartMail ($2) provides similar benefits to MySignature. However, unlike MySignature, the app lets you sync signatures between different mobile OSes. And when you upgrade to premium membership, you gain access to additional themes, fonts, colors, icons, and backgrounds.
Both apps offer plenty of customization choices. But, since their interfaces aren't exactly intuitive, let us help you navigate around.
First, click on the three horizontal lines situated at the upper right corner of your browser window. A dropdown panel will pop up containing several categories. Go to Manage Profiles and look for Mobile Device. Clicking on this button will pull up a long dropdown menu with two tabs at the very end: Templates and Styles. Scroll down the Templates tab until you reach the part labeled Default. On the styles tab, locate the header titled All Styles.
Scroll down past the styles and continue further until you come across a category called Text Elements. Inside this group, you'll notice a few useful items such as Address Block, Logo Image, Phone Number, and Social Media Links. Simply drag and drop whichever item suits your needs best. Repeat this step for every element you wish to alter. Note that you can delete certain elements altogether by hitting Delete Template/Style Button at the lower right corner of the screen.
Outlook makes it easy to switch up your email signature. Just follow the same instructions as described above for iOS users except replace MySignature with Smartmail and Mail with Microsoft Office 365. Keep in mind that Microsoft Exchange accounts require a paid subscription to utilize Outlook's signature feature.
Smartmail has been consistently updated since 2011 and now supports Windows 10 natively. Similar to the case with iOS, you must first login to your Google Account to import saved signatures. Otherwise, you may encounter errors upon launching the program. Once logged in, you can proceed further with editing profiles and importing signatures.
The following video demonstrates how easy it is to adjust your outlook signature.
This is quite simple to do too. Open the Mail App. Find the compose window and tap the More icon at the bottom right corner of the screen. Scroll down until you spot Signature. Tap this option. A small pop-up window will display asking you to input your current signature. Paste the copied signature here. Once done, tap OK.
Another convenient method involves downloading a dedicated app specifically designed to handle signatures. Do this by going to iTunes Store and searching for smartsignature. Download and install it on your iPhone. Launch the app and log in to your Facebook account. There, you can browse through hundreds of readymade designs until finding something suitable. Alternatively, you can manually write your own signature.
A helpful feature for this purpose is allowing the app to auto-detect addresses. Whenever you receive an email addressed to someone whose info you didn't provide, tap the pencil icon at the bottom right corner and select AutoDetect. Now, the app will automatically detect the recipient's name based on his or her location. Also, feel free to tweak various properties such as background color, font size, margin width and height, and much more.
As mentioned previously, you can change your signature in MS Word 365 by logging into your Microsoft account. Once connected, open the mail client and compose an email. Head over to Ribbon " Options " Customize Ribbon and enable Show Signature Box. Under Main Tabs, select Other Tools and choose Signature from the dropdown menu. Type in your usual signature and confirm.
Note: Some people claim that inserting a space after typing the @ symbol prevents spam bots from misinterpreting the email address. Nonetheless, I recommend doing away with spaces entirely unless necessary otherwise.
We hope you enjoy reading Belfies' articles. Feel free to leave feedback, questions, comments, suggestions, and recommendations. While we read every piece submitted, unfortunately, due to the large volume of correspondence received, we cannot respond personally to everyone.
Have stories of your own to tell? Submit your story anonymously. Visit www.belfiessignatures.com to learn more.
An email signature is usually at least one line of text that appears at the bottom or top of each and every message you send from a particular device, like your smartphone or computer. It’s essentially your contact information for people who receive emails sent to you by that device (or devices).
Many people use their company-issued phone as their primary mobile device, so they need to make sure they have everything set up correctly before sending out important messages. That includes setting up their email signatures properly — without this step, your signature won't show up when someone sends you an email. Here are some tips for changing your email signature on your iPhone if you're not using a Mac.
If you want to customize your email signature with a new image or logo instead of just plain text, there are two ways to go about doing it. You can either open up Microsoft Word and create a nice looking document, which will then be embedded into your outgoing mail messages via iMessage. Or you could download a template from OneNote called EmailSignature. This handy little note takes all the hard work off your shoulders and creates customized signatures right within Apple Mail.
To get started, head over to OneNote and click Create New Note, then select Templates under the More heading. When the screen loads, scroll down until you see "Email Signature." Select it and hit Open. Next, choose Edit Template Content... and type whatever content you'd like inside the box provided. Hit Save & Close. Now whenever you compose an email, you'll automatically see your chosen signature at the end. If you wish, you can also copy/paste the code directly into an existing email.
Now let's move onto creating a similar signature in Word. First, launch the program on macOS Catalina 10.15.2. Then find the Insert tab and look underneath Text Boxes. Find the Object dropdown menu and pick Rich Text Document (.rtf) and press OK. A blank window should appear with the title "Insert Fields" above it. Press Enter again, and now you'll see something resembling what we created earlier. To embed your newly made file into an email, follow these steps:
Go to System Preferences " Internet Accounts. Under Other, select Mail. Choose Signatures and Contacts. Click Add.... In the popup window, select Customize Signature and proceed through the process.
Once complete, check your email to verify that your signature shows up exactly how you want it. While both methods produce comparable results, only time will tell whether Word or OneNote ends up being better suited for your needs.
Changing your email address isn't difficult, but making changes to your default signature requires more finesse than simply going into Settings > Mail and adding another email address. Instead, first log into iCloud.com and visit the page where you normally enter your current email address and password. Change that info here, too, then return back to Mail. Once there, tap Compose, followed by the gear icon. Scroll down until you spot the Signature section and double-tap it. From there, tap Default Signature. Tap Done once more. Your new email address will replace the old one.
Alternatively, you can try opening Settings > Messages and tapping the blue arrow next to the name of your current carrier. There, you should find an option labeled With whom am I signed in?, located towards the very bottom of the list. Change the label to My Current Carrier Name and swipe left. From there, tap Manage Profiles. At the upper right corner of the resulting screen, tap +New Profile and fill out the fields accordingly. Finally, tap Send Message. The profile you've added should appear beneath the field labeled Reply to All.
It may take several minutes to fully propagate across your various messaging platforms, but don't worry. By the time everyone else starts seeing your updated signature, you'll already know.
The easiest way to edit your iPhone email signature is by following these simple instructions:
Open the Mail app. Head to the Compose button, which looks like a small paperclip sticking out of a piece of paper.
Tap the three vertical dots in the lower left corner of the compose window.
Select Mailbox Options.
Scroll down to Signature and enlarge it slightly.
Type in any desired text, then tap Return.
Repeat those same steps for whichever other accounts you might wish to include. Afterward, you can save your finished signature by clicking File " Export " Mobile XLS Format.
This method works best if you plan to share your signature between different devices since the Mail app itself doesn't allow users to export signatures. For example, say you own multiple iPhones. Maybe you keep one near your bedside table while others sit atop nightstands throughout your home. Either way, you can always switch out your default signatures depending on which device you happen to be using.
However, if you prefer, you can manually copy your iOS email signature into an Excel spreadsheet. Simply open Excel and navigate to Sheet1. Copy the contents of the Signature cell and paste them into a new sheet titled “Mail_signature.xls". Remember to delete the original data in the Signature field. Don't forget to update the rest of the cells in the new sheet, including your personal details such as name, job position, etc.
As long as you're logged into your iCloud account, the signature will sync across all your Apple products. So even though you changed your email address on your iPhone, you shouldn't lose access to it if you ever decide to sell your device(s). Just remember to sign out of your Apple ID before parting ways with your gadgets!
For most major carriers like Verizon Wireless, AT&T, T-Mobile, Sprint, U.S. Cellular, Cricket, Metro PCS, Simple Choice, Virgin Mobile USA, Boost Mobile, Page Plus, Republic Wireless, and many more, you can change your signature online by visiting your carrier's website. Simply login with your user credentials, locate the relevant link, and input your new signature. Depending on your service provider, you may be able to adjust your signature options after signing up for a specific plan. As previously stated, however, sometimes minor differences exist based on certain providers' policies. Be mindful of that fact if you intend to stick with your current network.
In order to maintain consistency among your various devices, it's best to perform this action beforehand. Otherwise, you run the risk of missing out on future updates due to unforeseen circumstances. But hey, no big deal—we live in the age of technology. We recommend bookmarking the necessary links ahead of time.
Do you have any questions regarding modifying your iPhone email signature? Feel free to ask us anything related to our article topic below. Also feel free to post any feedback or thoughts you have pertaining to this guide.
Email signatures have become an important way to make yourself look professional. They're the first thing anyone sees when they open your message and are usually used as a quick introduction for people who don't know you very well (like friends). You may want to use different signatures depending on whom you're writing to, so it's helpful if those signatures stay consistent across all of your accounts.
If there's anything you'd rather not include in your signature — such as links to your social media profiles — you can easily remove them from your profile by clicking "Edit" next to each item. However, this doesn't work with certain items, including phone numbers and addresses. If you still need to adjust something, here's how to update your email signature in Microsoft Office 365 apps, plus tips on making any necessary changes where possible.
Your default email client will likely be set up to send out emails using its own built-in templates. This means that changing your email signature within these programs requires editing several fields at once instead of just one. To begin, head over to whichever program you use most often for composing messages.
Outlook
In Outlook 2007 and newer versions, click Mail Format & Options under File menu. Scroll down until you see Signature Settings, then select Edit Email Signatures. Click New... to create a new signature template, which should appear at the top of the window. When finished, choose Finish Editing My Email Signature.
Go through each field on the page and decide what you would prefer to enter into each box. For example, if you've changed your address, you'll probably want to input your current street number and name along with your post office box and home address. As far as greetings go, you could fill everything in except the last two lines, which say Thank You/Regards and Your Name respectively. Keep adding additional signatures as needed, but remember that your computer will only save the latest version of the template.
Gmail
To access settings related to your email signature in Gmail, log into your Google Account and navigate to the following link: https://myaccount.google.com/signature/. Once inside, scroll down to find the section labeled Personal Document Settings. There you will see options for Greetings, Additional Addresses and Links, and More Information. The latter lets you put details about yourself, family members, and even other businesses you run directly underneath your email signature.
Click Change next to each entry to modify their appearance. You can also check off boxes beside various entries to disable them. In general though, it's best to leave things alone unless you absolutely need to make some adjustments.
Microsoft Hotmail
Logging into Windows Live Hotmail gives users easy access to setting an email signature in the service. First, visit the main login screen and sign into your account. At the bottom right corner of the screen, you'll notice an option titled Customize Message Field 1. Selecting it reveals more customization choices than usual.
For instance, you can add a photo to your signature, alongside your full name and title. Then simply type whatever text you wish to display beneath the picture. Finally, hit Save Changes before navigating away.
All three services allow you to download customizable templates saved onto your device. These come in handy if you plan to share the same email signature with multiple clients. However, bear in mind that many companies block images from being displayed in emails, so be sure to take care of that beforehand.
You can't really customize your email signature while creating a new one via the aforementioned method because it overwrites the previous template. Instead, you must manually replace your existing signature whenever you need to tweak something. Here we show how to accomplish both tasks in Outlook.
Open up your inbox and locate the file named [your_email].emsl. Now, switch back to your desktop app and select View " Modify Conversation " Properties " Advanced properties. Hit Manage signatures, followed by Open Default Signature. It'll bring up a popover window containing your old signature. Find the line beginning with "[Signature]" and delete everything after that.
Now, copy the rest of your old signature into the newly blank area. After copying it, highlight every occurrence of your name, job position, company name, etc., and press Ctrl + F to search for them. Replace each instance with the appropriate data, leaving enough space between sentences for readability.
Save the modified document, then return to the original email. Highlight the portion of the signature that contains your personal information, i.e. your name, phone number, postal code, website, etc. Hold Shift on your keyboard and select Cut Text Symbol " Selection. Right below the highlighted parts of your signature, paste in the copied content of your choice.
Repeat this process for any other sections that require modifications. Remember that all formatting needs to remain intact, including bolded phrases, italics, font colors, lists, hyperlinks, etc. Also, avoid pasting too much info into a single spot because it might break the formatting.
Once you finish modifying your signature, close the.emsx file and rename it with the date. Next time you receive a mail, Word won't overwrite your old signature again.
The quickest way to adjust your signature in Gmail is to follow these steps:
Select Tools " Preferences " Start Typing " Done. Head over to the Signature section and start typing your preferred greeting. Feel free to add things like your name, title, location, hobbies, etc. You can also opt to hide specific words from appearing in your signature. Just keep in mind that doing either of these actions will cause your signature to no longer auto-populate future mails.
Head back to the preferences pane and select Show Signature Box. From there, drag and drop your custom greeting into the designated slot. Don't forget that you can adjust fonts, sizes, colors, spacing, and more. Lastly, if you aren't happy with what you typed, try replacing it with another phrase.
When done, click OK and restart your browser. Any changes made during this session will apply immediately.
There are times when you may encounter issues trying to update your email signature. One common problem is that some people think that the ability to change your signature depends solely on whether or not you're signed into Microsoft Office 365. While that isn't necessarily true, it does play a part.
Here's why you can't change your signature in Outlook 2016 and later:
First, let us explain what happens when someone sends you a mail without opening it. Their electronic signature is embedded into the body of the message itself. Therefore, regardless of whether or not you opened the attachment, the sender was able to attach files filled with graphics, music, videos, photos, etc. What's worse, however, is that those unwanted attachments sometimes contain malware.
With regards to Outlook specifically, changing your email signature actually deletes the entire signature box from the recipient's view. Since the feature has been disabled, whoever sent you the message thinks nothing of sending you a whole lot of garbage. And because of this, you simply can't add new information to your signature anymore.
Luckily, removing the signature is pretty simple. Simply right-click on your mouse button and select Remove. On Mac computers, hold Command+Option+Delete. Doing so removes the signature from your message header, meaning recipients won't see it. But since Outlook keeps track of the text entered into your signature, it now shows up as Unknown in the list of texts.
This issue occurs due to security measures implemented by Microsoft to prevent spamming. So unfortunately, you can't bypass this rule by disabling features.
However, there is a workaround. By switching your outlook language to English (United States), you can enable the signature editor function in Outlook. Here's how to do it:
1) Go to Control Panel " Clock & Region " Administrative Features.
2) Switch Language to United Kingdom.
3) Enable AutoComplete Languages.
4) Restart your PC.
5) Log back into your Outlook account.
6) Try signing into your mailbox again. You'll soon realize that you can customize your signature and turn it on!
Your email signature may be more than just a fancy way to say "hi." It's also an opportunity for you to make sure recipients know who sent them what.
Whether it says "John Smith" as sender name and/or address or "Best regards," the message should always be clear. But how does one go about editing their signature in Microsoft Office applications such as Word, Excel, PowerPoint, and Outlook? Is there any difference between different versions of Microsoft Office? Let's take a look at some of these questions below.
Outlook users have two ways they can insert signatures into emails—the first method uses HTML code while the second utilizes VBA macros. To access either method, open up the Insert tab on top of the Ribbon menu bar (second icon from left). Then select Signature field. Once this pop-up window appears, click on Browse... button under Signatures section. This will bring up another window where all available options are listed. You'll see “Microsoft Office 2016 HTML Code'', followed by other options for older versions. Selecting Microsoft Office 2013 HTML Code opens up yet another popup box with several templates. If none of those work for you, then browse through the list until you find something suitable. After selecting the template, hit Ok button again. Now, within seconds you'll have a new signature ready for use!
Signature using VBA macro has many benefits over using HTML codes. For example, if you want to alter your signature on multiple computers, you could simply copy paste the same VBA script onto every computer. On the other hand, VBAs need not rely on internet connection when running. The most significant advantage however would be its ability to run independently without relying on external apps. In order to set up a VBA macro, follow these steps:
Select Tools - References - COM Add-ins - Microsoft Script Host Object Library.
Now, right click anywhere blank space on your desktop and choose New –> Module. Name it whatever you'd prefer.
Copy and Paste the following line inside the module editor: Dim oApp As New Application Set oApp = CreateObject("WScript.Shell")Dim WshNetwork As ObjectSet wshNetwork=CreateObject("wscript.networker")With wshNetwork.Connections("MyConnectionName")Do While.ReadyState "" 4And Not.IsBusyEnd DoWhile.readystate "" 6And Not.busydone End WithOn Error Resume Next 'Close network object if error occurs.If Err.Number "" 0Then WScript.Quit end ifend IfNot err.number "" 0then WScript.quit end if
Hit F5 key to execute the file. Your VBA Macro will now generate a new signature whenever you send an email via outlook 2010, 2012, or 2013.
Note: When trying to modify existing signatures, please note that changes made using VBA might require additional configuration depending upon the type of signatures used. Also, if you're using Windows 10, Microsoft Office 2019, or later, you won't even get the chance to try out VBA signatures because it doesn't support them anymore.
Editing signatures requires special permissions which only administrators possess. However, since you've been granted administrator privileges already, chances are high that you don't actually need extra ones. If you still wish to proceed, here's what you can do. Go ahead and launch the Control Panel applet named User Accounts. Expand Other Users category and double check whether you indeed have administrative rights. If yes, skip to next step. Otherwise, head back to Outlook.com login page and log in once again. Click on Account Settings located underneath your profile picture. Here, scroll down till you spot Manage accounts. Under Personalization section, look for Change settings dropdown menu and click Edit. From here onwards, you should be able to view and manage all types of signatures.
Please keep in mind that adding signatures manually takes time. Therefore, we highly recommend signing up for automatic signatures instead. Automatic signatures allow you to write one email and let it serve as both your personal and business signatures simultaneously. Some businesses even integrate automated signatures directly into their messaging platforms so that they appear embedded rather than separate documents. How cool is that?!
To sign up, visit Start My Free Trial page and enter your details. Upon logging in, you'll notice a small green circle beside your email ID. Right clicking on it brings up a context menu. Choose Auto Responders... option. A new window pops up showing various auto responders according to your current status. Look for Mail Options heading and click on Send Later. Another small window will appear asking you to confirm your subscription. Hit OK after confirming your decision. Now, whenever you receive messages, you'll see a custom signature included alongside with each email. Please ensure that the default signature isn't selected otherwise your account will stop functioning altogether.
Once again, things aren't too bad. Unlike previous years, Microsoft Office 20 no longer comes bundled with signatures. Instead, it relies heavily on third party services such as Google Docs. If you have upgraded from previous version before March 2021, you probably noticed that only Gmail provided integration was removed. Henceforth, anyone wishing to utilize autofill feature needs to upgrade to latest version of Outlook. Unfortunately, there doesn't seem to be much hope for people stuck on earlier versions of Microsoft Office.
Even though you cannot create signatures natively, you can easily import pre-made signatures straight from websites including Gravatar, LinkedIn, etc., into Outlook. Simply open up your compose window and look for the Attachment button towards bottom right corner. Now, drag and drop images from attach files pane onto composition area. At times, you may encounter errors saying image dimensions exceed maximum limit but rest assured that you can upload pictures larger than 50 MB. Just remember to save your document before sending it off.
It seems like changing signatures isn't exactly easy process. Whether you opt to use HTML based signatures or VBA Macros, you may face certain issues along the way. One common problem arises during setting up VBA scripts. In case of missing references, the script fails to function properly. Although this issue usually gets fixed after restarting office application, sometimes it persists across different machines. There's also a possibility of corrupt registry entries causing similar problems. Lastly, it's worth noting that signatures created using VBA often show up as disabled unless specific instructions are taken beforehand.
In conclusion, upgrading to newest version of Microsoft Office should solve most of your troubles concerning signatures. Alternatively, you can start exploring online solutions such as Zoho mail signatures. If nothing works out, feel free to reach out to us for further assistance.
Email signatures have become increasingly important over time, and are now more than ever used for branding purposes and as a way of adding information about yourself or your company. But if you're like me, your default Apple Mail email address is probably just "Mail" without any other details added in (I use iCloud). This isn't ideal when you want to make sure people know who they're dealing with -- especially if you work from home where everyone uses this same email account!
Thankfully changing your email signature on an iPhone is easy enough that anyone should be able to follow these steps. Here we'll show you how to customize your iPhone email signature so that you can create different ones depending on which accounts you need them for.
To start off, open up the Settings app on your iPhone then scroll down until you see Email & Accounts. Tap Add Account followed by Other. You will get another pop-up asking what type of account you'd like to set up. Select Create New Smartphone Label/Account Name and tap Next.
Then select iCloud from the list of options. On the next screen, enter your full name under Display Name, click Edit, and choose Firstname Lastname. Enter your telephone number into Mobile Phone Number, enter your email address into Registered Address, and finally set a password using the Password field before hitting Save.
Now back at the main screen, hit Continue once again. Then select Set Up Your Primary EMAIL ID and check the box above it labelled Skip Passcode Lock Screen. Now return to the previous page and hit Sign In instead of Save.
Enter your newly created credentials into the fields provided and tap Verify. Once verified, you should receive a new verification code via SMS message. Head back to the first screen of screens and hit Continue one last time. You should arrive at the final setup screen where you can finish setting up your email account. At this point, you may also wish to enable two factor authentication (2FA) if available.
Once done, head to Mail inside iOS 9 onwards and you should find your brand new customized email address has been automatically applied. If not, go ahead and edit the Mail section within the general settings menu. Scroll all the way down to Customize Message Content and change the Default Reply To option to [Your new email] From "[Your old email]"
If you don't already have it installed, download Vertexto, our favorite text expansion tool for iPhones. It allows you to quickly insert dynamic variables such as @username, #hashtag, %message%, etc., wherever you want. With this feature enabled, simply replace the placeholder text with something relevant to your circumstances, like [My username], and you've got a quick and effective customizable email signature ready to rock.
Download: VextTO ($0.99) | iTunes App Store
For those of us who aren't Apple employees, there's no official method for adding logos to your iPhone email signature -- but luckily third party developers have stepped up and made apps that achieve exactly this. These include Logos Pro ($1.49), MySignature Free, iLogoS 2, and Greetings Maker Pro. We recommend testing out each of these individually to figure out which works best for you.
Some require additional purchases after purchase while others offer free trials -- either way, most come highly recommended. For example, Logos Pro offers both a premium version ($3.99) and one called Logo+ ($4.99) which adds even more features including multiple signatures and support for emoji. As well as being available through the App Store, some of these apps are also accessible through Google Play too.
Whichever program you end up choosing, here's how to apply the logo to your iPhone email signature:
Open up whichever software you chose and sign in with your usual Apple ID. Most of these programs allow you to build a library of pre-made email signatures that you can switch between whenever needed. Navigate to the appropriate tab and search for whatever kind of template you want to try out. The image below shows a sample of what you might expect to find.
Tap on the email header icon (the arrow pointing upwards) located towards the top right corner of the text entry area. A small pop-up window containing the word Header appears. Choose Text Entry from the dropdown menu beneath. When prompted, enter the contents of your desired signature. Don't forget to remove unnecessary characters like brackets and commas along the way.
Next, navigate to the bottom left of the text input bar and tap the blue button marked Show More Fields. Find the Logo Image field and drag it onto the canvas. Use the paintbrush icon at the bottom right of the toolbar to adjust its size and position. Hit Done when finished. Repeat this process with every single element contained in the design. Make sure you keep everything tidy and uncluttered.
Return to the Home Page and tap on View All + Close. Go back to the design editor and tap Export Template. Give the resulting.sig file a descriptive name and save it somewhere safe. That's pretty much it!
The easiest way to update your iPhone email signature is to open up the Messages app and send a test mail to yourself. After tapping Details at the bottom of the compose window, type in your own email address. Look for the link labeled Send Test Emails which should appear underneath your address. Clicking on this link sends you a temporary email with instructions telling you how to proceed.
When you receive the email, tap Update Profile. Follow the instructions onscreen and you'll soon have updated your iPhone email signature. Unfortunately, this only really applies if you haven't changed anything else aside from your email address itself. So if you did decide to stick with your Apple ID, you'll still have to manually change things around elsewhere.
However, if you decided against using your primary Apple ID, you can take advantage of the aforementioned tools mentioned earlier to help generate better email signatures. Simply copy the HTML code generated by Vertexto, paste it into one of the templates offered by your chosen app, and modify accordingly. Some apps let you view a preview of your changes before saving. Others won't. Either way, be sure to save it immediately afterwards otherwise it could disappear at any moment.
Outlook 2016 users can also change their email signature by opening up the File Menu and selecting Options " Mail Setup. Under Personalization, ensure that your signature format is selected alongside Plain Text. Finally, hit OK to confirm whether you would like to Apply Changes Immediately or Schedule Them for Later.
There's currently no built-in functionality that lets you update your Outlook email signature directly, though Microsoft does provide a handy guide detailing how to add your personal details to your outgoing messages. Check it out here.
In terms of customization solutions, however, a few useful extensions exist for this platform. One option worth trying out is Signaturelyr.com, a free extension for Chrome, Firefox, Opera, Safari, and Edge designed specifically to help simplify the task of generating new personalized email signatures.
After installing the extension, simply visit any website offering a form requiring a signature. Hover over the respective button and look for the Signaturelyr badge in the lower right hand corner. There's no reason why you shouldn't give it a shot.
Meanwhile, Mailtrack is another excellent solution that lets you track your inboxes across various platforms, including Gmail, Yahoo, AOL, Hotmail, GMX, Live, Zoho, and MxLdna. What makes it stand apart is the ability to integrate it seamlessly with your existing email client. By doing so, you'll never need to worry about losing access to your email because of a lost phone again.
Head to the Get Started page and sign in with your usual login details. Next, pick a plan based upon your needs. Paid subscriptions cost $14 per month, while plans starting at $19 cover unlimited devices. Lastly, hit Start Monitoring.
Launch the app on your mobile device and log in using the credentials associated with your subscription. Alternatively, you can scan the QR code displayed on the Dashboard page. Upon launch, you should see an overview of all incoming messages. Each will display a short excerpt of the email body and a thumbnail of the attached photo beside it. Tapping on each individual notification reveals further details.
Lastly, if you prefer working outside of the browser, you can install MailTrack on Android or Windows 10 as well.
 Send emails at scale

