 LIMITED SPOTS
All plans are 30% OFF for the first month! with the code WELCOME303
LIMITED SPOTS
All plans are 30% OFF for the first month! with the code WELCOME303

LIMITED SPOTS
All plans are 30% OFF for the first month! with the code WELCOME303

Your smartphone is probably full of pictures, text, emails, and everything else that makes up our digital lives — but there's one thing it doesn't have any room for: signatures. That's because most people are still stuck using paper mail without the ability to add their own custom signatures (or even initials) at the bottom of each letter they send out.
But if you're not interested in adding your name or a title to every single message you write, you can easily disable this feature and use Gmail as it was intended instead. Here’s how to turn off the auto-signature function in Gmail so your friends and family won’t see it popping up in their inboxes anymore.
If you ever wanted to erase your default "From" line from incoming mails, removing your signature is just about the easiest way to go about doing that. We'll show you exactly how to make sure your next missive will never appear with your name attached again.
To start, open your browser on your computer and head over to gmail.com. Sign into your account if you haven't already done so. Once logged in, look towards the top right corner where you should find the familiar Compose window. Click on the cog icon located in front of “Settings." You’ll now be able to access many different options within your Gmail settings menu. Scroll down until you reach the Mail section and click on “Signatures & Blur.” This will bring up a dropdown menu filled with several options. Select none, which means no signatures will be automatically added to your future emails. If you choose otherwise, select your preferred option from the list below.
Once selected, hit save changes and your signature will disappear from your emails forever!
Note: Many users report not being able to locate the same button under Settings for some reason, so here’s another method to try. Just visit gmail.com/manageSignatureBlur and log in to your Google Account. From there, follow these steps: 1.) Click on Manage Signature Blurring 2.) Uncheck the box beside Enable Automatic Email Signature 3.) Hit Save Changes 4.) Your signature will vanish from all future emails!
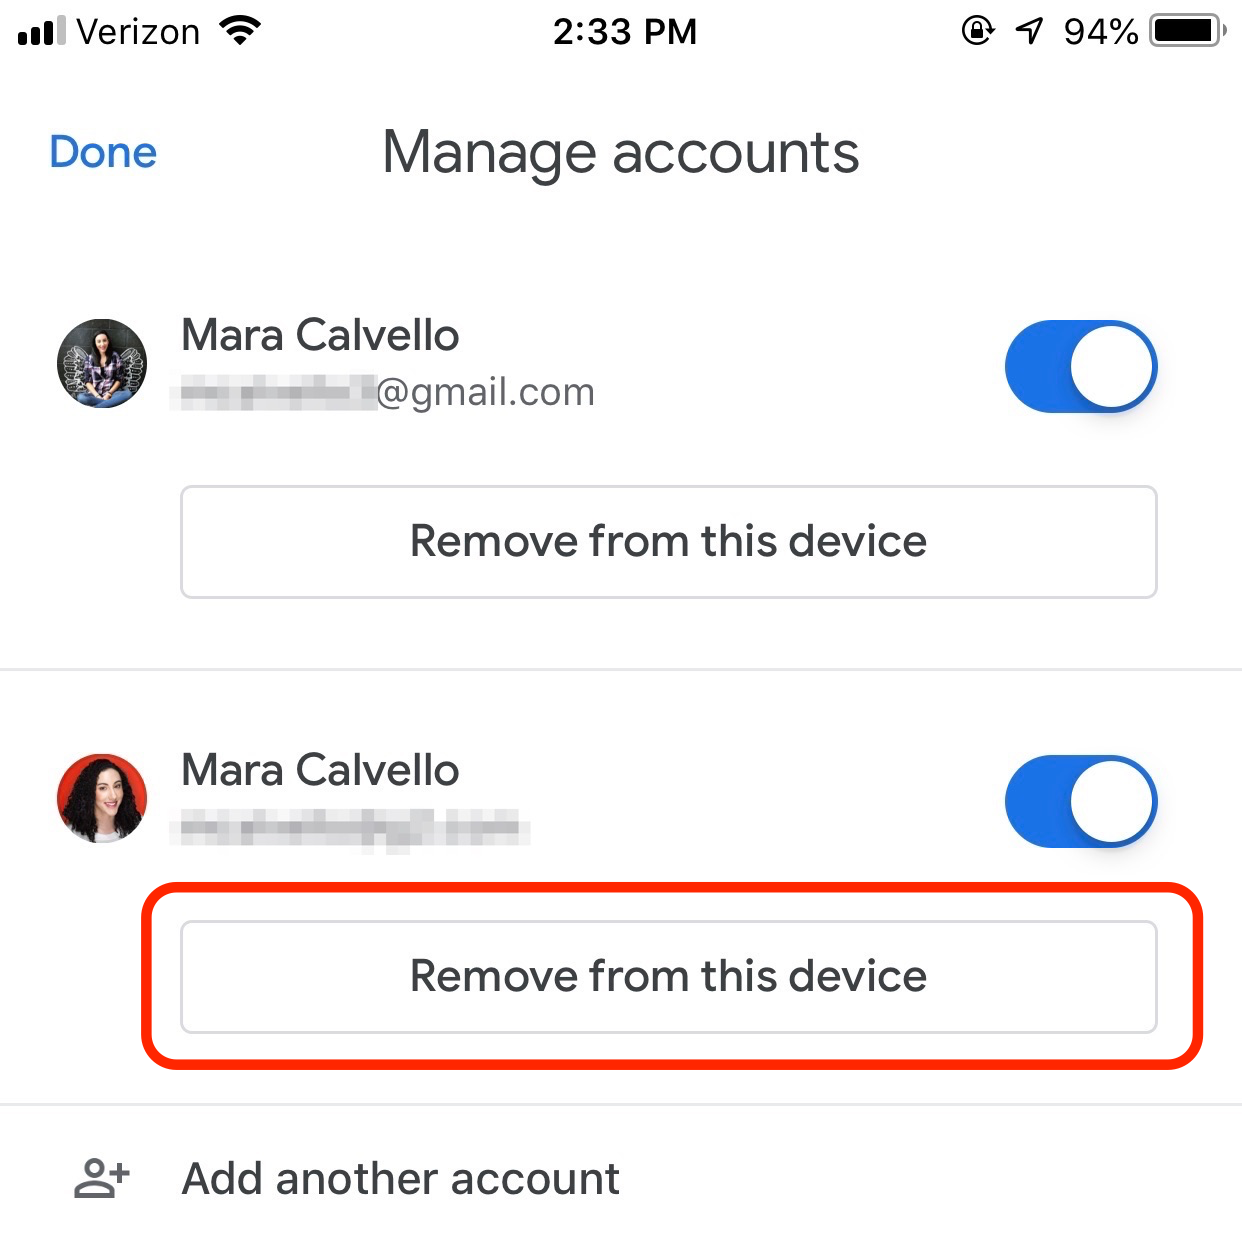
After completing either method above, you may run into an issue where your profile picture isn’t removed along with your signature. To fix this problem, simply hover over your avatar, then click X > Remove Profile Picture. Repeat this process if necessary before saving the settings change. For more information on why this happens, check out this article by Gmail support staff member Johnathan.
If you’re looking to edit your signature directly from your device, we’ve got good news for you. Removing your signature from the Gmail app shouldn’t cause any problems, though you might experience minor hiccups here and there. As long as you have internet connection available, however, you should be fine. All you need to do is fire up the mobile version of Gmail and perform the exact same instructions listed above for iOS users.
For those who prefer to stick with the official Gmail app, the procedure is slightly different than what we described earlier. First, tap on the three horizontal dots located in the upper left part of your screen. Then, scroll down until you find the hamburger icon in the lower left corner. Tap on it, followed by More Tools " Settings. Now, navigate back to the main page and tap on Accounts. Afterward, scroll down until you come across Compose settings. Tap on them, then switch to Compose tab. At last, uncheck the box alongside Allow me to sign previewed e-mails. In case this does not work properly, restarting your device could help. And remember, once you've saved your changes, your signature will be gone from other emails too.


The only real difference between sending emails from your desktop versus your mobile devices is that you cannot modify your signature on your Apple products—it remains unchanged throughout the entire transaction. However, since iPhones and iPads tend to receive much less spam compared to desktops, you should find it easy to adjust your signature accordingly.
Here's how to delete your signature in Gmail: Open your iPhone’s Safari web browser, type gmail.com in its address bar, and enter your login details. When prompted, authorize the website to access your data via iCloud. Next, tap on the gear icon situated at the very end of the search field. Go to General " Advanced " Auto-Delete Message Content. Finally, deselect the toggle next to Include a Signature.
That said, if you want to hide your signature completely, you can also create a filter in Gmail specifically for that purpose. The following video shows exactly how to do it:
Disabling your signature from Gmail used to be quite complicated, especially if you were running older versions of iOS. Thankfully, things aren't as difficult nowadays unless you happen to be using old hardware. Simply download the latest update for Gmail [No Longer Available] onto your iPhone or iPad. Launch the app after installation, then pull down the notification drawer at the bottom of your screen. Tap on the Gear Icon situated at the extreme right side of your screen. Choose Edit Filter... inside the popup menu that appears. On the next screen, tap New Filter.... A pop-up window will appear asking you whether you would like to set up a new rule for existing messages or create a brand new alert. Choose Create New Rule. Under Filters, tap Add Existing Label. Type in something like "[My Name]" or "[My Full Address]." Make sure to include spaces in order for Gmail to correctly detect your words. Lastly, tap Done.
Now, whenever you compose a new email, Gmail will ask you whether you want to enable the personalized signature. Say yes, then continue composing your message like normal. Once finished, tap on Send. Your recipients' inboxes will display a note informing them that you disabled your signature. They can take it upon themselves to reply to let you know that they didn't appreciate having their names constantly appearing on their screens.
Of course, disabling your signature on Gmail is far better than deleting it altogether. Unfortunately, Apple has yet to roll out the ability to customize the signature setting in its native apps.
Gmail signatures are a pain, especially if you're running an older device with limited screen space or who doesn't use their smartphone for work every day. Thankfully, there's no need to type up that long-winded message again—just disable it!
We'll show you how to adjust your own Gmail signature settings so you can stop seeing those pesky auto-generated ones appear at the end of each outgoing mail. You can also get rid of them after sending emails by deleting the text yourself. Here’s what you should know about switching out your default Gmail signature on Android.
If disabling your Gmail signature is too extreme for you, try these tips instead to customize your signature appearance without losing any functionality.
You have two ways to update your current Gmail signature using Google's Inbox mobile apps (Android and iOS): either manually enter one into the "Signature" field under Settings & General or tap the three vertical dots next to the signature box and select Edit Signature... This allows you to modify existing texts as well as add new ones. If editing options aren't sufficient enough for you, tap More actions at the bottom of this window and choose Change Signature to start typing up your own custom message.
To make sure the changes take effect immediately, open Settings & Accounts then scroll down until you see Email Signatures. Tap the name of your account, followed by Manage signatures. Select whichever option suits you best, whether you prefer to keep your original signature unchanged, swap it out entirely, or create another profile altogether.
Under Edit Signature, you can delete the entire thing or replace it with something else. To save time, simply highlight the text you'd like to retain and press Delete Text. Doing this will only affect future signs but won't impact anything already sent. On the other hand, tapping Replace means selecting a completely different phrase and entering its details.
When done, hit Done at the top right corner or tap Save Changes.
Your updated signature will now automatically display whenever you send a new email. Just remember not to enable this setting within Gmail itself. Otherwise, it will override whatever you've set here. Also, note that while changing your email signature via Gmail works fine on most devices, some users may experience issues related to certain browser extensions such as Adblock Plus. In case this happens, check to ensure you haven't accidentally enabled ad blocking filters elsewhere.
Disabling Gmail signature on Android involves going through similar steps to above, except we need to access our accounts' settings directly rather than opening individual profiles before we can switch it off. Follow these instructions below:
Open the Gmail app and head over to Menu " Settings " Account Preferences. Then go back to your main inbox tab where the compose section appears.
Tap Mail composition header and input your preferred email address. Once finished, click Next. Now, look for the dropdown menu labeled Show signoff message and uncheck the corresponding toggle button. Your modified signature will no longer appear at the end of newly created mails.
This method applies to both personal and professional accounts alike since they share the same preferences panel. However, just because you've disabled Gmail signature on your computer doesn't mean it disappears instantly from your phone. It might still remain active even though it isn't listed anywhere under the Gmail app's menus.
Fortunately, there's a quick way around this problem. Open the Settings page once more and find Profile Options underneath the list of tabs along the left sidebar. Scroll down until you see Mobile Applications and tick Disable signature. Confirm by hitting Apply at the top right of this window.
Now, your modified signature has been erased from your phone, unless you reenabled it later.
For removal to really stick, you must first log out of your Gmail account. Go ahead and close the Gmail app, then launch the System UI Tuner tool from your phone's settings menu. Head over to Advanced and swipe away the respective entry labelled Gmail. When complete, reboot your handset to apply these changes.
Alternatively, you can uninstall the Gmail app from your phone's App Drawer to accomplish the same task. Keep in mind that doing so leaves behind no trace whatsoever of your previous modifications and removes everything associated with your Gmail account. Thus, it's recommended you perform this step only if you plan to never use Gmail ever again.
After rebooting, open Gmail once more. Clicking the Gear icon located beside Compose heading reveals several useful customization tools. Look beneath the New Messages section and tap Remove signature to erase your old signature permanently. Alternatively, you could move this function to Customize keyboard shortcuts. Or perhaps you'd prefer replacing it with something easier to read. Either way, follow the prompts to proceed.
Once you finish, return to the main interface and confirm the action by clicking Yes.
The process differs slightly depending on which version of Gmail you're currently using. For example, on the web client, simply visit gmail.com/preferences and scroll down to the very last paragraph titled The End. Beneath the aforementioned sentence lies a link labeled Turn Off Auto Signature. Hit it, then verify the changes by checking the appropriate radio buttons. Remember to refresh the page afterward, otherwise you'll lose sight of the alterations.
Unfortunately, unlike Android, turning off Gmail signature on iPhone requires accessing the Settings panel. From there, locate the Accounts tab near the middle of this window. Find the desired item called Send Mail With Name and Address Preceded By and untick the relevant toggle button. Afterwards, you can opt to disable Gmail signature temporarily or permanently.
Keep in mind, however, that doing things this way affects your ability to receive replies to incoming messages. Without a signature attached, recipients cannot tell whom the correspondence originated from. Should you wish to maintain this capability, you should consider keeping your signature visible.
Yes, actually. There's a trick that lets you hide your signature without having to deactivate it completely. Simply edit the text and font size and arrange it to match the rest of the body paragraphs. Afterward, drag the signature to wherever you'd like, preferably towards the center, then release it. Finally, resize it to fit neatly alongside the others.
If you'd like to revert to the standard view, you can always bring it back by dragging the signature downwards. Note that this technique does come with limitations. First, the maximum width for letters is 50 characters, plus 20 pixels per line. Second, the total height shouldn't exceed 200 pixels. Anything beyond that causes the image to stretch horizontally. Lastly, you must avoid wrapping words together. As soon as the lines reach the edge, the resulting text will become cut off.
In essence, this approach offers better flexibility than choosing between displaying or hiding your signature. But be warned that it might cause compatibility problems with various browsers and plugins.
That being said, it's worth mentioning that you can achieve a similar outcome by tweaking your browser's user agent string. A user agent is essentially software used to present information based upon specific parameters. Some websites detect it and tailor themselves accordingly, while others ignore it altogether. Because of this, making the necessary adjustments ensures that they treat your request intelligently.
As far as Gmail goes, you can utilize this function to pretend you use a desktop browser by adding Chrome://flags/#forcechrome parameter to the URL. Afterwards, restart your system and navigate to gmail.com/prefs/. Underneath the Send Mail section, you should notice that the text labeled My Header shows a blank placeholder. Feel free to fill it with your customized content.
Remember that enabling this flag forces Gmail to render pages according to standards intended for desktops. Unfortunately, this includes images that contain gradients. So, if you intend to include one, please wait until you finish composing your email.
If you decide to turn it off, you can do so by following the exact same procedure. Only this time, append chrome://flags/#forcechrome=falseú to the end of the URL, i.e., http://gmail.com/prefs/. Furthermore, you mustn't forget to remove the aforementioned parameter afterwards.
Those who use third-party clients such as Outlook or Thunderbird often run into trouble trying to download files larger than 2 MB. Since many providers impose restrictions on file sizes, they fail to recognize large attachment links. Luckily, Gmail provides a solution to this issue.
Simply find the Attachments tab atop the left sidebar and scroll down to the bottom of the page. Beneath the labels column, you ought to spot a green arrow pointing to the right. Upon arriving at it, you'll discover a small gear icon. Use this to tweak your settings further. Check Allow Large Attachments, then specify Max File Size (MB). Enter 1024 in the latter field and confirm by hitting OK.
With this combination, attachments exceeding 10 MB can be downloaded normally. And if you ever encounter issues downloading smaller files, you can increase the limit to 2048 MB.
If you're one of those people who prefers not to sign emails, it's possible that you might have accidentally enabled a setting that automatically adds your signature at the bottom of every message sent through Gmail.
It's easy enough to disable this function if you know how — but what if you forget or just don't bother looking for the option yourself? We'll show you how to manage your online signatures with ease so you can get rid of them altogether.
First things first: If you've never changed your signature before, the easiest way is probably by opening up Gmail on your desktop browser. Head over to inbox.google.com (or whatever web address you use) and log into your account using your Google credentials. Then click "Settings" in the upper right corner followed by "Signature". You should now see two options available under the "Edit Signature" heading: One lets you add a custom signature while another allows you to edit an existing signature. Click whichever one works best for you.
Once you choose either method, follow these instructions to set up your own signature or delete any pre-existing ones you may already have saved. Once everything has been configured, hit save changes next to the "signing status" field and then "Save." That will take care of adding a signature to future messages as well as removing the default text that appears below each response. However, there are some cases where you may still want to keep your signature intact, which we cover later.
This process varies depending on whether you use stock Android or a third party launcher like Nova Launcher Prime. With most launchers, you need to access Settings & Accounts & Mail accounts. This screen actually contains several different sections that apply specifically to various types of messaging apps like Hangouts, SMS, etc., but the section labeled Email includes a toggle switch for disabling auto-inserted signatures. It looks something like this:
For non-launcher users, here's how to find the same functionality via the mobile app itself:
Open the Messages menu in Android 6 Marshmallow or higher. Tap More settings " Manage preferences " Auto-add signature and select Off.
In iOS 11, head back to the main Settings tab and scroll down until you spot the entry titled "Mail, Contacts, Calendar." Select it to pull up the corresponding page, which shows a checkmark beside the box marked Automatic Message Signatures. To disable it, tap the toggle button underneath.
The exact wording differs slightly between versions of Android and iOS, but they both perform essentially the same task. In other words, once you flip this option off, no more automatic signatures will appear unless you manually send out a self-written note. Note that this doesn't affect anything else besides the signature portion of incoming mail. For example, if someone sends you an image attachment, you won't suddenly start seeing extra images pop up alongside your responses.
On top of that, since Google uses its own servers to deliver emails to recipients' devices, you won't see any additional signatures appearing inside of Gmail even after turning off the aforementioned option. As long as your device isn't running old software, you shouldn't ever encounter a problem with sending out messages without including a signature.
You can also adjust your signature within Gmail for Android. Just go ahead and open up the app, and make sure you're logged into your account. Next, look for the three horizontal dots located on the left side of the compose window. Hit Menu and then Edit Signature. From here, you can write a brand new personal message that goes along with your name and photo instead of simply having Gmail append your standard signature onto the end. Keep in mind that you can only include text in your signature and not links or attachments.
As mentioned earlier, however, you can leave this part alone if you'd rather maintain compatibility with older operating systems. The above steps work fine on phones running Lollipop and newer, but they aren't necessary if you're running an ancient version of Android. Users on KitKat 4.4 and lower can skip straight past this step because their system already lacks the ability to modify the signature. Instead, you must rely on the manual approach described previously.
No matter what kind of smartphone you use, you can easily customize your Gmail signature by going back to your computer and logging into your account again. Open up the same "Signature" panel as mentioned above, and you'll notice that nothing was added yet. This time around, you can type out whatever you wish, put in multiple lines, and experiment with fonts. When you're done, go ahead and hit Save Changes beneath the relevant fields. Your modified signature will stay active indefinitely as long as you're connected to Wi-Fi and haven't deleted it.
However, if you ever decide to revert back to the original signature, tap "Reset Signature," pick the radio button that says "Delete Existing Signature," and enter your preferred details. Make sure you remember what you wrote because you cannot reverse course once you've activated this option. Also, bear in mind that you can only update the signature associated with your primary Gmail profile. If you have multiple profiles tied to your account, you'll need to repeat this entire procedure separately for each one of them.
Lastly, you can always create a completely separate signature within your email client if you prefer. This is helpful if you tend to receive lots of messages on your mobile device but rarely respond to them. On top of being able to control font style and size, you can also input your desired contact information at the very footer. Since signatures typically fall outside of our view anyway, you wouldn't really miss this much except for aesthetic purposes.
To achieve the same results as described above, visit the "Manage Preferences" screen in Safari on macOS 10.14 Mojave or newer. Go to the "Safari" category and scroll down until you reach the "Email" header. Here, you'll find the option labelled Enable automatic signatures. Toggle it off and voila! No more unwanted signatures anywhere.
Keep in mind that Apple limits the amount of space you can dedicate to a signature to 100 characters, so you'll need to compress your thoughts accordingly.
 Send emails at scale

