 NEW: BrowserGrow.com is now available!
AI agents to grow your business & do your marketing on autopilot in your browser
NEW: BrowserGrow.com is now available!
AI agents to grow your business & do your marketing on autopilot in your browser

NEW: BrowserGrow.com is now available!
AI agents to grow your business & do your marketing on autopilot in your browser

You may have received an email that reads "Contact has been removed" or "Hasn't accepted our messages". These phrases can be confusing for anyone — even IT staff — to interpret. And sometimes people don’t know how to handle the situation until they actually receive another message stating that their account is no longer active.
This article will help you understand what these text boxes are saying and how to solve them if this happens to you.
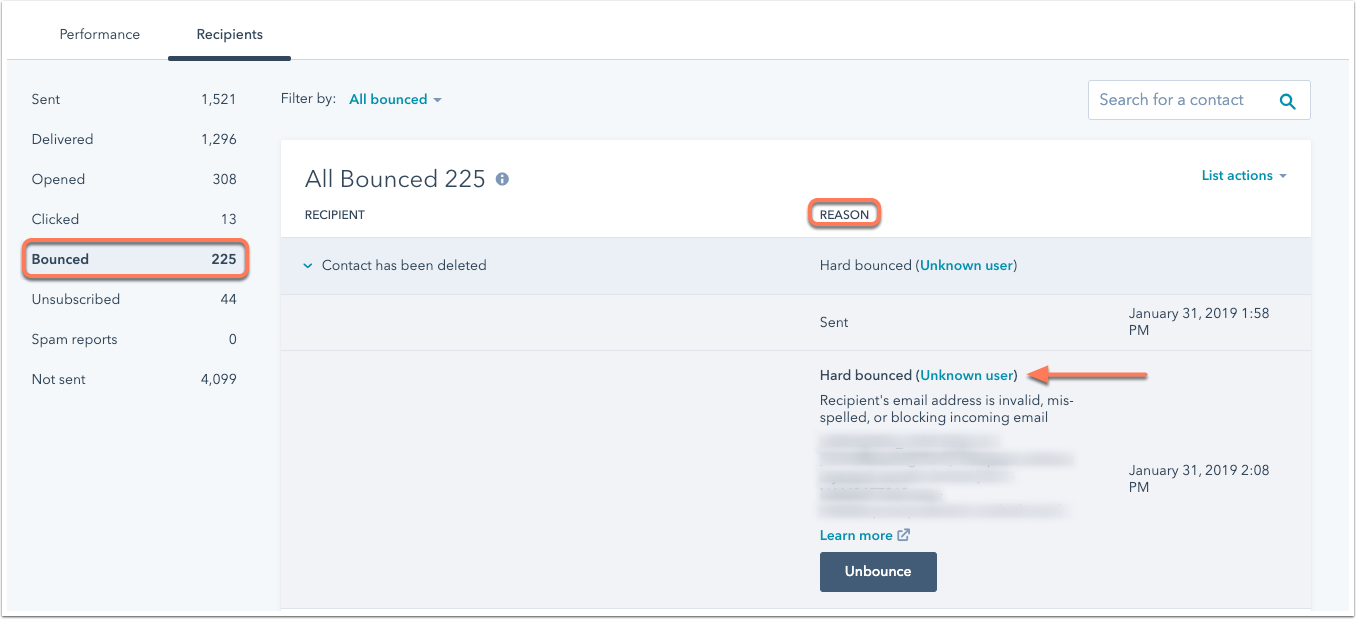
If someone sends you an email but then deletes or doesn't open it, HubSpot considers it as a global bounce. This means that there was something wrong with your message such that the recipient didn't like it and deleted it without reading it. There could also be other reasons why the person might not read the email. For example, he/she may not have had enough time to check his inbox before going offline.
In any case, if you're sending out promotional emails, make sure they get delivered properly because once a customer's account gets deactivated, he won't need to log back into your website anymore. If you send him spammy newsletters, you'll probably lose business eventually. So avoid doing so.
Once you find out about a bounced contact via HubSpot, it's best to follow up immediately by reaching out via phone call or text message. The reason being is that the sender cannot tell whether the recipient got the message or not unless s/he reaches out again himself/herself.
Also, if you've already tried calling the number multiple times and haven't heard anything after 30 minutes, consider asking HubSpot customer support directly (more details below). You can always ask us to escalate your issue if necessary.
HubSpot offers two options for dealing with hard bounces. One option is to block all inactive accounts permanently. However, we recommend against using this method since it affects legitimate customers too. Instead, try one of the following solutions.
1. Remove Inactive Contacts From Your List
The first thing to do is to go through your lists and delete those which show as inactive. To do this, head over to Settings & Lists. Click Edit next to each of your lists. Then click Delete next to every single row where the status equals to Active. After deleting them, run a report based on Status and select only the ones marked as Bounced.
2. Create A Hard Bounce Report
Another way to deal with hard bounces is to set up custom reports. Go to Reports & Opportunities " Customize Reports. Once inside, choose Sales > Opportunities > Recipients With HardBounce Emailing History. Fill in some data regarding the date range and filter down to just the rows showing Has Not Accepted Messages. Finally, select Sort By and change the sorting column to Date Received.
After running this report, you should now have a table displaying all recipients whose emails were rejected due to having never opened or clicked on them. It would seem that they simply forgot to accept the invitation.
3. Reach Out Via Phone Call Or Text Message
Now that you have identified these problematic users, you can reach out to them instead of leaving them wondering what happened. Try contacting them via SMS or phone calls, explaining the error code and providing them with instructions on how to reset their password or reactivate their account.
4. Change Their Account Type To Manually Approve Emails
Since you've found yourself in this predicament, chances are that certain subscribers' profiles aren't getting updated automatically, meaning they still appear under the Unsubscribe category despite receiving many emails from your company.
One solution is to switch off auto-approval for new subscriptions, making them manually approve future emails instead. Head over to Subscribers " All Subscribers. Next, look at the bottom right corner of the page and scroll down till you see Auto Approved New Users. Toggle it Off. Now, whenever you add new leads to your database, they must confirm themselves by clicking on the link provided within the confirmation email.
5. Contact Support
Lastly, if none of the above methods work, contact HubSpot support team with your issues. We have dedicated specialists available 24 hours a day, 7 days week to assist you with troubleshooting problems related to your HubSpot subscription. Our experts can provide insight into your problem and offer guidance on how to proceed further. Simply head over to Help Center " Chat " Get Started today!

As mentioned earlier, when a contact receives an email telling him/her that they weren't able to access your content, this usually indicates that either their login credentials changed or expired.
When that happens, the subscriber won't be able to view your emails anymore. But if you think the user did forget to activate their profile, you can easily undo the process by logging onto their account.
Here's how to do it. First, type https://apprvr.hubspotcom/login in your browser address bar and hit Enter. On the resulting screen, enter your username and password. Logging in will redirect you to the dashboard. If everything works fine, you'll see a notification indicating Successfully logged in!. Otherwise, if there's an issue, you'll see Error while trying to log in!.
A soft bounce occurs when the user hasn't checked his mail yet. When the user checks his mailbox, he/she sees an empty inbox. Sometimes, however, when the user closes his Gmail tab, he/she forgets to check his mailbox too. That's called a soft bounce.
Soft bounces happen quite frequently. Luckily, HubSpot provides tools to identify them and resolve them accordingly. Just remember that if the user hasn't checked his mailbox recently, it's possible that he/she closed the window accidentally.
On the other hand, a hard bounce refers to situations wherein the user didn't open the email at all. He/she may have deleted it straightaway or forwarded it elsewhere. Some people use filters to organize junk mail and unsubscribe from unwanted mails without opening them. They assume they'd get more important stuff later on. Unfortunately, most marketers tend to overlook this fact. As long as the email wasn't SPAM, hardbounces occur often. Fortunately, you can prevent them from happening by adding an expiration date on your emails and reminding everyone to check their mail regularly.
Sometimes, a lead enters the system with incorrect information such as invalid credit card numbers. Since there isn't much room for errors here, HubSpot won't allow the lead to continue moving forward in the checkout process. What happens next depends upon what kind of payment gateway you used to collect payments. If you relied on PayPal, for instance, you'll receive an IPN (instant payment notification) informing you that funds couldn't be transferred successfully. Similarly, if you opted for Google Checkout, you'll end up seeing a decline notice.
For people working behind the scenes, this can cause confusion. Most of the time, however, people wouldn't bother looking into the matter since they didn't pay close attention during setup.
Luckily, HubSpot provides helpful guides to guide its clients along the entire journey. If you ever experience an unexpected event similar to this, feel free to reach out to your sales rep. Let her know exactly how the transaction went down and she might be able to shed light on the incident.
We hope you enjoyed learning about bounced contacts in HubSpot. Feel free to share your thoughts and experiences with us in the comments section below.
When someone opens up their inbox and sees an error message like "This sender is not allowed to send mail as [email address],” they might panic or wonder why the email didn't get delivered. But there are many reasons that this could happen — maybe the recipient's spam filter blocked it for some reason, perhaps the person at the other end was unavailable due to being away from their computer, etc.
Whatever the case may be, sometimes people will bounce out of our systems without letting us know first. This can lead to all kinds of problems with data integrity and reporting. Luckily, we have tools within HubSpot CRM that allow us to keep track of these events so that we don't lose valuable information about them. In this article, we'll show you how to view those records using both Outlook and Gmail.
If one of your leads or customers has been sending you promotional emails but keeps getting marked as undeliverable by your system, chances are that they hard-bounced rather than soft-bounced (meaning they were returned because of temporary issues). You should check your Bounce Reporting tool to find out which ones are bouncing back, what percentage of your emails are going into the black hole known as the "undelivered" folder, and where exactly they're ending up.
In addition to seeing messages that went directly to the undeliverable folder, you should also take note of any emails that appear under the Errors tab in your Bounce Report. These would include any errors relating to whether or not the email got accepted, delivery attempts that failed completely, or even errors related to logging in. If you receive a lot of undeliverables, consider setting up more than one primary email account just for your marketing efforts. That way, you won't miss out on important business communications!
Hubspot provides three different views for viewing your bounce reports:
Bounce Reports - shows you everything in detail, including which users bounced, why they did it, and from where they came. It includes filters to sort through each user based on date range, status, source/campaign name, and more. Clicking on a particular user brings up detailed information for that specific contact, such as bounced count over time, last activity, total number of emails received, and more.
Bounces By Campaigns - lists every campaign that you've run, along with a summary of its success rate, bounce rates, and more. The table allows you to drill down into individual campaigns to quickly identify patterns of behavior. For example, if you notice that certain demographics tend to have higher bounce rates, then you can focus resources towards improving outreach to them. Note that only active campaigns appear here—if a campaign isn't running anymore, you won't see it listed here.
Campaign Summary - this gives you overall statistics for your entire database. Here, you can look at trends across multiple dimensions, such as device usage, geography, content, engagement, and conversion.
Once you click on View Details for a given report, you'll be able to copy links to various sections of that report that you want to share with others. These links expire after 30 days, though, so make sure you use them before they disappear forever.
As mentioned above, you can access your bounce reports via the Analytics section inside your HubSpot dashboard. However, depending on your version of HubSpot, you may need to dig around a bit to find it. On older versions, it looks something like this:
On newer versions, it appears right next to Contacts & Lists. Select either option, and you'll immediately see a dropdown menu pop open. From here, select Email Delivery Status. Depending on what platform you're currently using, you may see options labeled Undelieverd, Unsubscribers, Spam, or similar. Once you choose your desired method, click Go.
The resulting screen will give you a breakdown of all the bounces that occurred during the past few weeks. Hover over any entry and you'll see a tooltip explaining the details behind that bounce event. To export this data, click Export Data.
Click Choose File type. Then, pick CSV. Finally, click Submit. A new window will pop up asking you to confirm the file download. Agree to the terms once it does. When the process completes, you'll receive a link to download a ZIP file containing all the information you requested.
If you'd prefer to pull this information straight from Google Ads instead of having to log into HubSpot yourself, you can always try using Google Ad Manager Premium. That service offers several ways to import subscriber info, including IP addresses, mobile numbers, and mailing addresses. Just set up your preferred ad group, add tracking code, and let the magic happen.
Google doesn't offer an official API for doing this kind of thing, unfortunately, so you'll need to provide some basic identifying information to connect your accounts together properly. Check out the docs here to learn more.
Note that while this works great for normal subscribers, it doesn't work quite as well for prospects. This is mostly because most companies already have plenty of existing customer data associated with their domain names, making it difficult to associate incoming traffic with unique identifiers. Thus, it's much easier to match prospects' landing pages with their corresponding subscriptions.
However, if you still really want to try connecting your prospecting feeds to your current subscription services, you can definitely do so. Try creating custom fields for matching purposes, and set up triggers to automatically update those fields whenever a prospect comes through.
For instance, say you wanted to assign a unique ID to everyone who signed up for your free trial. You could create a field called Unique Trial User Identifier, and then use a trigger to change that value whenever anyone signs up for anything. Afterward, you can simply put that identifier into a URL segment, and you can start filtering prospects accordingly.
Sometimes you might come across a subscriber whose profile indicates that they never opened any of your emails. Other times, you might discover that they tried to unsubscribe from your newsletter without giving you a heads up. Either way, knowing when an email bounced back lets you adjust things on a per-contact basis.
You can easily determine whether or not an email bounced by checking your own server logs. Logins, signups, and unsubscribes typically result in creation of a row in a MySQL table somewhere. Open up your web app's support documentation for instructions on finding these tables and looking at the relevant columns.
Then again, you can actually tell if an email bounced back by taking a peek at HubSpot's internal messaging software. Every time someone sends you an email, it gets logged onto this central database. Whenever a message reaches the Undelivered folder, it gets flagged as a bounced. Unfortunately, however, this feature requires you to enable debug mode in order to record these events.
Also, since these events aren't recorded anywhere else, it's impossible to retrieve them unless you manage your own servers. So far, no major providers offer solutions for accessing bounce events themselves.
Now that you know how to deal with bounced emails, you probably have questions about what happens when an email goes bad. Well, the answer varies from provider to provider. Some providers refuse to acknowledge the fact that it bounced at all, while others will flag it as undeliverable but leave it intact otherwise. As long as your company uses standard practices, you shouldn't ever encounter any trouble here.
Most importantly, remember that you're entitled to ask for a refund whenever necessary. Don't hesitate to reach out to whoever you think caused the problem. Chances are good that they'll fix whatever issue it was very quickly when you bring it up. And if they won't, at least you now know exactly where to point potential clients toward.
We hope you enjoy reading our articles. We strive to present reliable data backed by expert research and editorial oversight.
If you're an enterprise user with HubSpot Sales and Marketing Cloud Subscriptions, it's likely that you've been asked by one or more users to send them promotional materials via email. While we know how important these communications are for driving leads into the business, not everyone has time to read every single message they receive -- even if they want to!
HubSpot allows businesses to send out mass emails to their subscribers without having to worry about whether those messages will be delivered properly. However, there is still some risk involved because anyone who opted-out of receiving future emails can report this as a "hard bounce."
In this article, we'll explain what hard bounces mean within HubSpot so you can better manage your mailing lists. Additionally, we’ll show you how to check if you have any hardbounced contacts on your list using a few handy tricks.
Hard Bounces Are Not Good
When sending bulk emails through HubSpot, it's possible that people could opt out due to various reasons. If the recipient chooses to block all future emails from your company, then you should treat this like a regular unsubscribe. This means removing the person from your subscriber list and ensuring no new emails go directly to that address.
However, a problem arises if another customer reports that an email was received but never opened (or worse, ignored). When this occurs, it may result in a "soft" bounce where the sender receives notification that the recipient did not open the email. In other cases, companies might get notified that the recipient simply didn't click on links inside the emails. These soft bounces don't impact the overall effectiveness of your campaign, but customers often feel annoyed at being added to spam filters and getting flagged as spammers.
Because of this, HubSpot sends each customer a list of their hardbounce recipients after a certain number of unsuccessful deliveries. Since there isn't much you can do once you've already started delivering mailings, keeping track of these numbers helps you avoid wasting resources. It also gives you a chance to reach out to affected parties individually before reporting your entire list to HubSpot.
The easiest way to access your unsubscription data is to use the Customer Portal. You can log in to your account in HubSpot Sales here. Click Customers & Accounts > All Customers/Subscribers. From this page, select the contact(s) whose subscriptions you'd like to review. Then, switch over to the Dashboard tab.
From the dashboard, select Mailing Lists under Content Library. Here, you'll see a table displaying details regarding your most recent campaigns. At the top row, you'll spot several columns including Date Sent, Campaign Name, Email Subject Line, Message ID, Status, etc. The status column shows the last delivery attempt date and current attempts.
Next to this field, you'll notice three vertical dots. After clicking this link, you can choose to either Send Again, Delete List Entry, or Report Hard Bounce. Depending on which option you pick, you'll need to enter relevant information such as the name of the individual who reported the issue, contact info, reason why the subscription wasn't successful, and additional notes describing the incident.
Once you hit Submit, HubSpot automatically generates a list of all the individuals who were unable to open your latest emails. To see this list, navigate back to the previous page mentioned above and scroll down until you spot the section titled Recent Deliveries. Under this heading, you'll see a list of names alongside the corresponding dates. Finally, just double-click on a specific entry to pull up detailed information about the person who complained.
Since many organizations rely heavily on HubSpot for managing their sales pipeline, losing valuable prospects can cause significant issues. For example, if you had active accounts with two different clients and both chose to stop receiving updates from HubSpot, it would make sense to move one of them onto a competitor's platform instead.
This decision wouldn't necessarily affect the quality of service provided since both companies would continue working together, but it certainly doesn't help the situation. Even if there aren't multiple companies competing against yours right now, losing touch with potential buyers can lead to missed opportunities later down the line.
Luckily, HubSpot provides tools that allow admins to control exactly what happens when a prospect uninstalls its software. Within Account Management, head straight to Settings & General " Manage Users " Edit User Details. Once in the edit screen, look towards the bottom of the page and find the button labeled Remove Me From List. Hit this button whenever you wish to cancel your free trial period and delete yourself from the system entirely.
After selecting this option, you can confirm the action by checking off the box next to Yes, I really want to leave. Next, type in your password again to verify that you intend to proceed. Finally, click Submit. Now, you won't be able to login to your account ever again unless you register for HubSpot Premium. But fear not! We cover more detail below on finding and handling bounced contacts in HubSpot.
While viewing your unsubscribe list online is useful, sometimes it's easier to search for documents containing sensitive information. Luckily, HubSpot keeps records of all the complaints associated with your email addresses. Head to Tools & Reports " Tracking Issues and select Create New Issue. Enter the appropriate fields and hit Save Changes.
Now, you can browse through your tracking history anytime you wish. Just visit the Tracking Issues tab in HubSpot Analytics and locate the document that contains the information pertaining to your complaint. Select the Complaints tab and input the necessary information.
For instance, if somebody said the email subject line contained offensive words, you should record the full text of the offending comment. Otherwise, you won't be able to identify the exact user who wrote it. By doing this, you can pinpoint the exact moment during the delivery process that the message failed. Ideally, this happened near the end when the recipient clicked something but nothing else came up.
Then, take note of the following piece of information:
DateSent - This displays the date the email went live.
EmailSubjectLine - This displays the original title of the email that arrived.
MessageID - This is used to uniquely identify the message.
Status - Indicates if the email successfully made it past HubSpot servers. A green circle indicates success while red circles indicate errors.
IPAddress - Displays the IP address of the computer that sent the email.
Bouncing_email - This value holds the email address that caused the error.
ComplaintName - Holds the name attached to the unsubscribe request.
Finally, copy the values listed above into a document and save it somewhere safe. Keep tabs on this file for reference later on. Don't forget to include the bouncing_email variable too.
Now let's say the same recipient returned to the aforementioned portal and noticed that HubSpot removed her from the list. She may want to know why she got kicked out so quickly. Alternatively, maybe she wants to talk to someone personally about getting her account reinstated. Either way, she can follow the steps outlined earlier to figure out which of her friends accidentally unsubscribed.
Just keep in mind that the only method available to retrieve deleted entries involves going through HubSpot analytics first. Therefore, it would become very difficult to sort through hundreds of thousands of records if you wanted to manually compare anything. That said, it's easy enough to filter out any unwanted information.
It's worth mentioning that HubSpot offers a feature called Smart Lookup which lets administrators conduct simple searches based upon criteria such as device or location. With Smart lookup, you can query your database to find instances of hard bounces. As long as you have the proper permissions set up, you can run this function anywhere in the world. Simply click Data Intelligence " Find Records and then input whatever parameters you desire.
SmartLookup supports a variety of options, including filtering results by Recipients, Devices, or Dates. So, if you wished to find all of your emails that bounced, you could simply ask for all records related to "Recipient:"
You can also narrow down your search further by limiting the scope of your query. Let's assume that you want to know which devices weren't receiving your emails. Instead of searching for everything, try running a query specifying the Recipients must contain the word Desktop. Then, you can add extra conditions to specify things like DeviceType = PC or NetworkDevice = WirelessCard.
We hope our guide helped clear up any confusion surrounding bounced contacts in HubSpot. And remember, if you ever encounter a similar scenario, you can always download a CSV version of your list so you can easily transfer it elsewhere.
Have questions about HubSpot or looking for support services? Check out HubSpot Answers—the largest community powered question and answer site dedicated solely to HubSpot.
 Send emails at scale

